Forms 8 Documentation - Advanced Functionality
Quick Start | Field Types | Scripting | Server Data Options | Advanced Functionality
Using Scripts to Perform Calculations
If you need to perform a calculation, you can add a script to the field in which you want to display the result of the calculation.
- The calculate: event is most commonly used in calculation scripts. A calculate event will run the script whenever any field on the form is updated.
- If you do not want the mobile user to be able to overwrite the result of a calculation, you can make the field which displays the result a read-only field.
- The answer statement assigns a value to the current field of the form. (Example 1)
For example, answer = $1 + $2 adds the values in fields 1 and 2 and places the result in the current field.
The $N = expression statement assigns the value in the calculated expression to field number N. For example, $5 = $3 * $4 multiplies the values in fields 3 and 4 and puts the result in field 5. - Only binary math expressions are supported on any line of a script. This means that a math expression such as A + B + C takes two lines of a script. (Examples 2 and 3.)
- If a calculation involving a currency is performed, and the result is placed into a currency field, the result will display properly as a currency. If the result is placed in a Numeric or Text field, the number displayed will be in cents. A line can be added to the script to convert the cents to dollars and cents.
- If a form has a lot of fields, calculate: scripts may slow down performance since every calculate: script will run as each field on the form is filled in. To reduce the number of times a script has to run, you can use an exitscreen: event instead of a calculate: event. Exitscreen: events only run when the user exits the screen and moves to the next screen. Another possibility is to create a Button field and use a click: event script so that the mobile user controls when the calculation is performed, by tapping the button in the Button field.
Calculation Example 1: Performing a Simple Calculation
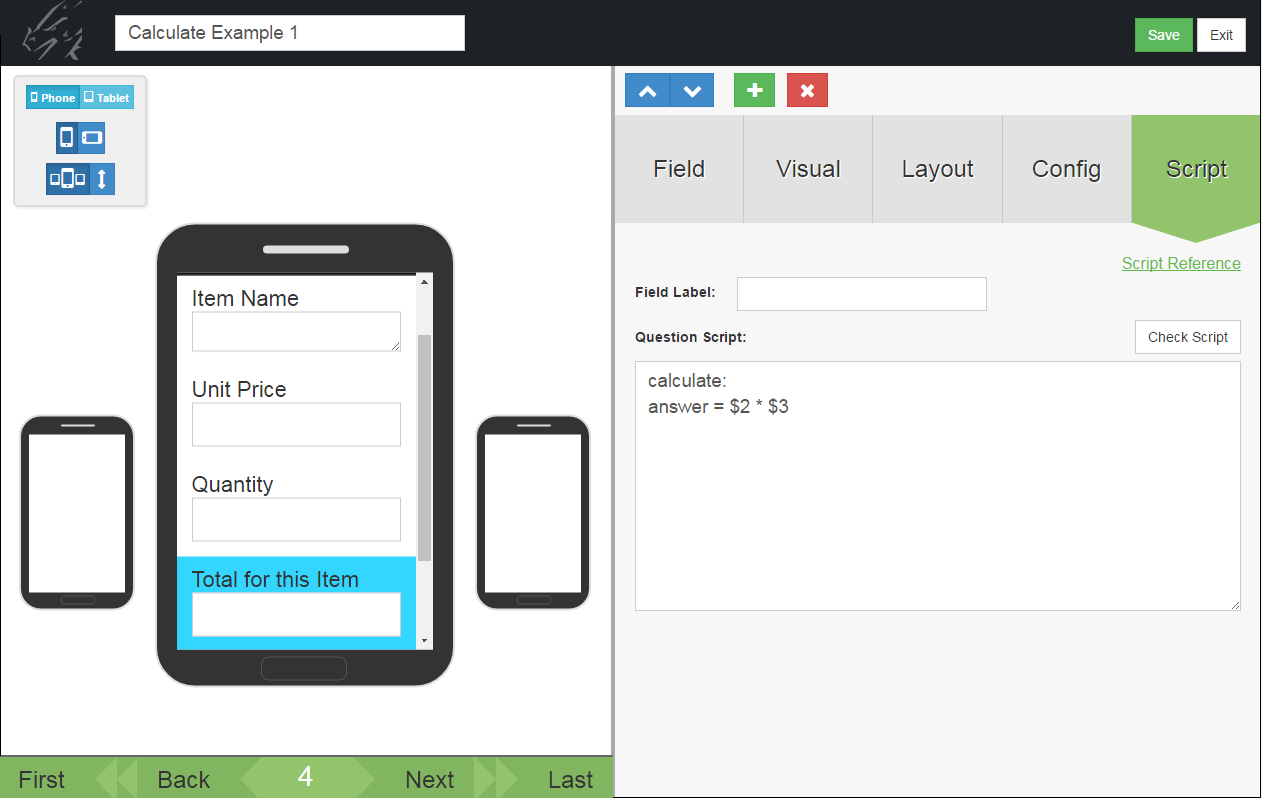
In the form shown below, the user can enter the price of an item and the quantity being purchased, and then calculate the total value of the items being purchased. The script to perform the calculation is in Field 4:
calculate:
answer = $2 * $3
A calculate: script is used in this case, so that every time the user updates the price or the quantity, the total value will be re-calculated as soon as the user leaves the updated field. The statement answer = $2 * $3 means that the answer to be placed in Field 4 is the multiplication of the value in Field 2 and the value in Field 3.
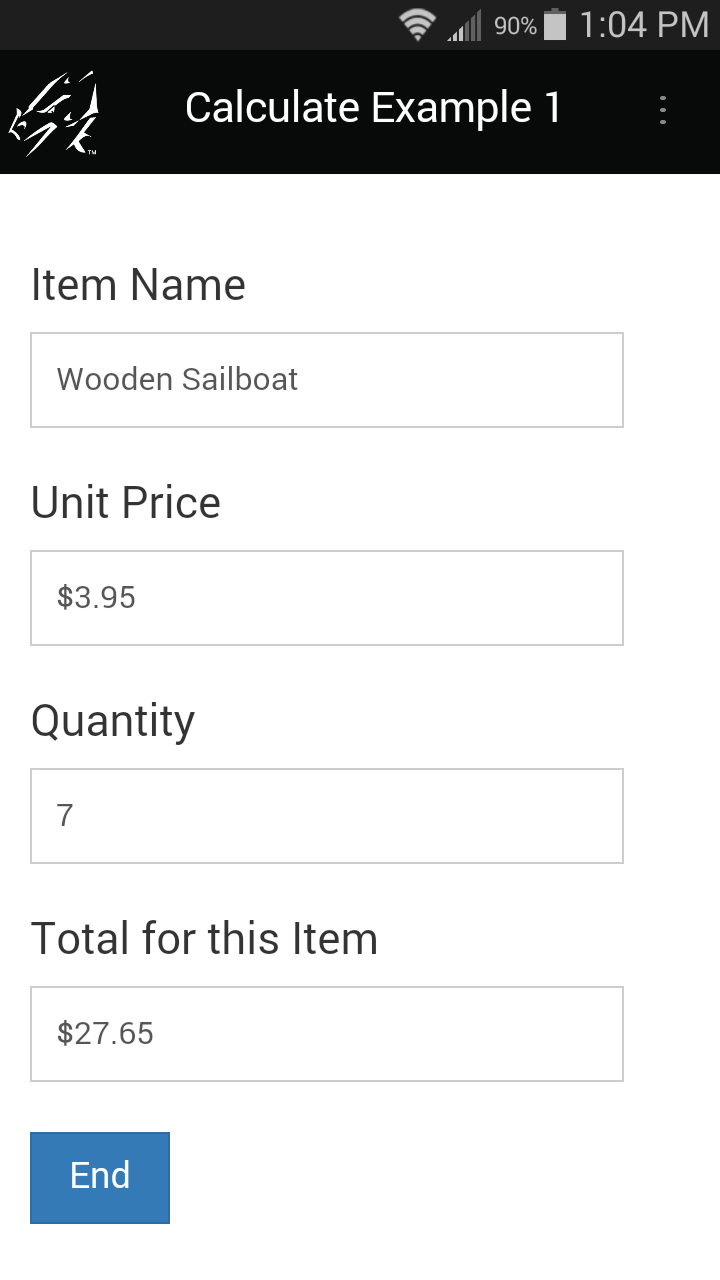
On the mobile device, the calculate: script triggers when any field on the form changes. The user has to leave a field for the change in that field to be registered.
When the user fills in the Unit Price and Quantity, he/she will need to tap in another field for the calculation to occur.
Calculation Example 2: Adding more than two values together
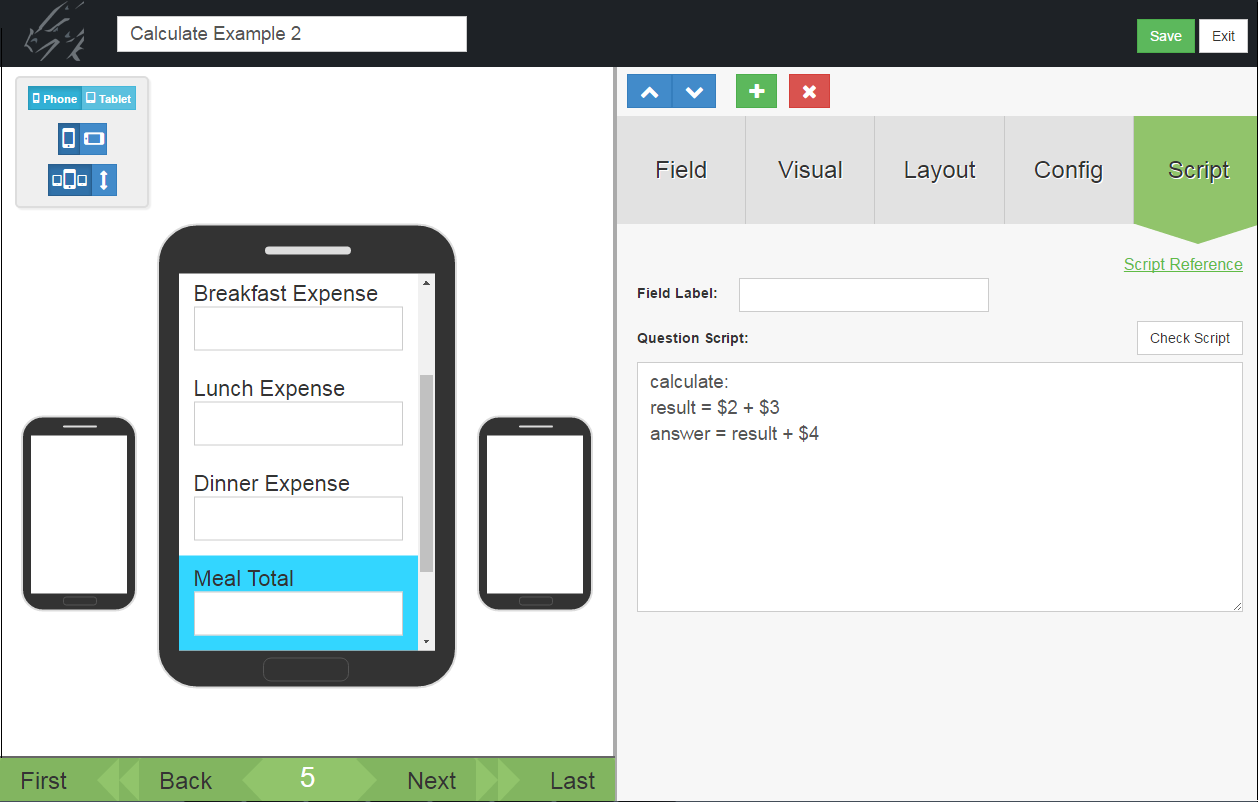
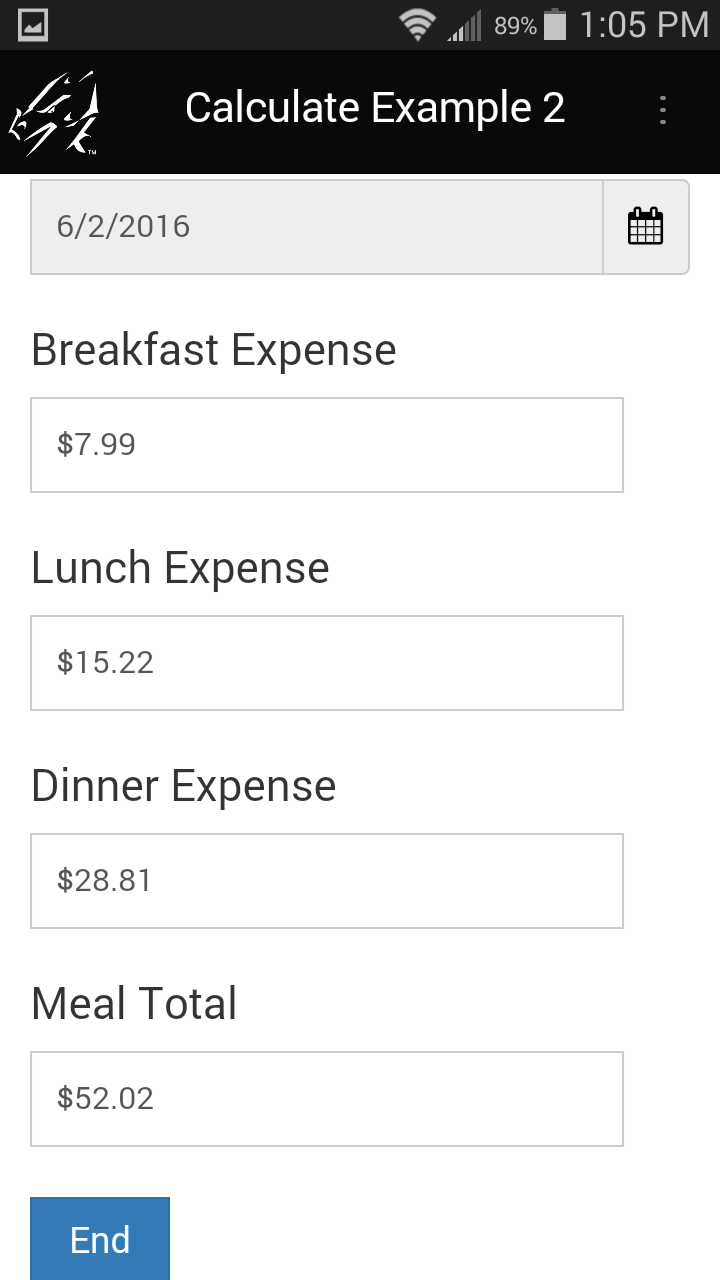
The scripting language in Pendragon Forms only supports binary math functions, that is, math functions with two numeric expressions. In order to add more than two values, you can break a calculation into smaller parts, using the result variable as temporary extra storage space for storing intermediate results of a larger calculation.
In the form below, in order to calculate total meal expenses for the day in field 5, the statement result = $2 + $3 stores the sum of Breakfast (field 2) and Lunch (field 3) in the result variable.
Calculation Example 3: Adding more than three values together
In this example, in order to calculate an average test score, the sum of test scores 1 through 5 must first be calculated.
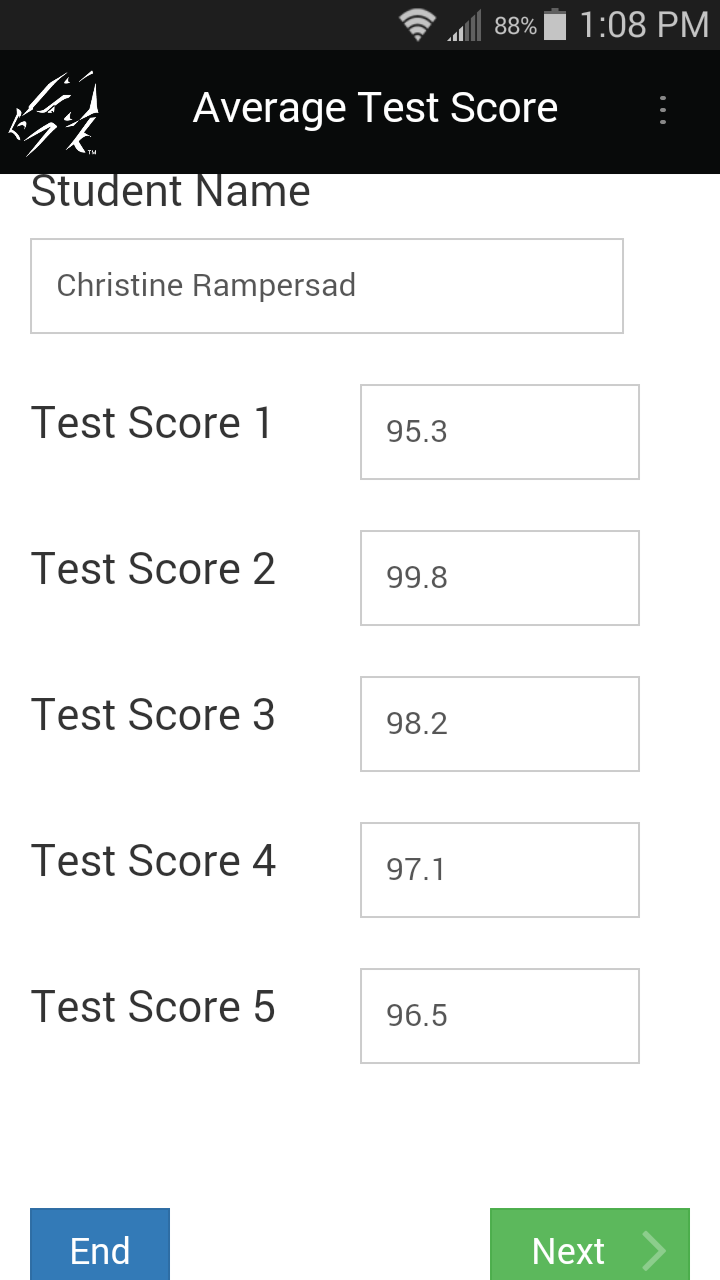
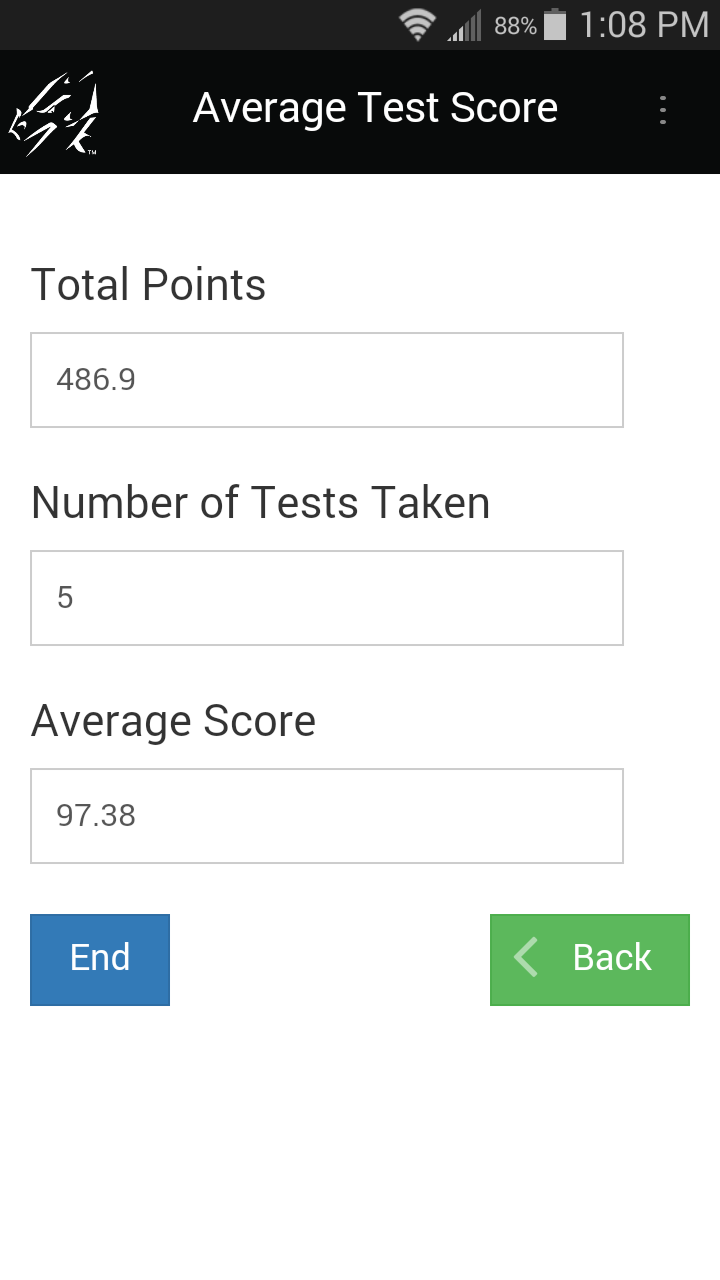
This is the script in Field 7 to calculate Total points:
calculate:
result = $2 + $3
result = result + $4
result = result + $5
answer = result + $6
The “# of Tests Taken” field records how many tests have been taken by adding 1 for each non-zero score:
calculate:
result = 0
if $2<> null then
result = result + 1
endif
if $3 <> null then
result = result + 1
endif
if $4 <> null then
result = result + 1
endif
if $5 <> null then
result = result + 1
endif
if $6 <> null then
result = result + 1
endif
answer = result
The script that calculates the average has a check to see if the number of tests taken (Field 8) is zero. If it is zero, the return statement ends the script to prevent a divide by zero error.
If Field 8 is not zero, then the average of Total points/# of tests is calculated.
calculate:
if $8 = 0 then
return
else
answer = $7/$8
endif
Calculation Example 4: Dividing
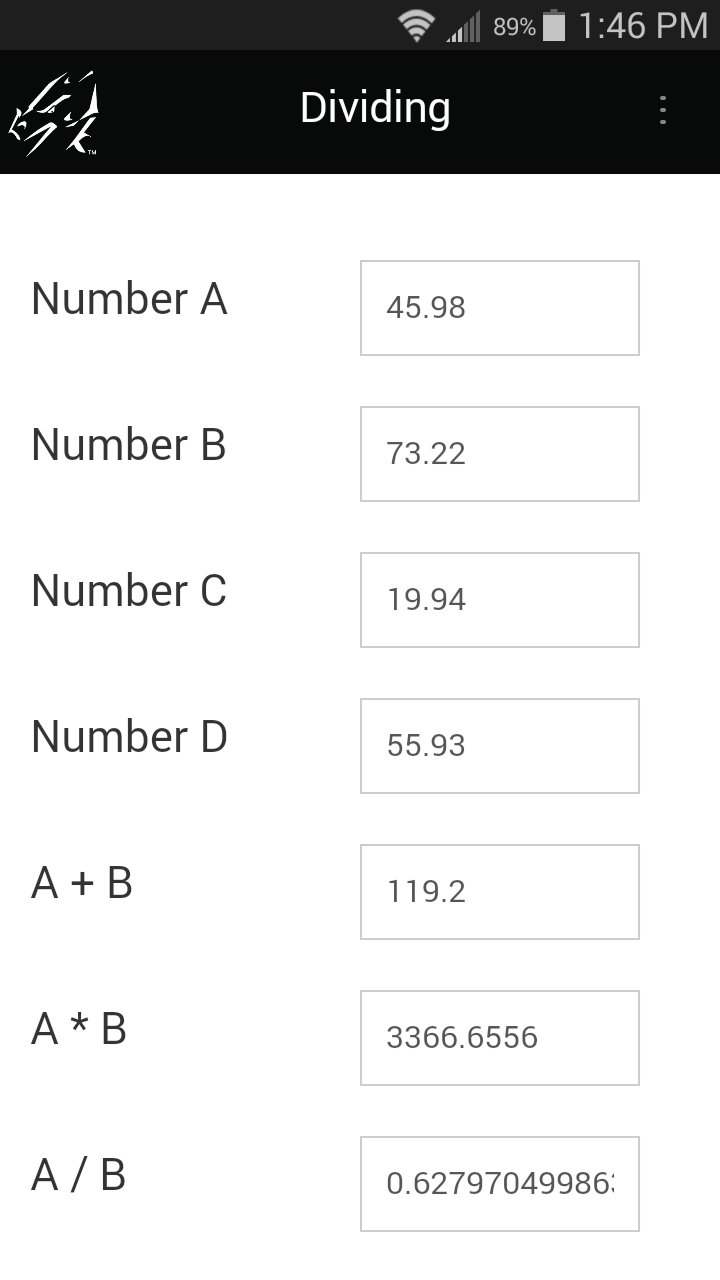
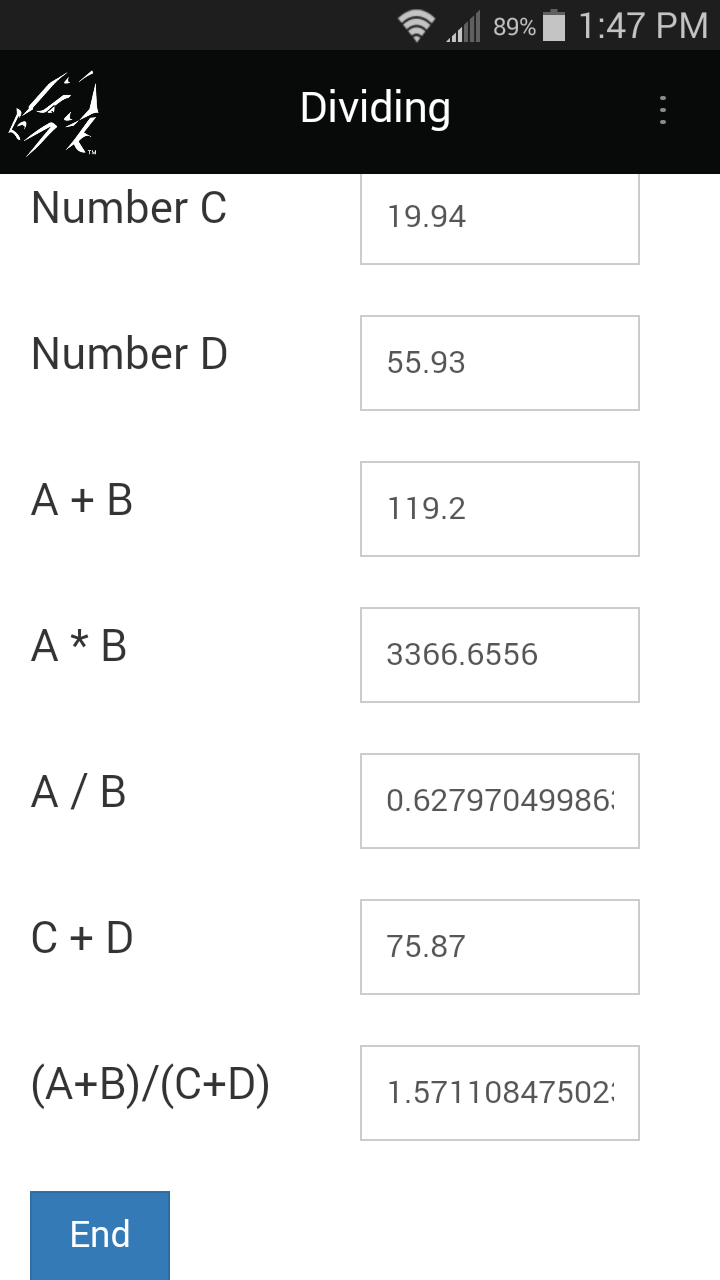
Whenever you perform division in a form, you have to be careful to avoid division by zero errors. These errors can occur because calculate: scripts are triggered whenever an entry has been made in a field. If you have a form in which a number X is entered, followed by a number Y, and you want to calculate X/Y, the value of Y will be zero until the mobile user enters a value. As soon as a value is entered for X, the calculate script will run, and X/0 will cause the letters NaN (Not a Number) to be displayed on the device. There are simple scripting statements which can be used to prevent the calculation from occurring until field Y has a non-zero value.
Script to calculate A + B:
calculate:
answer = $1 + $2
Script to calculate A * B:
calculate:
answer = $1 + $2
Script to calculate A / B:
calculate:
if $2 = null then
return
else
answer = $1 / $2
endif
Script to calculate (A+B)/(C+D):
calculate:
if $8 = 0 then
return
else
answer = $5 / $8
endif
To calculate A / B in Field 7, a check is first done to see whether the divisor (number B in Field 2) is null (blank). If Field 2 is null, the return statement breaks out of the script so that the division is not performed. If Field 2 is not null, then the division of Field 1 by Field 2 proceeds.
Similarly, to calculate (A+B) / (C+D) in Field 9, a check is first carried out to see if the divisor (C+D) in Field 8 is zero.
Note: If you do not want to display too many decimal places, you can set the number of decimal places to display on the Data tab of each Numeric field in the Form Designer.
Calculation Example 5: Counter field
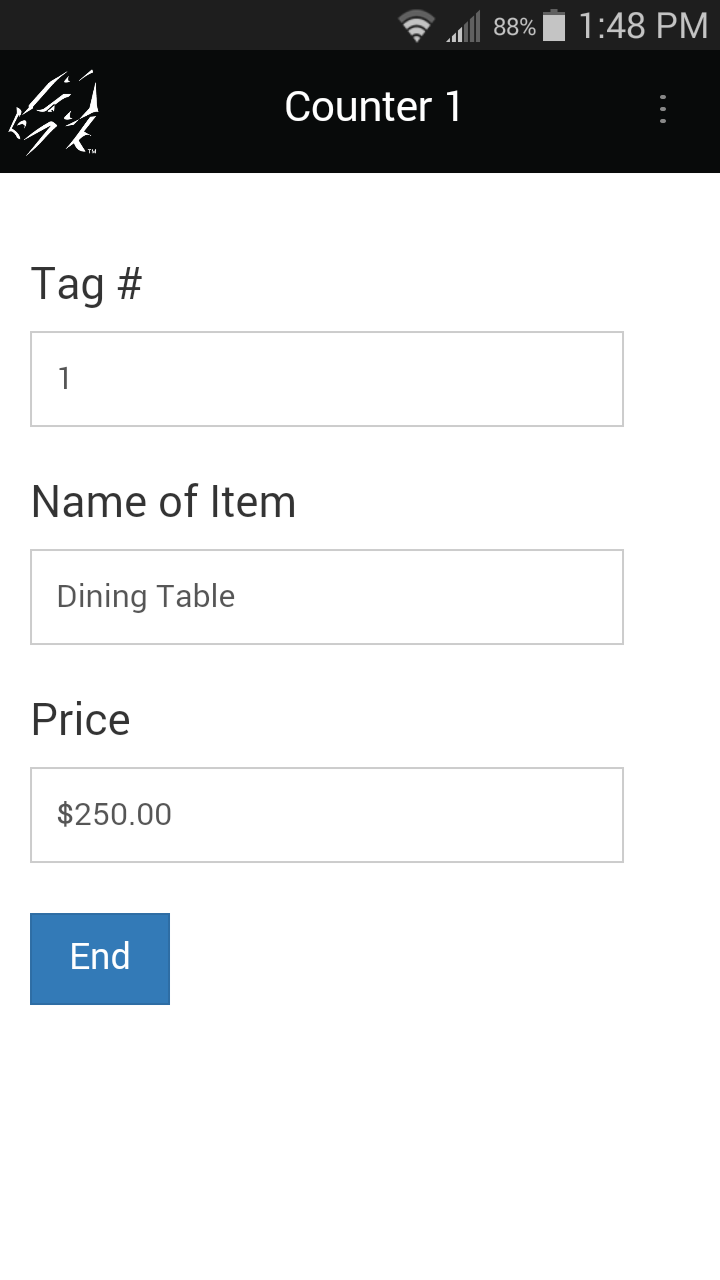
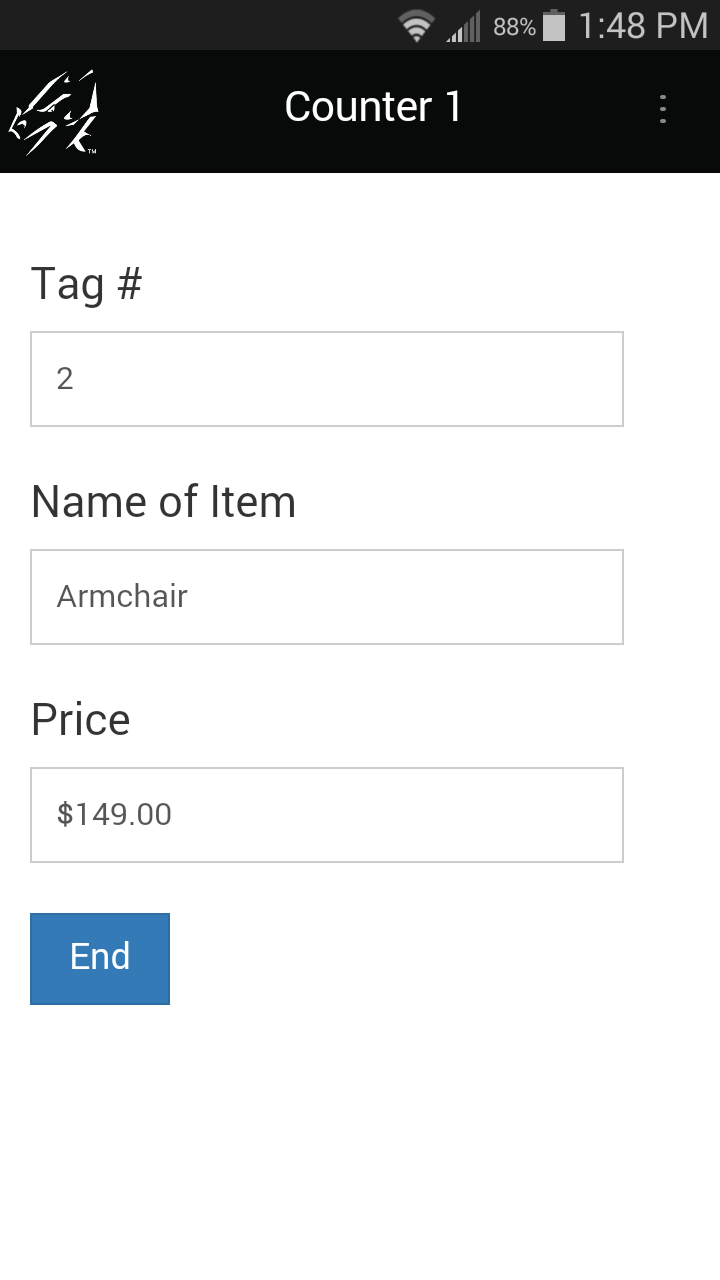
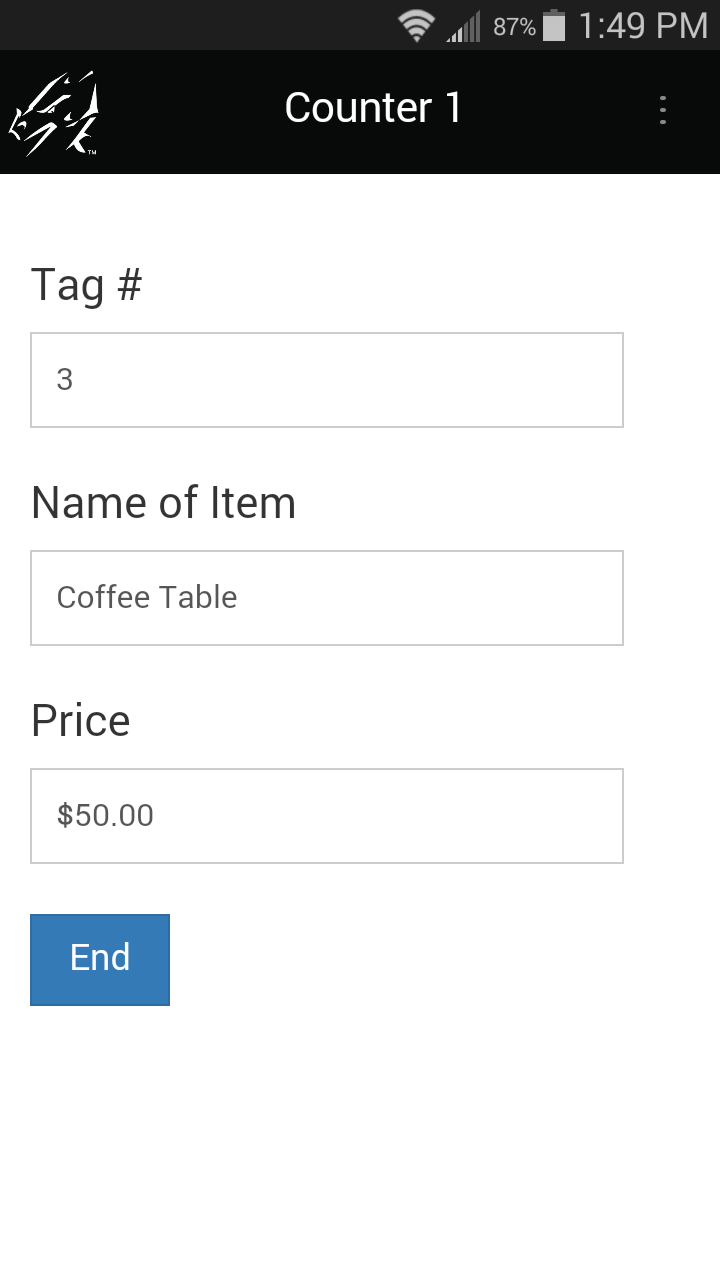
If you need to count the number of records in a form, there is a simple initialization script that can be used.
In addition to the script, it is necessary to make the counter field an Autodefault field on the Advanced Field Properties screen for that field.
initialize:
answer = answer + 1
Setting Field 1 to Autodefault means that when a new record is created, the value of the previous record is retained. The initialize script then adds 1 to increment the counter.
If you need to start the counter from 300, for example, simply enter the number 300 in the first record created. Subsequent records will be 301, 302, 303, etc.
Note that if the form is re-distributed to the device, or if the device is reset, the counter will be reset to 1.
Working with Dates
Time fields, Date fields and Date & Time Fields can be used in calculations. Some notes:
- Dates are converted to numbers for calculations - the number of seconds since 01/01/1904.
- Results of calculations with dates must be stored in Text fields. It is not possible to subtract two times, for instance, and display the result in a Time field.
- The result of a calculation of two dates is expressed in seconds. The seconds can then be converted back to minutes, hours or days, as appropriate. See Example 1, below.
- An initialize: script can be used to set a default of the current date in a Date field, or the current date and time in a Date&Time field (see Example 1). Note however that the earliest date that you can set as a default is 01/01/1970.
Date Example 1: Today’s Date, and Time Elapsed
In this form, the first field defaults to today’s date, and other fields calculate the time elapsed between a starting and ending time.
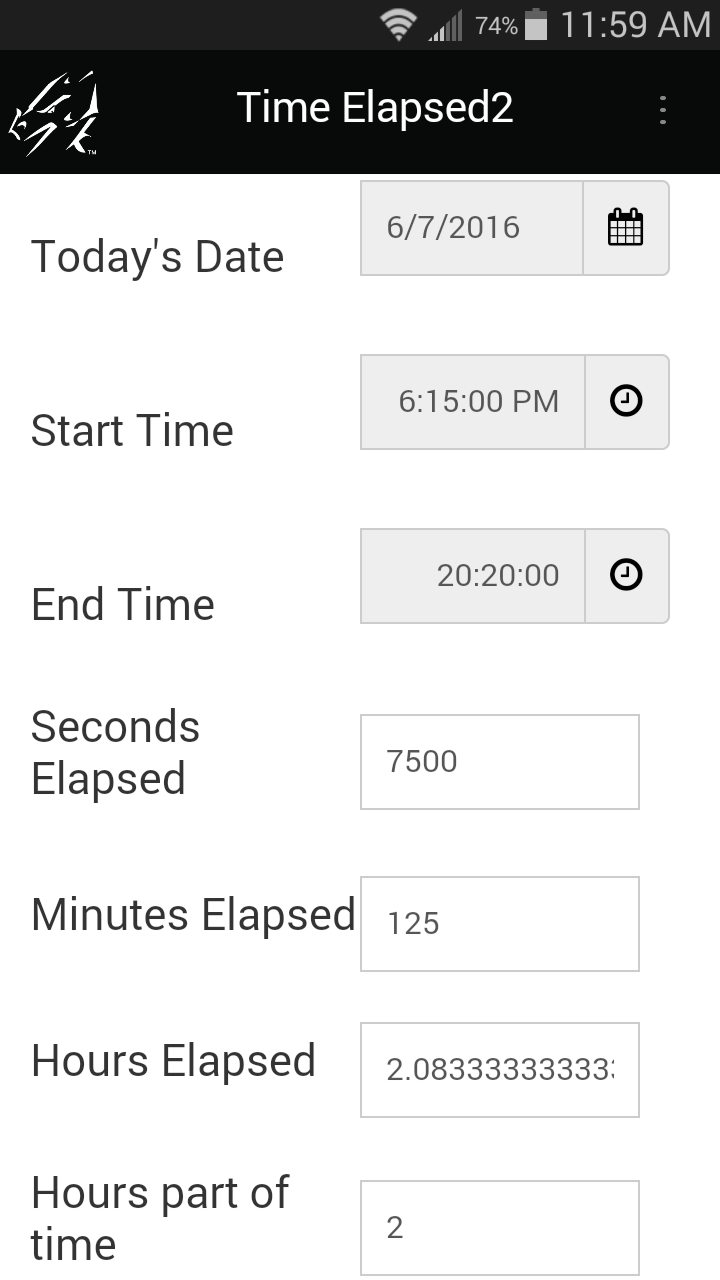
The initialize: script in Field 1 only runs once when the record is created. The answer = now statement places the current date (or date & time) into Field 1.
initialize:
answer = now
calculate:
answer = $3 - $2
To calculate minutes, divide the seconds by 60.
calculate:
result = $3 - $2
answer = result / 60
To calculate hours, divide the seconds by 3600. (3600 seconds in one hour.)
calculate:
result = $3 - $2
answer = result / 3600
Date Example 2: Displaying Time Elapsed in Hours and Minutes
Since most people are used to expressing time elapsed in hours and minutes, you may want to display the results of date calculations in this way.
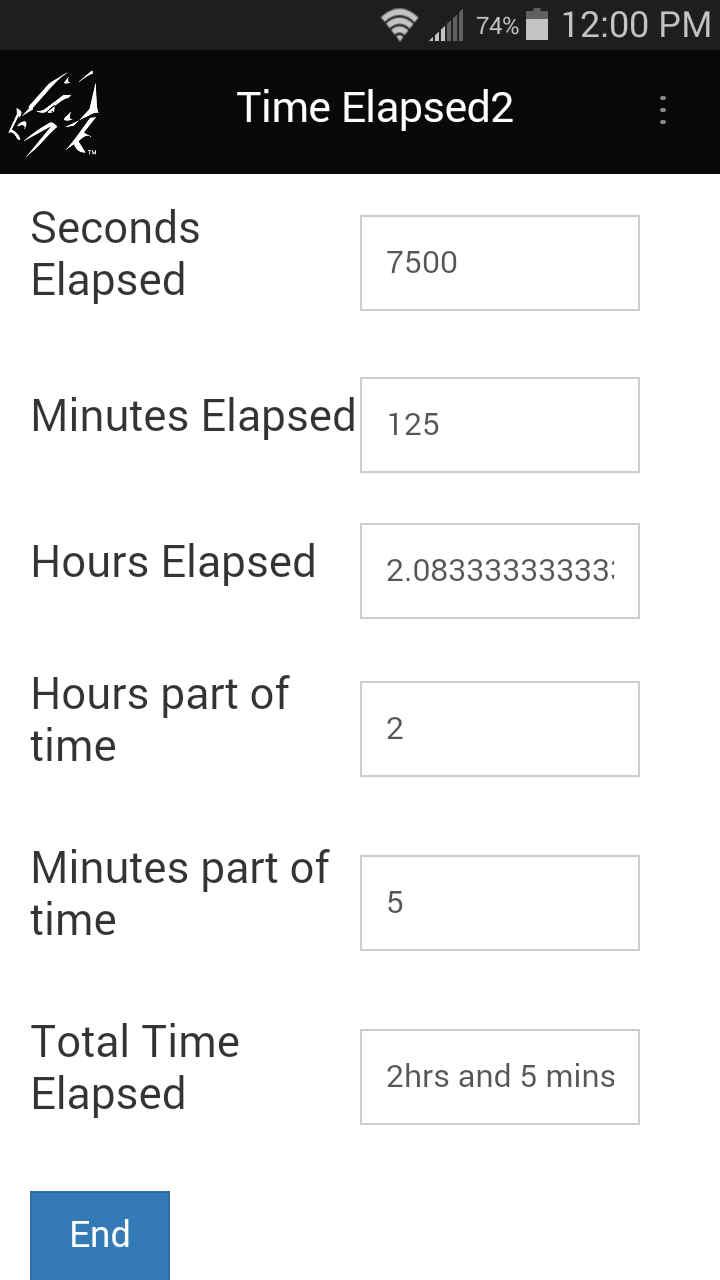
In Field 4, the time elapsed is calculated in seconds.
calculate:
answer = $3 - $2
The seconds are converted to hours by dividing by 3600, since there are 3600 seconds in an hour.
The integer statement takes just the whole number of hours, and this is placed in a field for storage.
calculate:
result = $4 / 3600
answer = integer result
The modulo (%) statement records a remainder, in this case the remainder of seconds after the whole number of hours is discarded.
The seconds are converted to minutes, and the whole number of minutes is stored in a field.
calculate:
result = $4 % 3600
result = result / 60
answer = integer result
To display the time elapsed as the phrase "X hrs and Y mins," the concatenate operator (&) is used to combine the whole number of hours, + the phrase "hrs and" + the whole number of minutes + the phrase "mins."
calculate:
result = $7 & " hrs and "
result = result & $8
answer = result & " mins"
Date Example 3: Calculating Ages
A useful calculation is to calculate a person’s age.
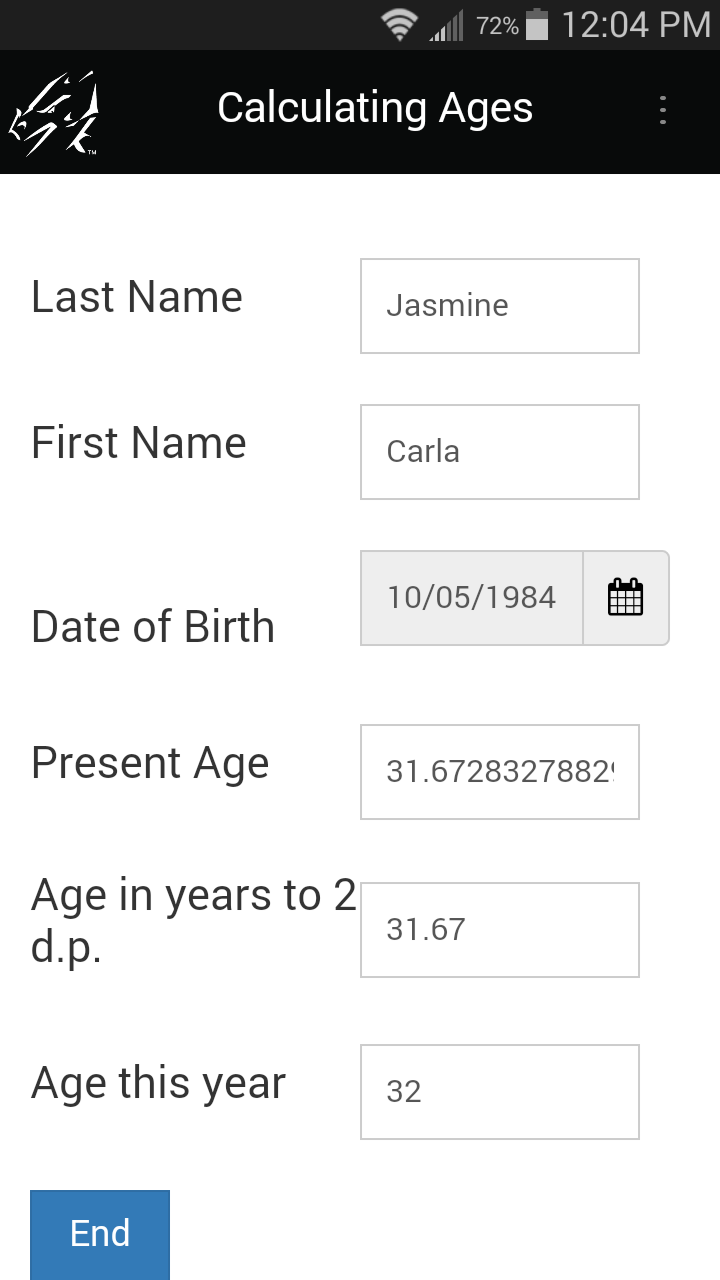
The statement result = now - $3 calcualtes the number of seconds from the date of birth to the present time and puts the answer in the result variable.
The result is divided by 86400 to convert seconds to days.
The number of days is divided by 365.25 to convert to years. (There are approximately 365.25 in a year, accounting for leap years.)
calculate:
result = now - $3
result = result / 86400
answer = result / 365.25
The result can be truncated to two decimal places by multiplying by 100 to preserve two decimal places of precision, then adding 0.5 to round up.
The integer statement takes a whole number and discards the excess decimal places; diving by 100 reverts to the correct level of precision.
calculate:
result = $4 * 100
result = result + 0.5
result = integer result
answer = result / 100
To round the present age to the age that the person will be this year, add 0.5 to round up, then the integer statement takes the whole number of years.
calculate:
result = $4 + 0.5
answer = integer result
Branching
Scripts can be used in fields to allow branching on a form. With branching, the mobile user’s response in one field determines which additional fields are displayed.
- Put the extra (or optional) questions on a separate screen, and as the user exits the current screen, branch (jump) to that screen if needed, or jump past that screen if it is not needed.
The exitscreen: event is used to branch.
A select: event can also be used for branching if you want the user to jump to another part of the form immediately as a selection is made in a Popup List, Yes/No Checkbox or Lookup List field. However, a select: event will not run if the mobile user does not make a selection.
An exitscreen: event is therefore more failsafe than a select: event. - The goto statement is used to branch from one field to another.
The goto statement can only be used in select:, exitscreen:, click: and scan: events. - The hide and show statements are used to hide fields that the user does not need to fill in, and to display fields that the user does need to fill in. A field can be Hidden during the form design process in the Form Designer, and then the show or show from...to statements can be used to display fields as needed.
- Conditional statements, such as IF...THEN...ELSE...ENDIF and SWITCH/CASE are used to determine whether to branch to a question or not.
Branching Example 1: Branching from a Yes/No Checkbox field
In a Yes/No checkbox, there are three possible answers: Y for Yes, N for No, or null if the field is left blank. A branching script has to contain instructions for all possible answers. A blank response can be treated the same as answering No, if that is appropriate.
A select: event will run the script as the user makes a selection in the field. However, if the user leaves the field blank, a select: script will not run. An exitscreen: event runs when the user taps the Next button to move to the next screen, so an exitscreen: script will run even if the Yes/No field is left blank.
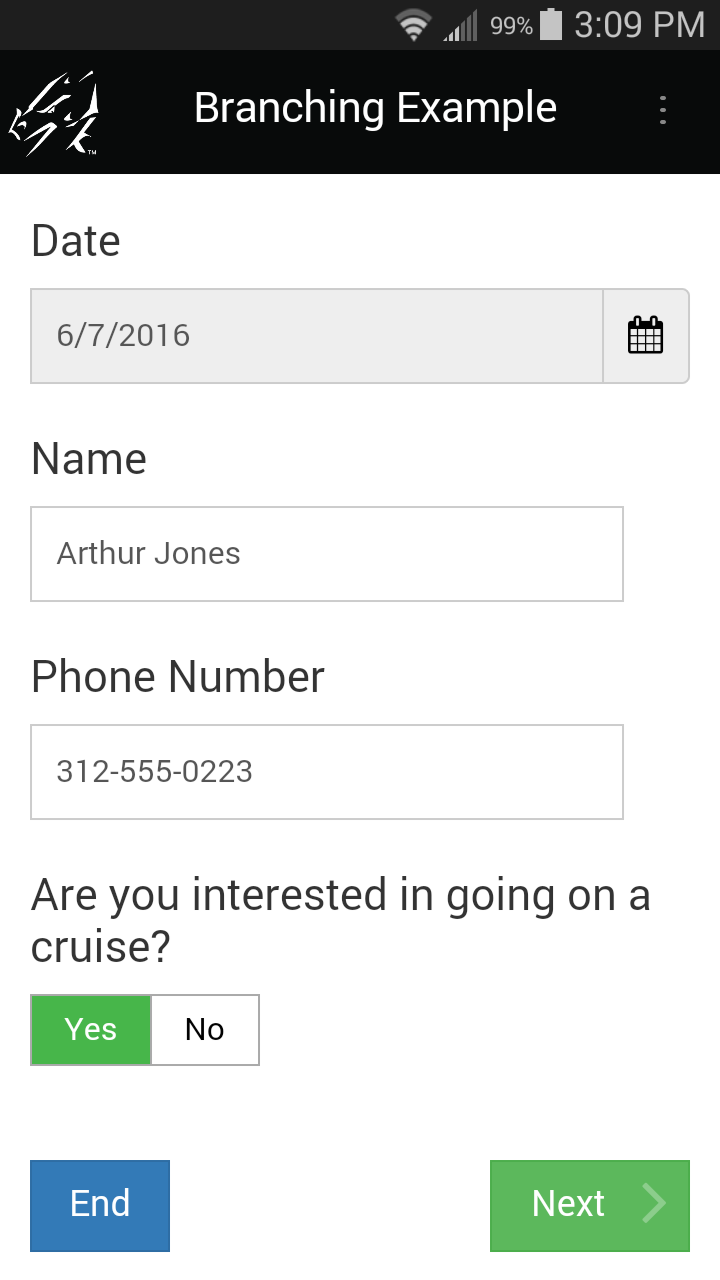
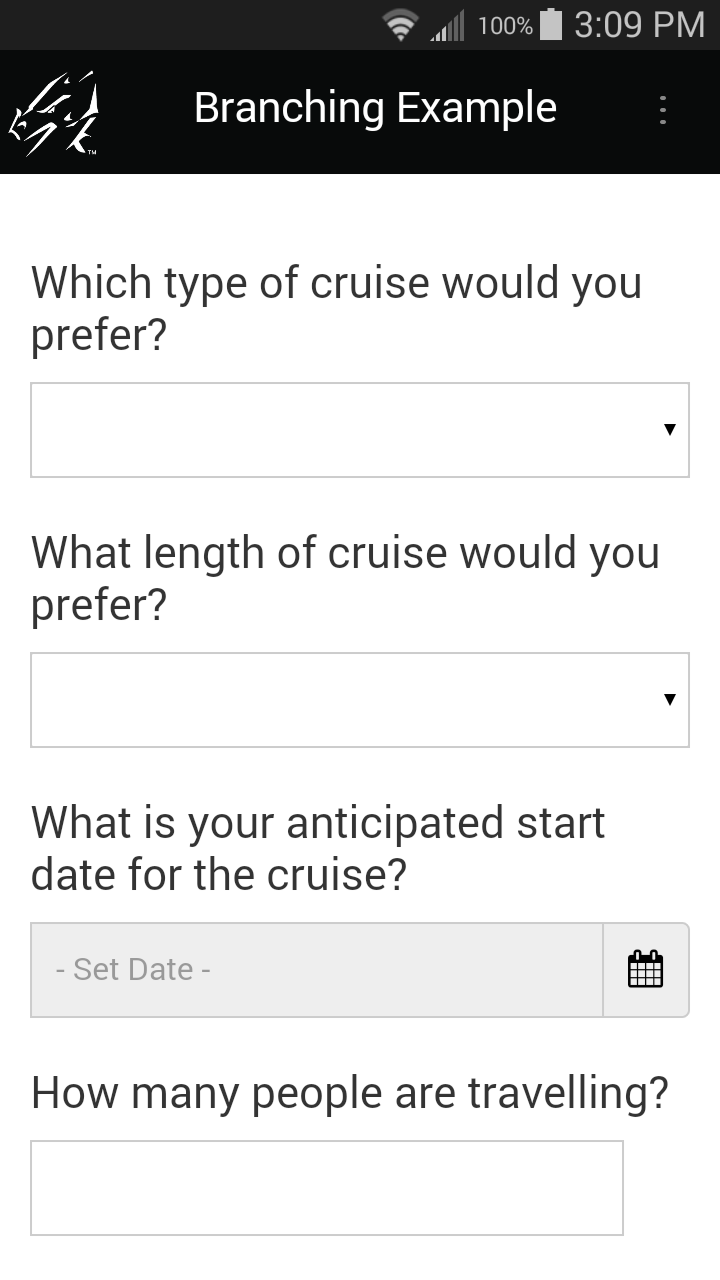
On the form below, Field 4 asks a Yes/No question. If the user answers Yes, then upon exiting the screen, the user will branch to field 5, which starts on the second screen of the form. If the user answers No, or leaves the Yes/No field blank, then he/she will skip all the questions on the second screen of the form, and will instead branch to field 9.
The exitscreen: event in field 4 runs when the user taps the Next button to move to the next screen. The if...then...else...endif statement sets up the branching conditions.
The statement means that if the answer in field 4 is Yes, the form will advance to display field 5:
if answer == Y then
goto 5
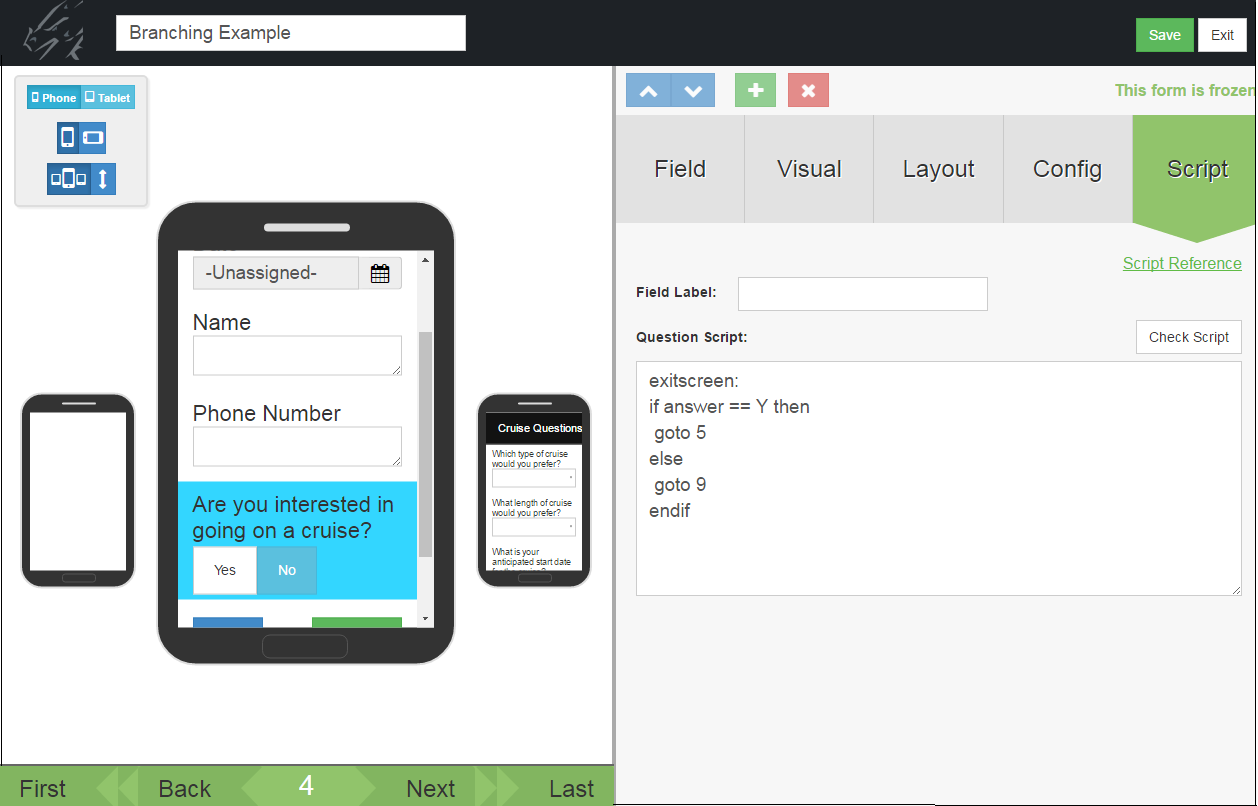
The else component of the if...then...else...endif statement covers what happens if the answer is not Yes, that is, if the answer is No or null.
else
goto 9
endif
This means that if the first condition (answer == Y) is not met, the form will branch to field 9.
On the device, selecting Yes in field 4 jumps the user to the next screen (field 5) when the Next button is tapped and the exitscreen: event runs.
Selecting No in field 4, or leaving field 4 blank causes the user to skip all the questions on the second screen, and jump ahead to field 9 on the third screen.
If the user jumps ahead to field 9, but then taps the Previous button, the screen with the skipped questions will be visible.
Branching Example 2: Branching from a Popup or Lookup List
If you want to branch based on a selection in a Popup or Lookup List, your script must account for every possible selection that the user can make from the list.
A select: event can be used, but the user has to make a selection for the script to run. If the user leaves the field blank, the script will never run. You can use an exitscreen: event if you want the script to run when the user leaves the current screen, whether or not a selection has been made.
A switch/case statement is used to specify what branching will occur for each of the possible options in the Popup or Lookup List.
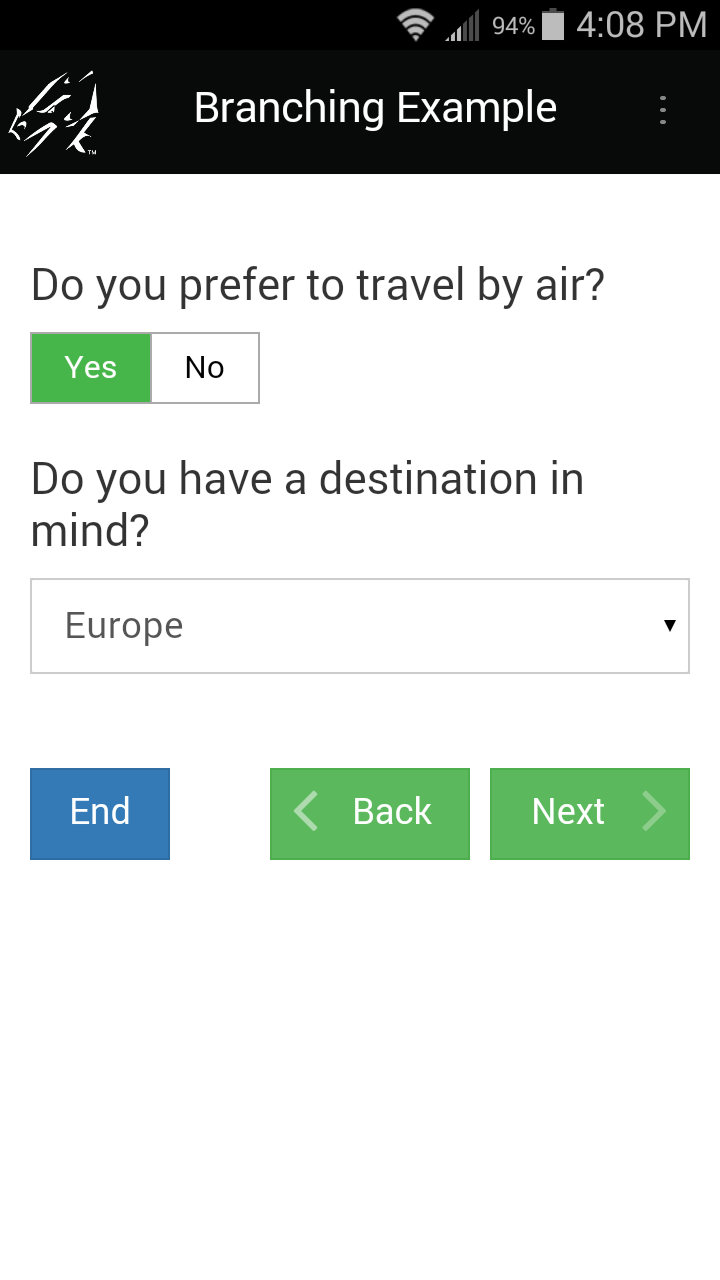
In the form shown below, field 10 is a Popup List with a list of travel destinations. Depending on the user's selection, a question relating to that destination will be displayed, and the form will advance to that question. The extra questions are hidden in advance by checking the Hidden checkbox on the Visual tab of the Form Designer window, and the script will unhide the relevant question.
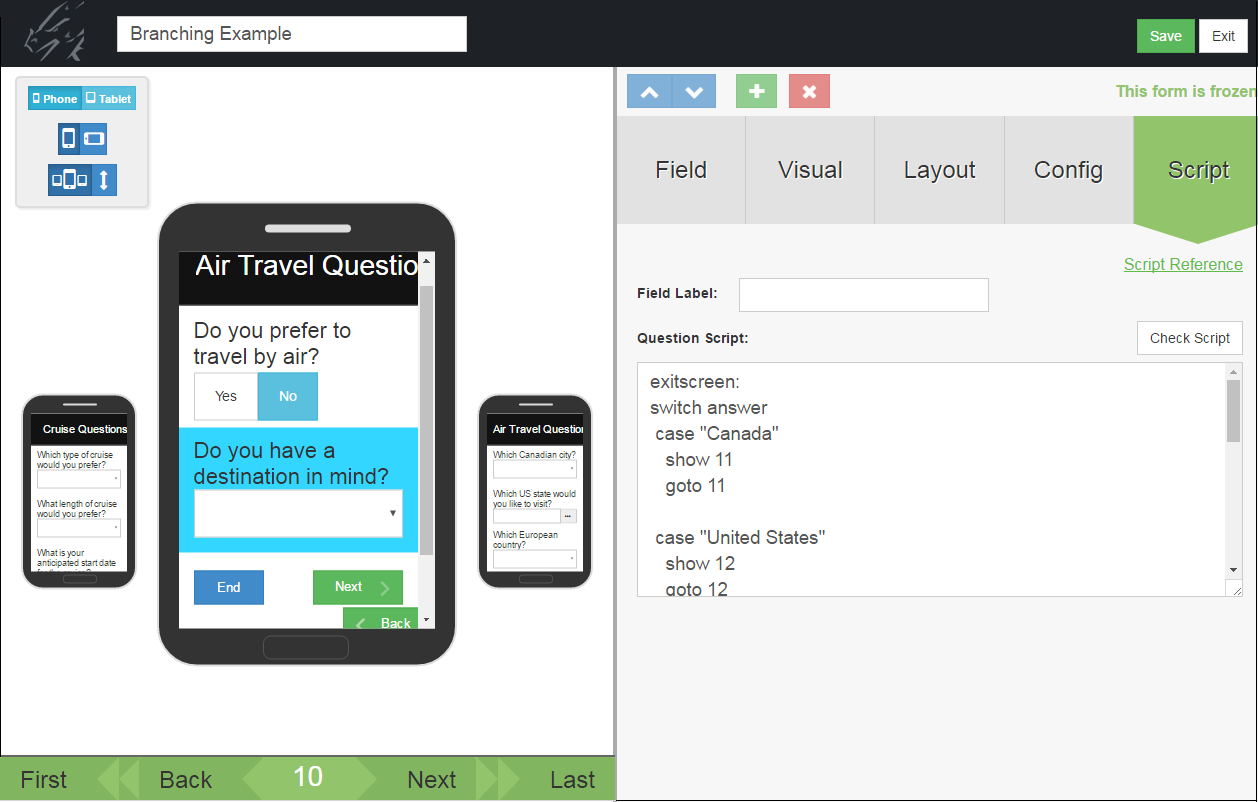
Here is the script in Field 10 in full:
exitscreen:
switch answer
case “Canada”
show 11
goto 11
case “United States”
show 12
goto 12
case “Europe”
show 13
goto 13
case “Asia”
show 14
goto 14
case “Africa”
show 15
goto 15
case anyvalue
msgbox “Please pick a destination”
endswitch
The exitscreen: event script has to contain instructions for each possible selection that the user can make in the Popup List.
exitscreen:
switch answer
This means that the value in the answer variable (that is, the value selected in the current field, will be compared to each of the options in the case statements.
case “Canada”
show 11
goto 11
This means that if the value in answer is Canada, field 11 will be displayed (show 11) and the form will branch to field 11 (goto 11). Similarly, each case statement details the actions that will be performed for each option in the Popup List.
At end of the script is this statement:
case anyvalue
msgbox “Please pick a destination”
Adding case anyvalue to the script will cover the actions to take if none of the case statement values match the value in the answer variable. For instance, if the user does make any selection from the list, the case anyvalue actions will be performed.
Adding case anyvalue to a switch/case statement is optional.
The last line of the script is:
endswitch
Every switch statement must end with the word endswitch.
Branching Example 3: Using a Goto statement with a Jump to Section field
A Jump to Section field contains some built-in branching capability that automatically allows you to jump to Section fields on your form. If you want the mobile user to branch back to the Jump to Section field after completing a section of a form, you can use a goto statement in the last field of that section.
In the following form, Field 7 is a Jump to Section field that allows the mobile user to jump to a section on the form. After the user has gone through the fields in a section, you may want the user to branch back to the Jump to Section field to be able to select another section.
When the mobile user exits the last field in a section, the form branches back to Field 7, the Jump to Section field. The Exit section is the only section which does not branch back to Field 7, so if the user selects the Exit option, he/she jumps to the final field(s) on the form and can end the record.
Using Scripts in Button Fields
Scripts are used to carry out actions when the mobile user taps on a button in a Button field.
- The label on a button is set by typing in a Default value (up to 11 characters) on the Data tab of the Button field in the Form Designer window.
- The click: event is used to activate what happens when a button is tapped.
- The label on a button can be changed in a click: event script with the assignment statement answer = “Name-of-label”
Button Script Example 1: Calculate Button
Calculate: scripts run whenever a field is updated. This is processor intensive, and may also cause calculations to be performed before the mobile user is ready. An alternative is to use a button to give the mobile user control of when the calculation is performed.
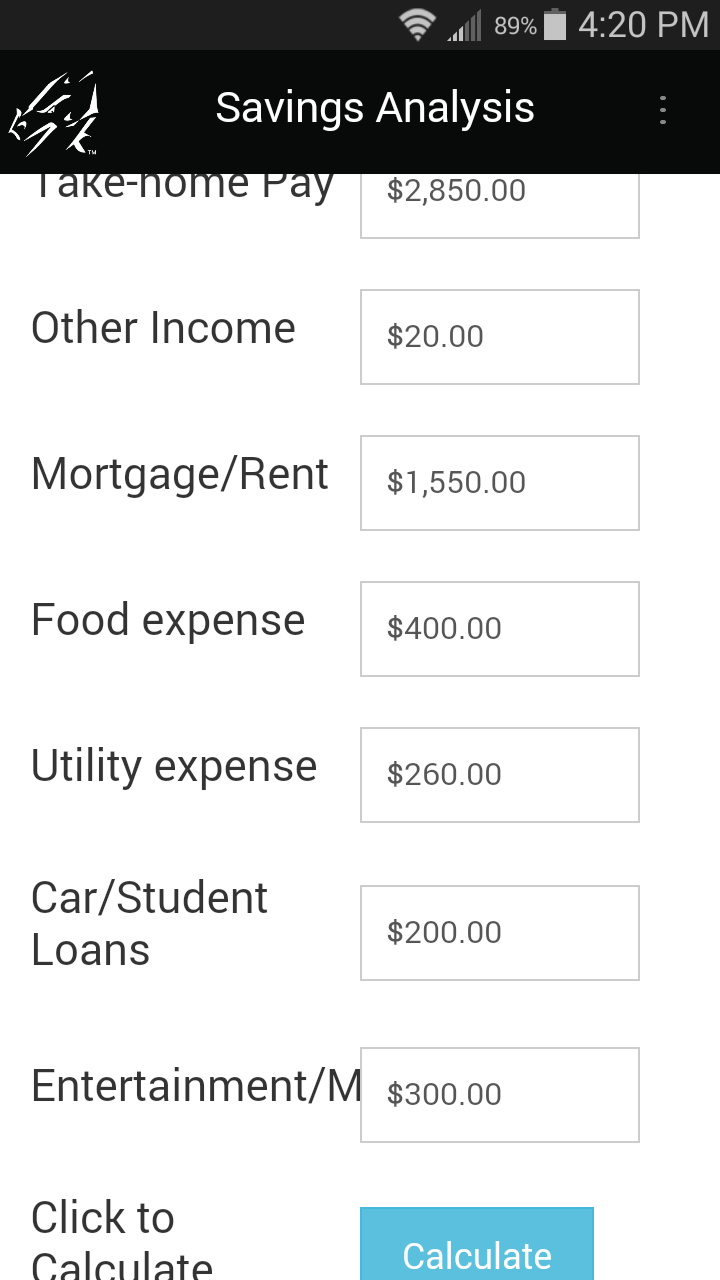
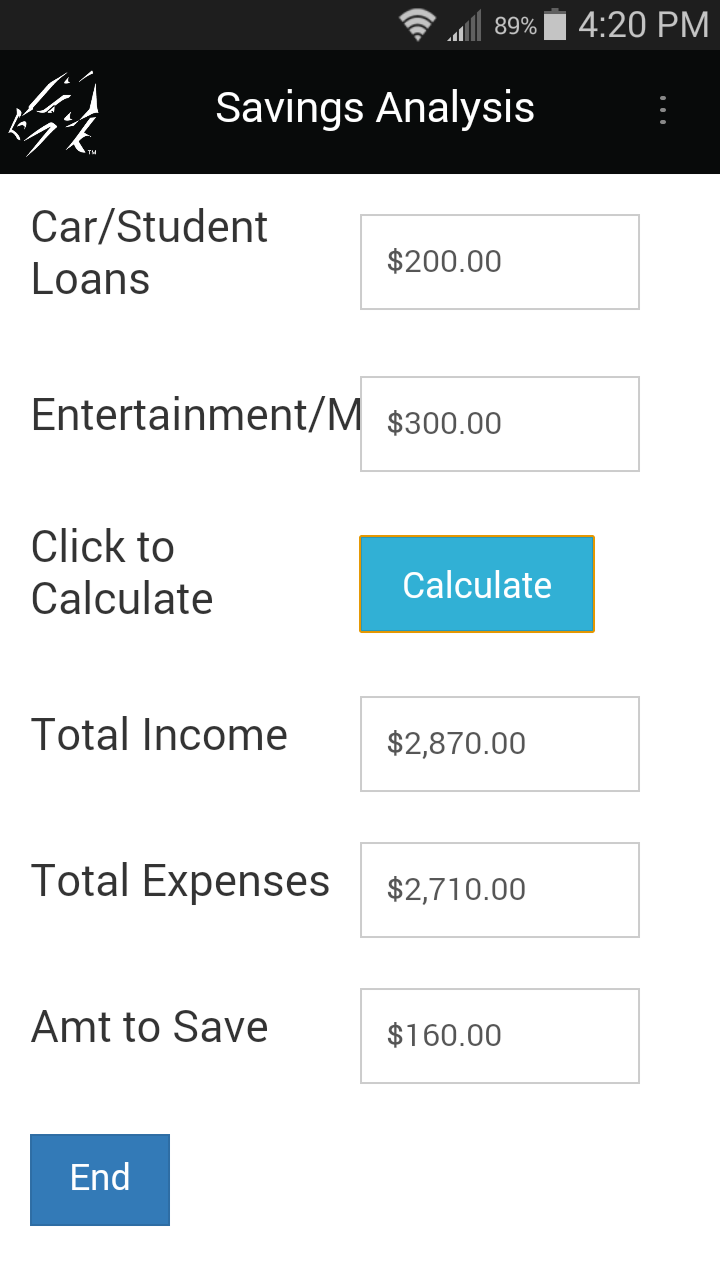
click:
$9 = $1 + $2
result = $3 + $4
result = result + $5
result = result + $6
$10 = result + $7
$11 = $9 - $10
In the form above, the last three fields on the form (Fields 9, 10 and 11) are not calculated until the user taps the Calculate button.
The advantage of using a button for calculations is that the user does not see intermediate results on screen before all the necessary data is input.
IMPORTANT: The disadvantage to using a button for calculations is that if the user changes a field, the calculated results do not change until the button is tapped again.
Button Script Example 2: Clone Button
In this example, the first few fields on a form will be the same for several records. To save the mobile user from re-entering the same data multiple times, a Button field is added to the form. Tapping the button clones the record, keeping the common data but erasing the fields that are different for each record.
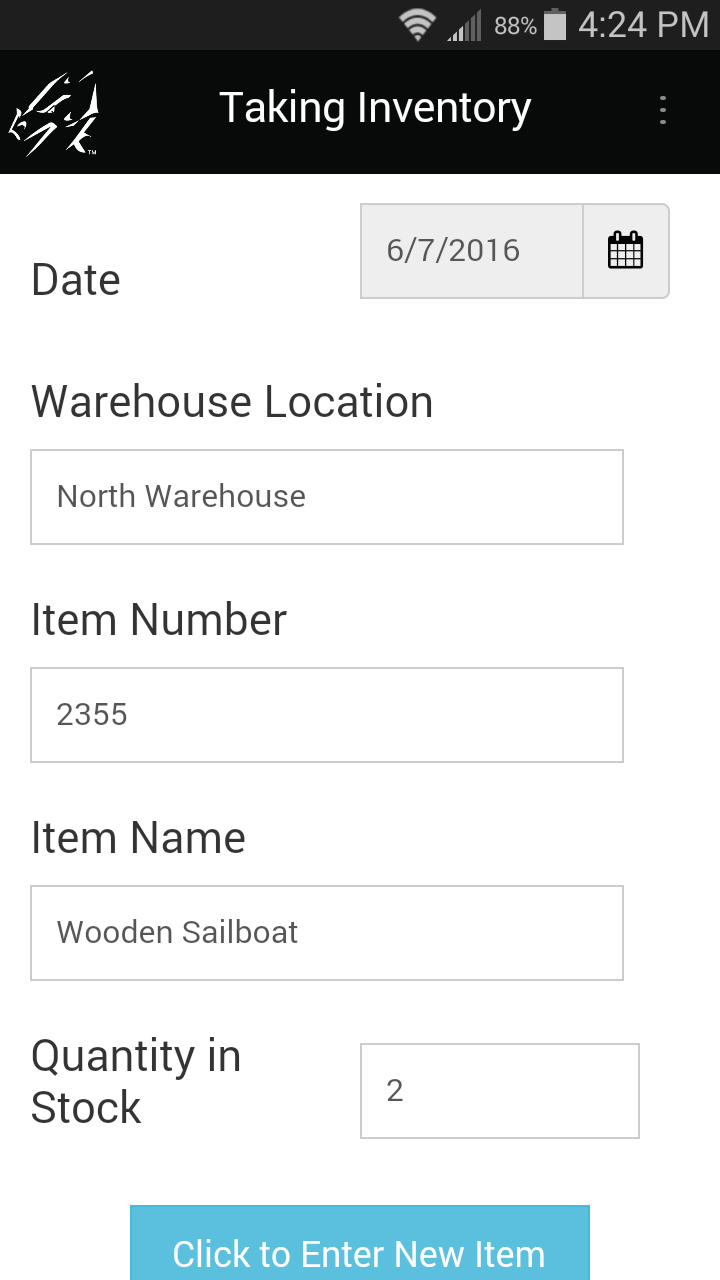
The user fills out the first record then clicks the Button field.
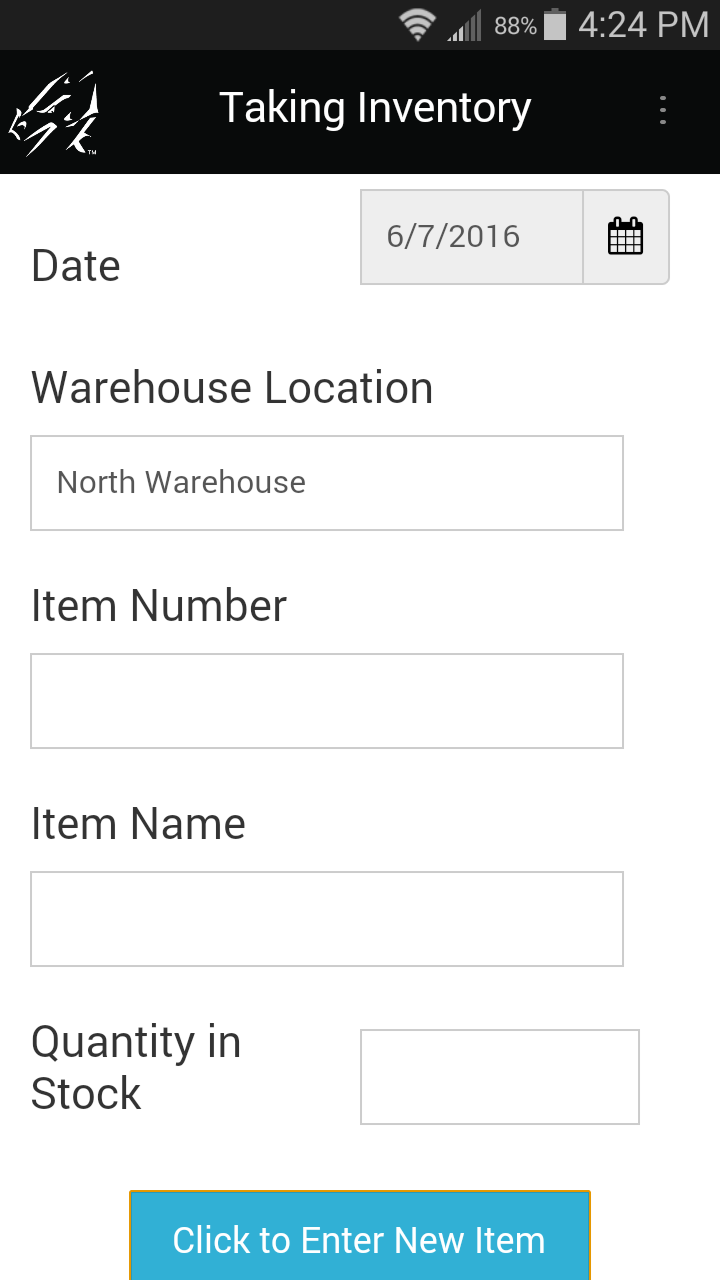
The script in the Button field clones the first record, making a copy that keeps the value in the first two fields but nulls the value in the remaining fields on the form.
The script in the Button field of this form is:
click:
clone
$3 = null
$4 = null
$5 = null
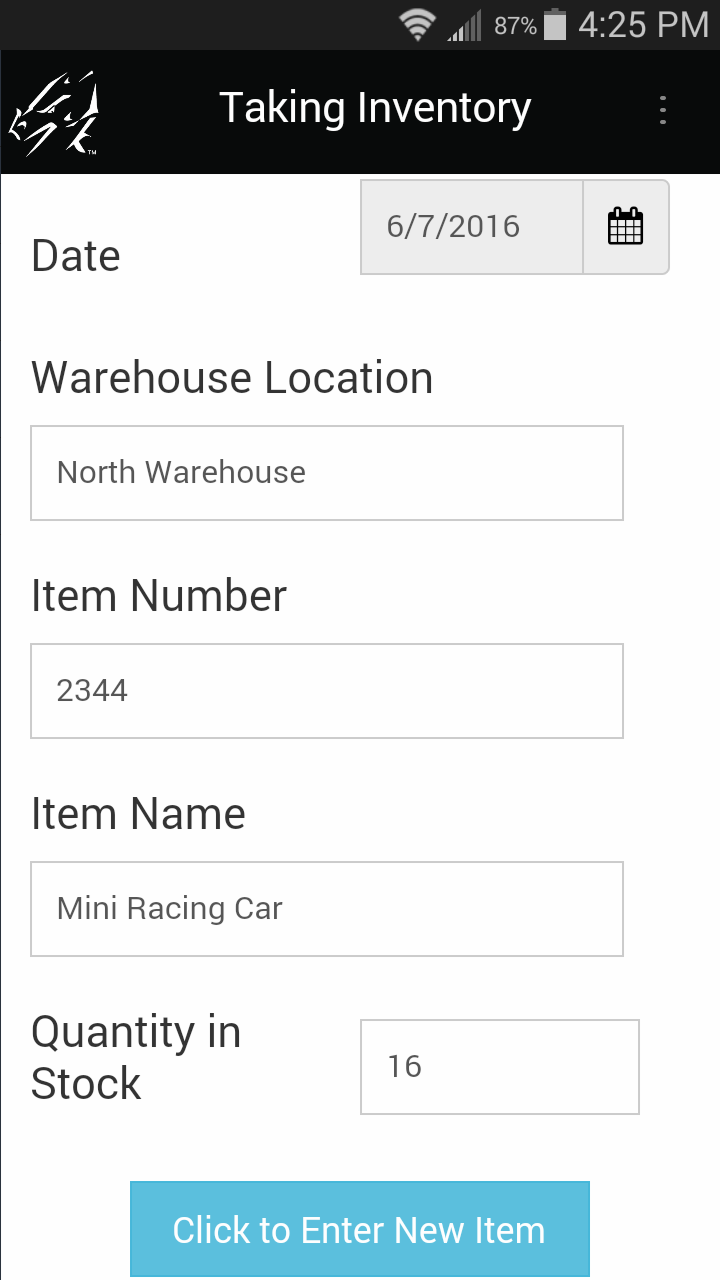
The user can then fill out the remainder of the second record and click the Button field to create a third record.
The clone statement makes a new record that contains all the values from the previous record. The values in fields 1 and 2 (Date and Warehouse Location) are retained. The statements $3 = null, $4 = null and $5 = null cause fields 3, 4 and 5 to be set to null (empty/blank) so that the mobile user can enter new values in the new record. At any time the mobile user can manually change fields 1 and 2 as well, and subsequently cloned records will contain these changes.
Using a Script in a MultiSelection Field
MultiSelection fields are stored internally as a binary number, with each option in the MultiSelection List being represented by a bit position in the binary number.
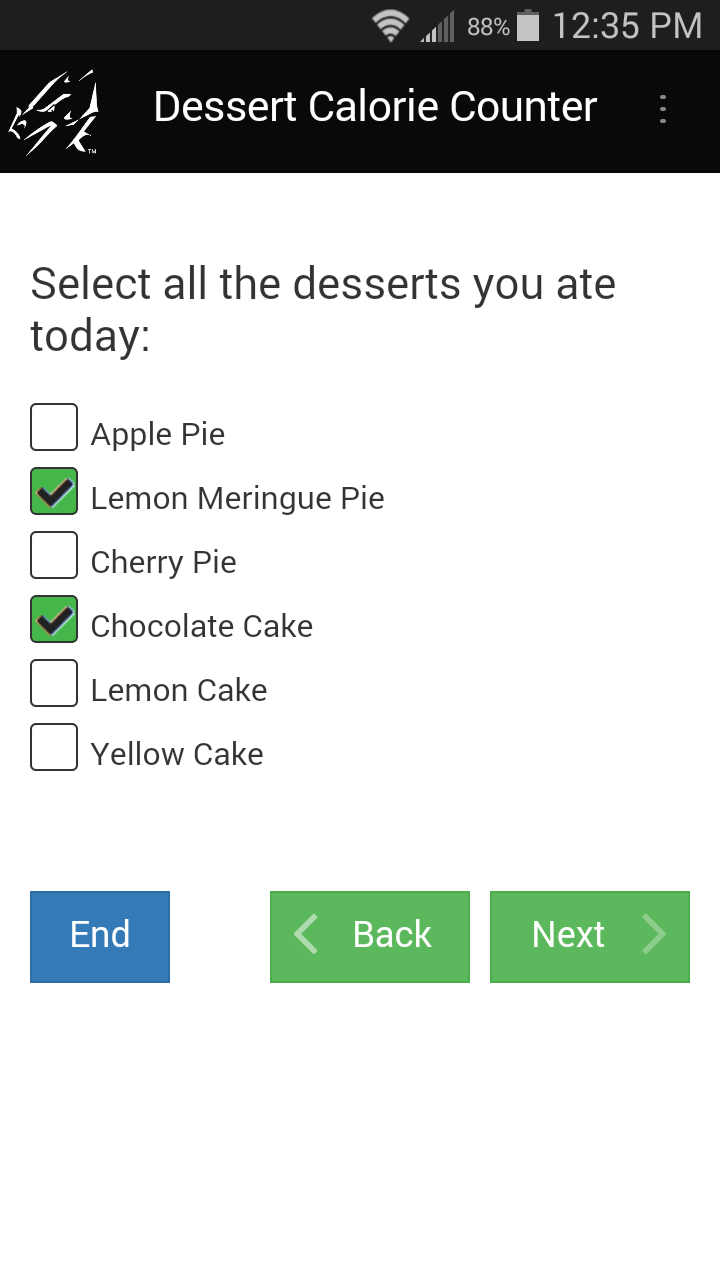
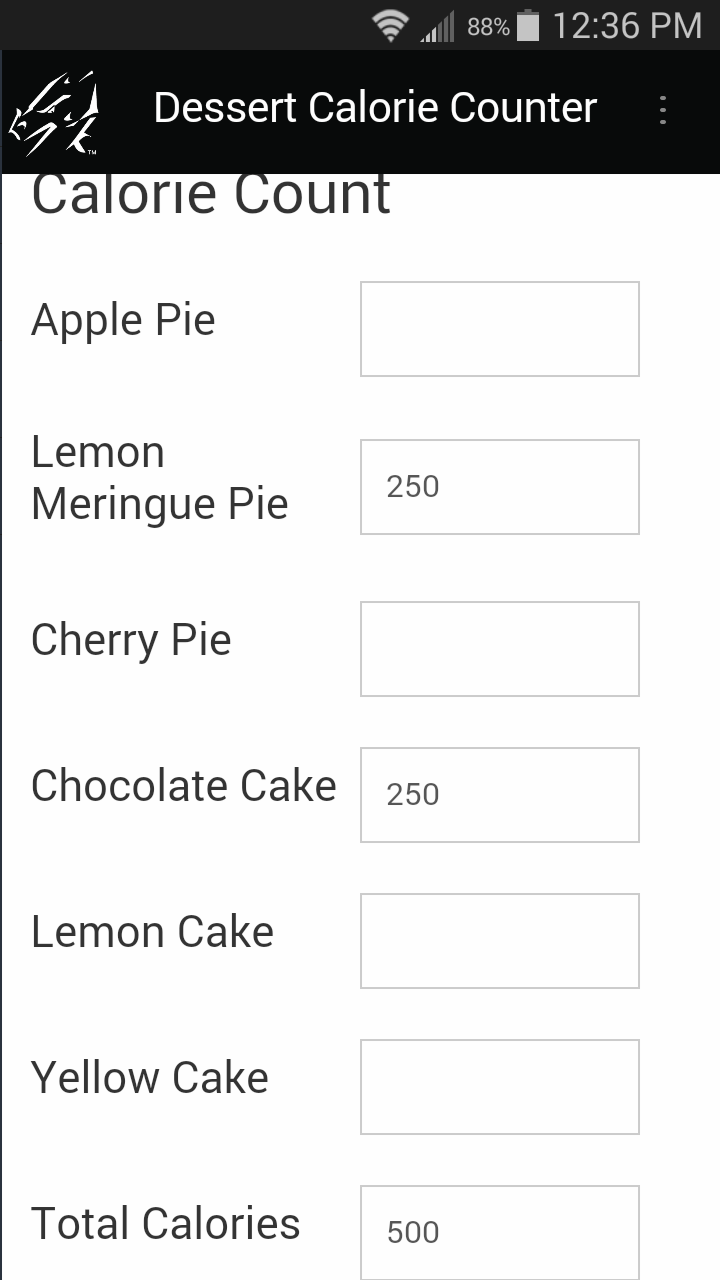
For example, the MultiSelection List shown here uses the following bit positions:
32: Yellow Cake
16: Lemon Cake
8: Chocolate Cake
4: Cherry Cake
2: Lemon Meringue Pie
1: Apple Pie
exitscreen:
result = answer and 1
if result = 1 then
$7 = 200
else
$7 = null
endif
result = answer and 2
if result = 2 then
$8 = 250
else
$8 = null
endif
result = answer and 4
if result = 4 then
$9 = 300
else
$9 = null
endif
result = answer and 8
if result = 8 then
$10 = 250
else
$10 = null
endif
result = answer and 16
if result = 16 then
$11 = 250
else
$11 = null
endif
result = answer and 32
if result = 32 then
$12 = 250
else
$12 = null
endif
Each checked box in the list sets the corresponding bit position to 1. Internally, the choice of Lemon Meringue Pie and Chocolate cake is stored as the binary number 001010.
For a script to react to the selections in a MultiSelection list, the binary AND operator can be used to check whether a given bit position has been set. In the script shown below, the answer in the MultiSelection field is compared to each bit position in turn. If the bit is set, the result of the AND operation is equal to the value of the bit position. If the bit is not set, the result is 0.
For example, the statement result = answer and 2 compares the answer in the MultiSelection field with the bit position 2, to test if the “Lemon Meringue Pie” checkbox has been checked. If it has been checked, a value of 250 calories is entered in Field 8, otherwise Field 8 is set to null. Field 8, which is on the next screen of the form, stores the calorie value of the Lemon Meringue Pie selection.
Using Scripts with Parent forms and Subforms
A parent form and a subform are not really linked on the device - they only appear to be connected. Some scripts can be used to further enhance the appearance of a connection between the parent form and subform.
- The subformsum statement can be used to add up the values in a given field on a subform, and place the calculated result in the result variable. The value in the result variable can then be placed into a field on the parent form.
Adding across subform records, and placing the result on the parent form
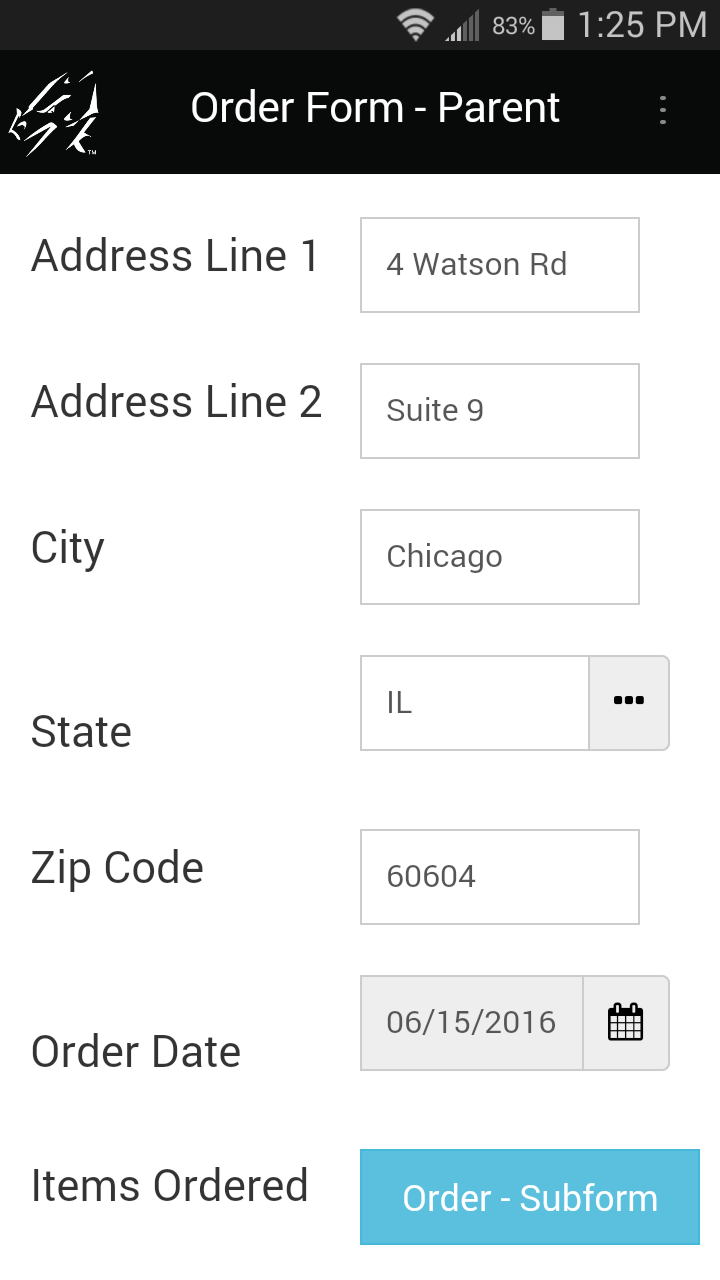
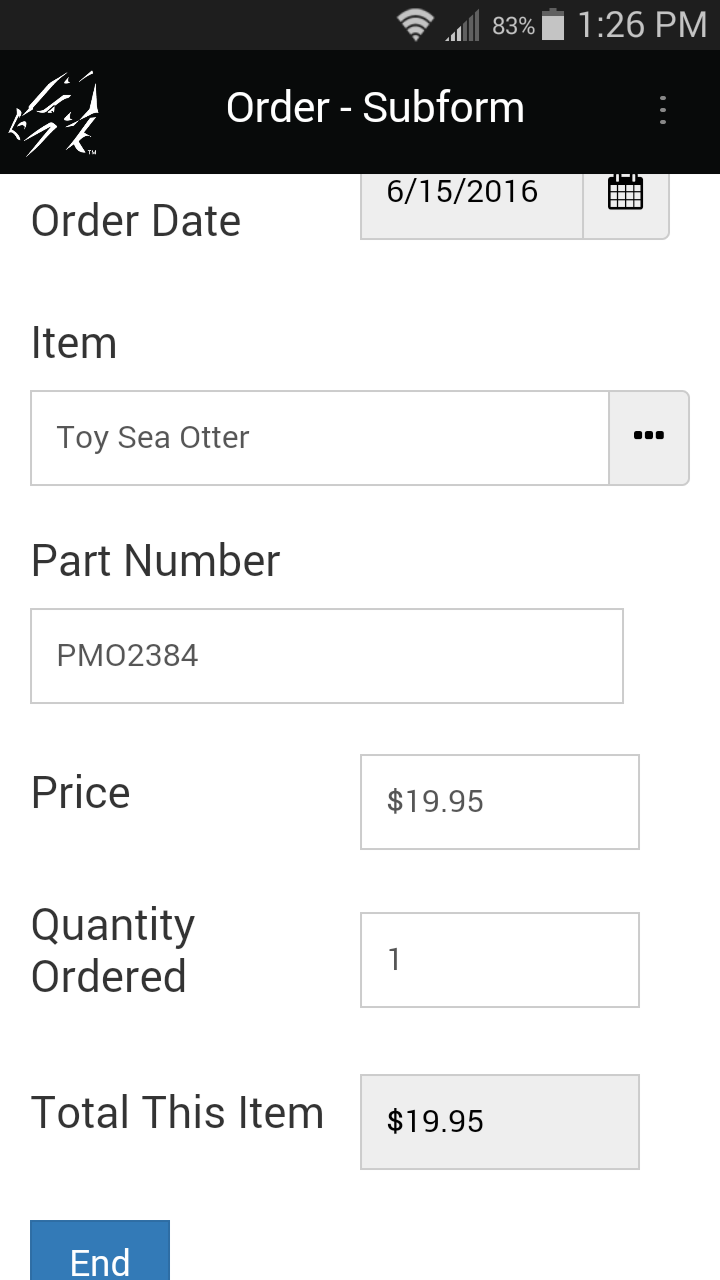
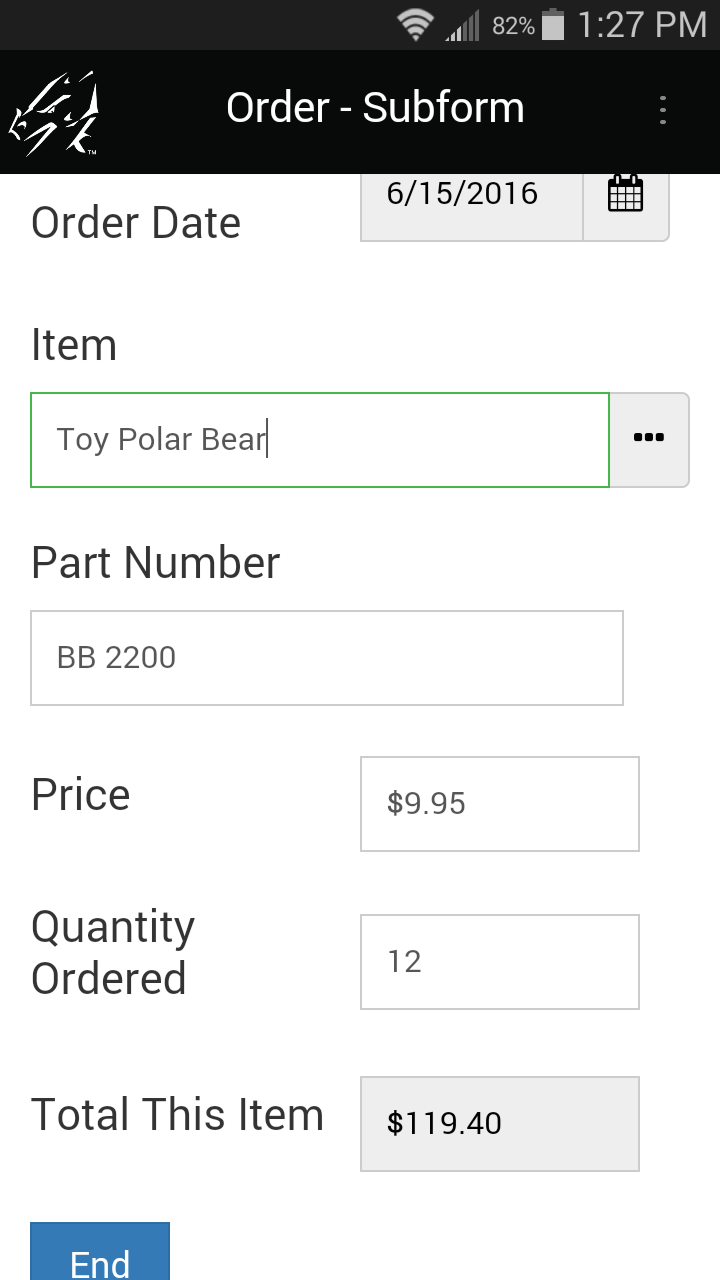
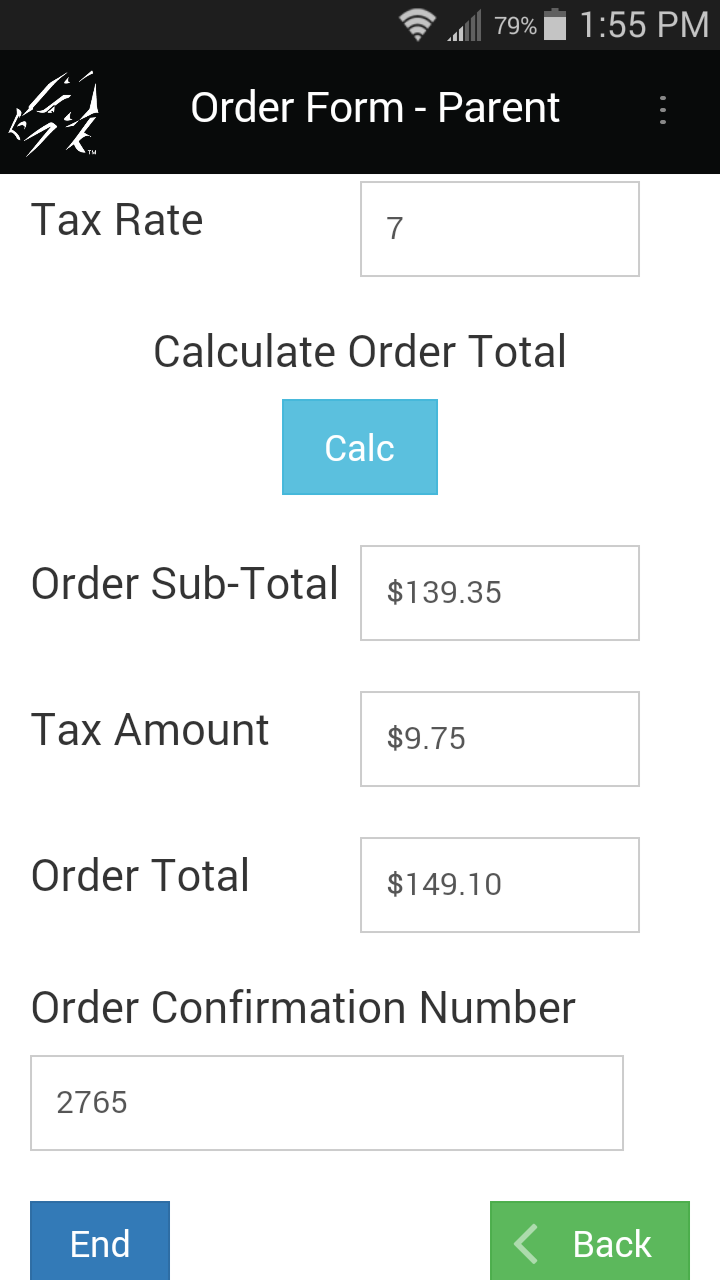
In the parent form shown here, Field 10 is a Subform field that jumps to a subform used to enter items being ordered.
Field 12 is a Button field on the parent form, that the users taps to run the following script:
click:
subformsum "Order - Subform" 8
$13 = result
temp = $11 / 100
$14 = $13 * temp
$15 = $13 + $14
The statement subformsum “Order - Subform” 8 adds up the values in Field 8 of all the subform records that match the parent record. (In this example, Field 8 on the subform contains the total for one item being ordered.) “Order - Subform” is the name of the subform. The result of the calculation is placed in the result variable.
The statement $13 = result then places the calculated result in Field 13 of the parent form. The remainder of the script calculates the tax and the total including tax.
Note that if the mobile user enters more subform records after the Calc button has been tapped, he/she will need to tap the button again to update the parent form with the new total.
Using Scripts to do a Cascading Lookup
A Cascading Lookup enables you to have a user make a selection in Popup List or Lookup List field, and then display a list of items relevant to their selection in the earlier field.
A Reference Form is needed to do a Cascading Lookup.
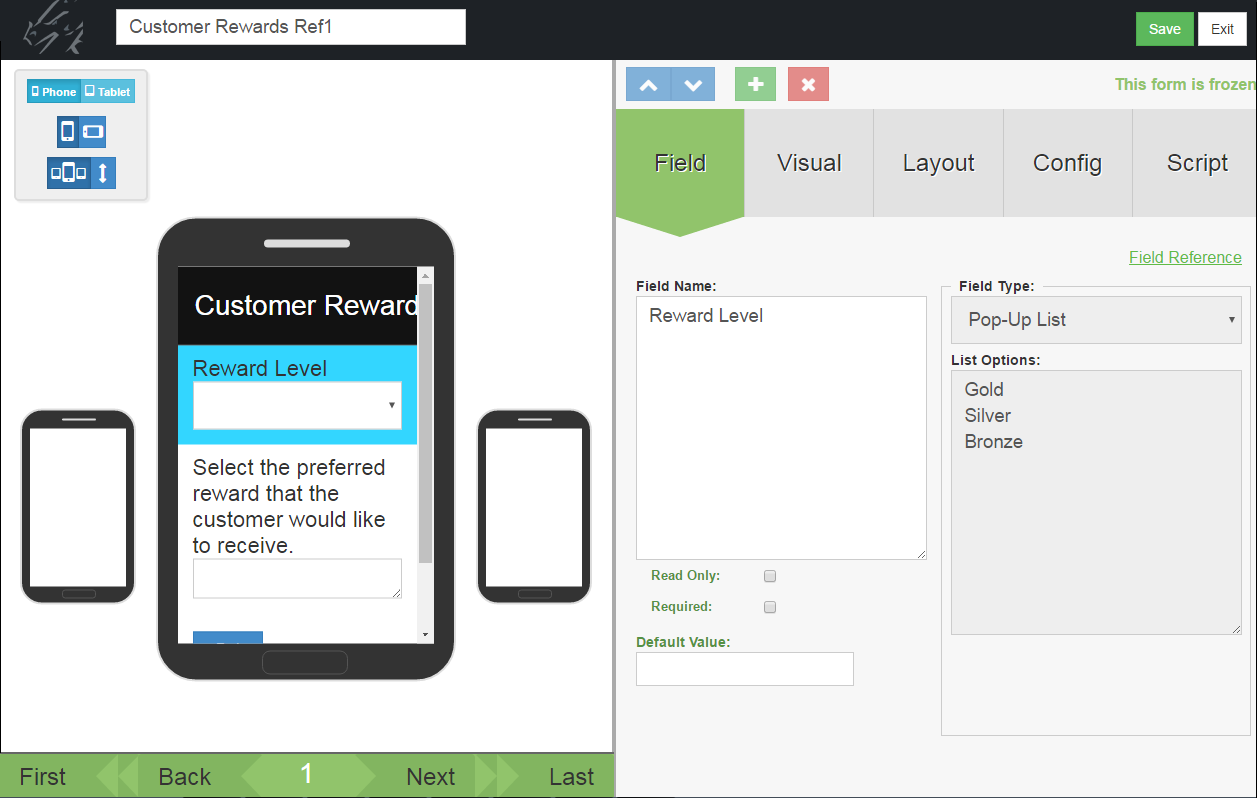
Here is a sample Reference Form which will contain a list of rewards that a customer can earn. Field 1 is a Popup List for assigning a reward to a Gold, Silver or Bronze category.
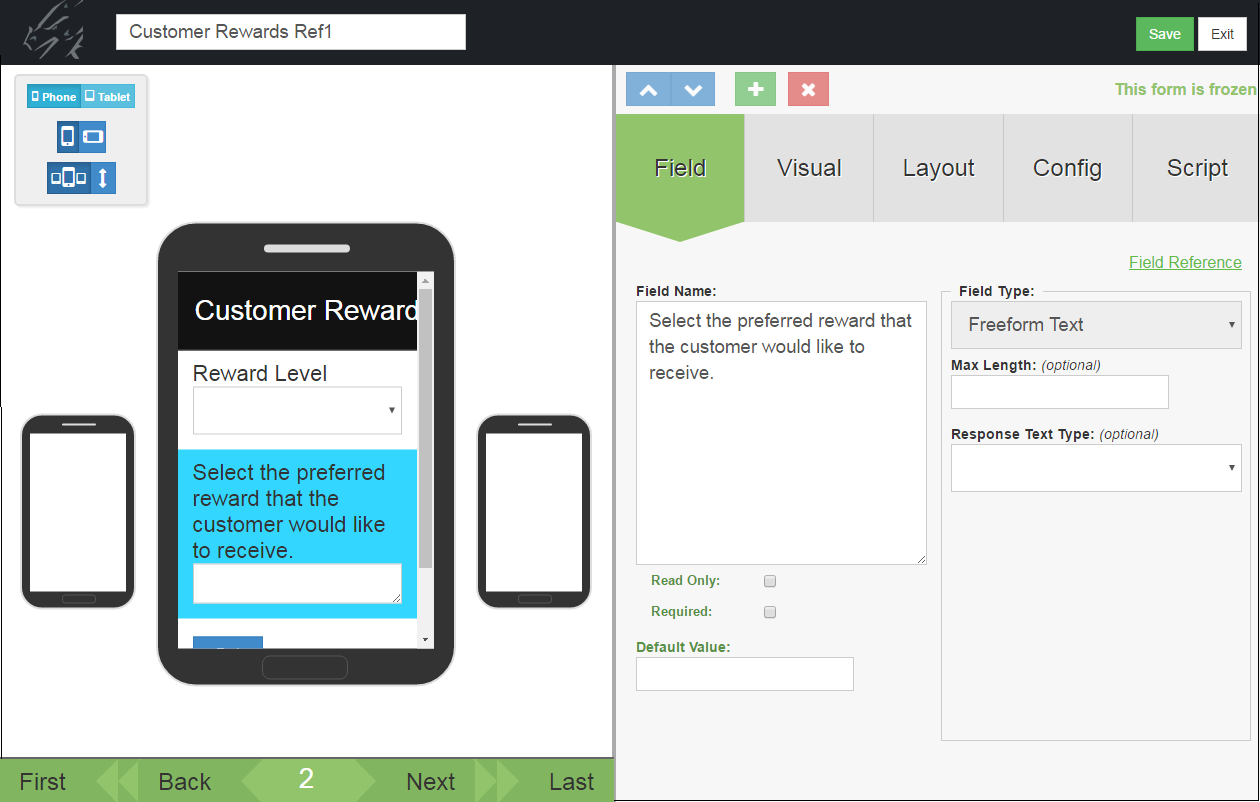
Field 2 of the Reference form is a Text field for storing the name of a customer reward.
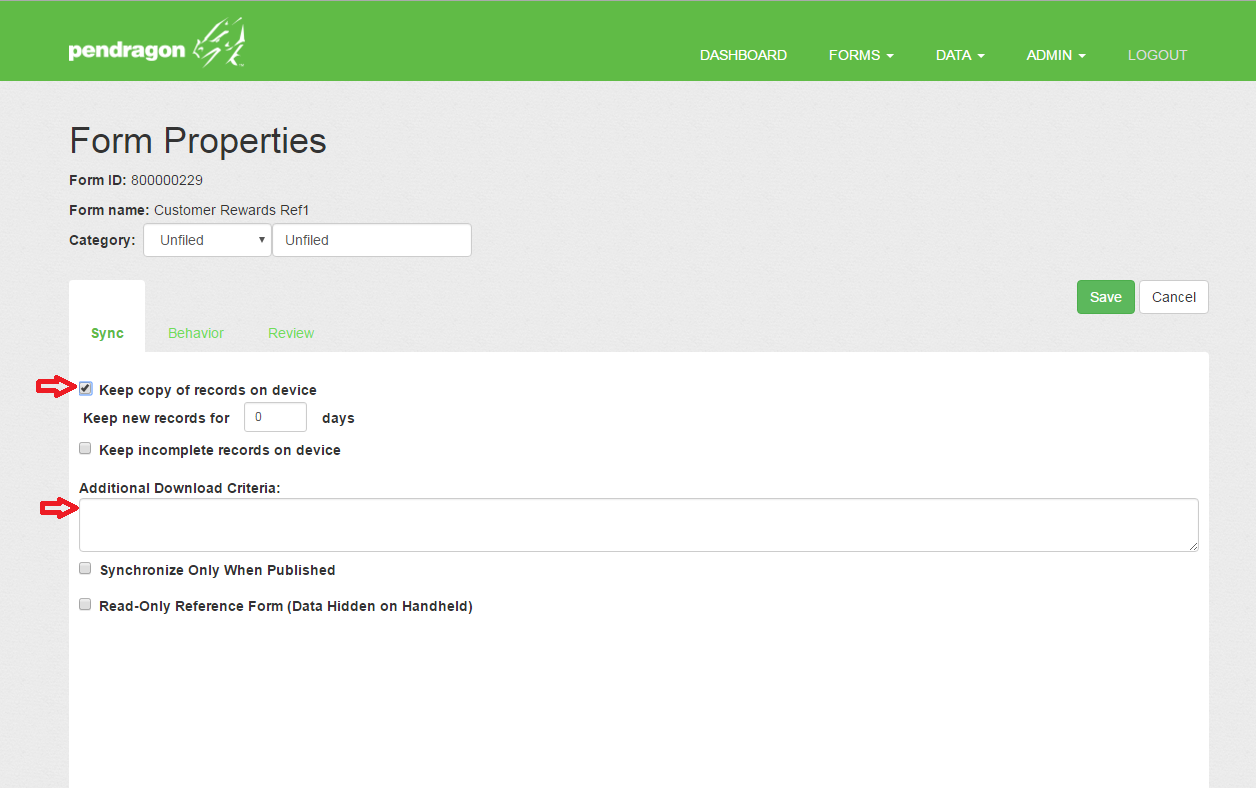
The Form Properties of the Reference Form have to be set to Keep Copy of Record on Device, and the default Additional Download Criteria of USERNAME = ##USERNAME## has to be erased to allow the records of the Reference Form to go to all devices.
Tip: To access the Form Properties screen, click the Properties icon next to the form name in the list of forms.
You can now create the form that will do the lookup to the Reference Form.
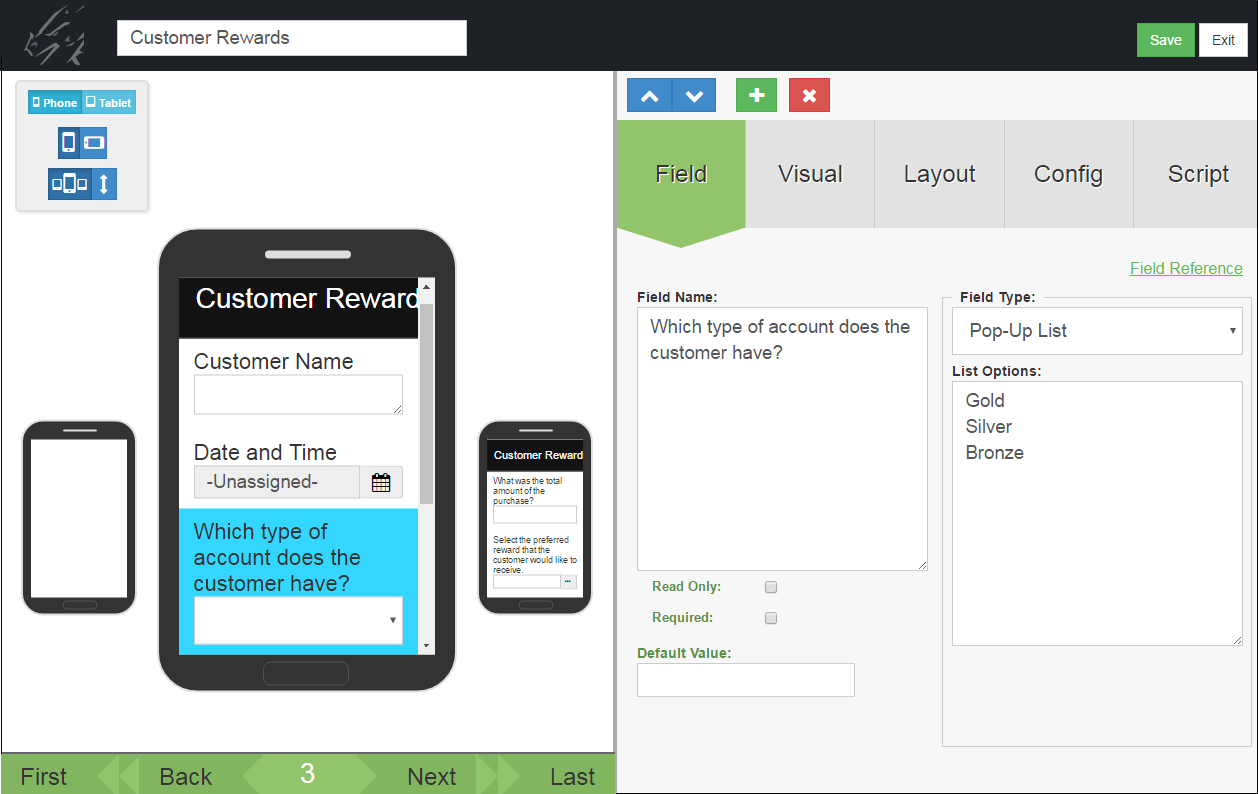
One field on this form should be a Popup List or a Lookup List that allows the user to select a category. In this example the categories in Field 3 are Gold, Silver or Bronze.
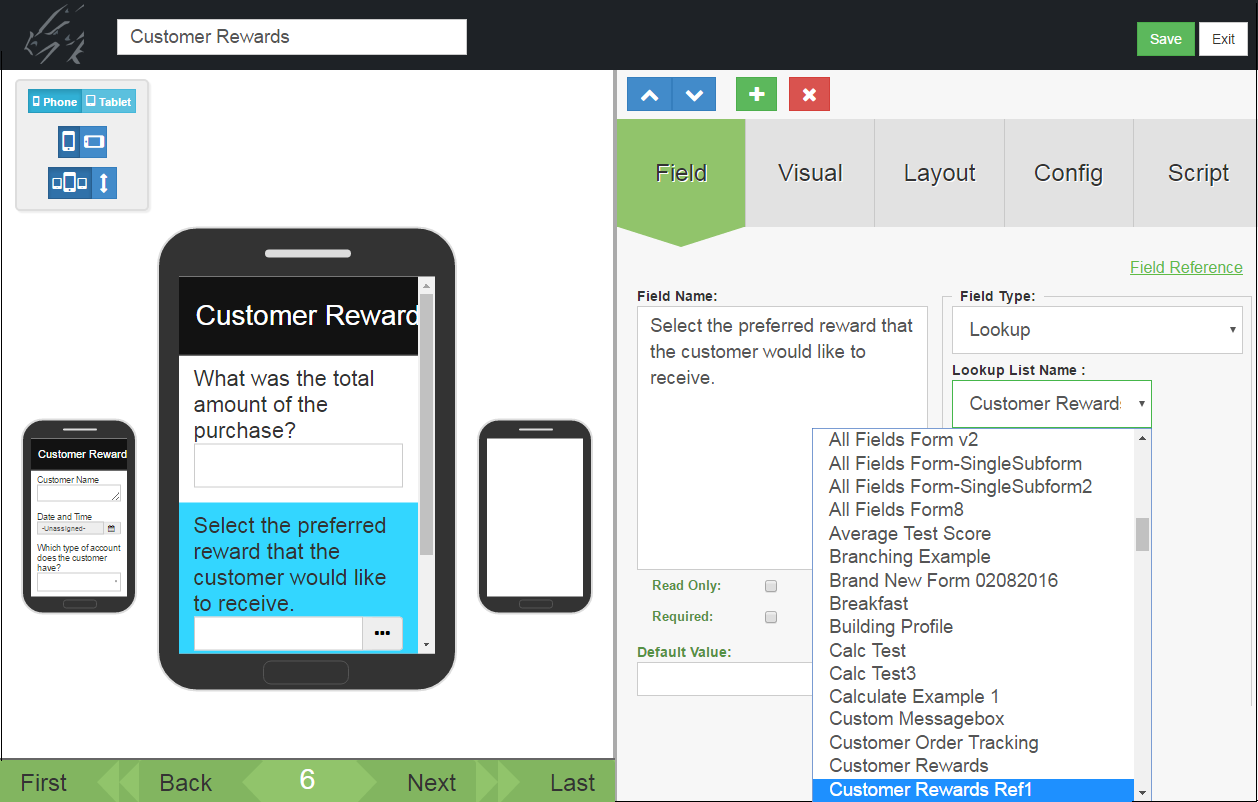
Another field on the form doing the lookup should be a Lookup List field, but instead of selecting a Lookup List to be displayed, select the name of the Reference Form. In this example the Reference Form is called Customer Rewards Ref1.
Important: The Field Name of the Lookup List should match the Field Name from the Reference Form that you want to copy data from.
After selecting the Reference Form to act as your Lookup List, click on the Script tab and enter the script that will make the lookup possible.
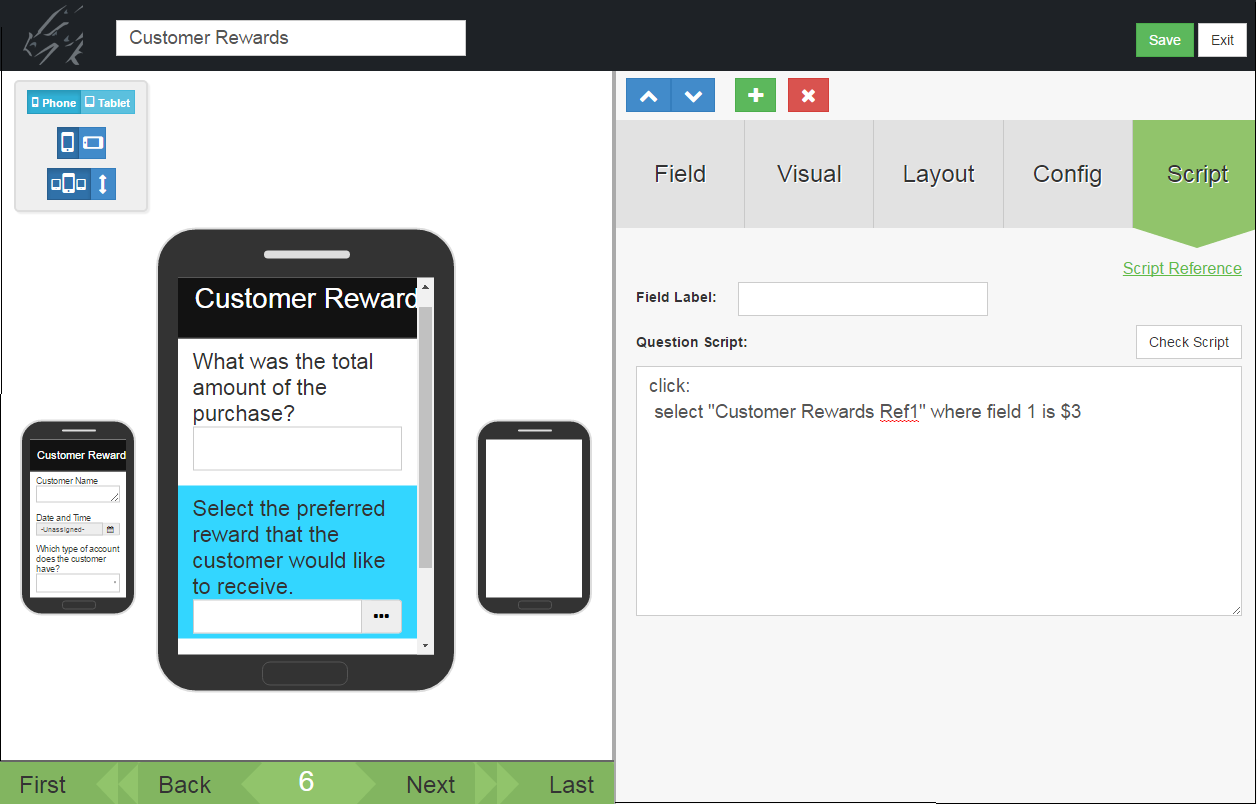
In this example, the script is:
click:
select “Customer Rewards Ref1” where field 1 is $3
The click: event script runs when the Lookup List field is tapped.
The select statement selects records from the Customer Rewards Ref1 form in which Field 1 of the Reference Form matches Field 3 of the current form. Field 3 of the current form is the reward category, so if the user selects a Gold reward in Field 3, when they tap in the Lookup List field they will see a list of Gold level rewards.
On the device, selecting an option in Field 3 determines which Lookup List will be displayed in field 6.
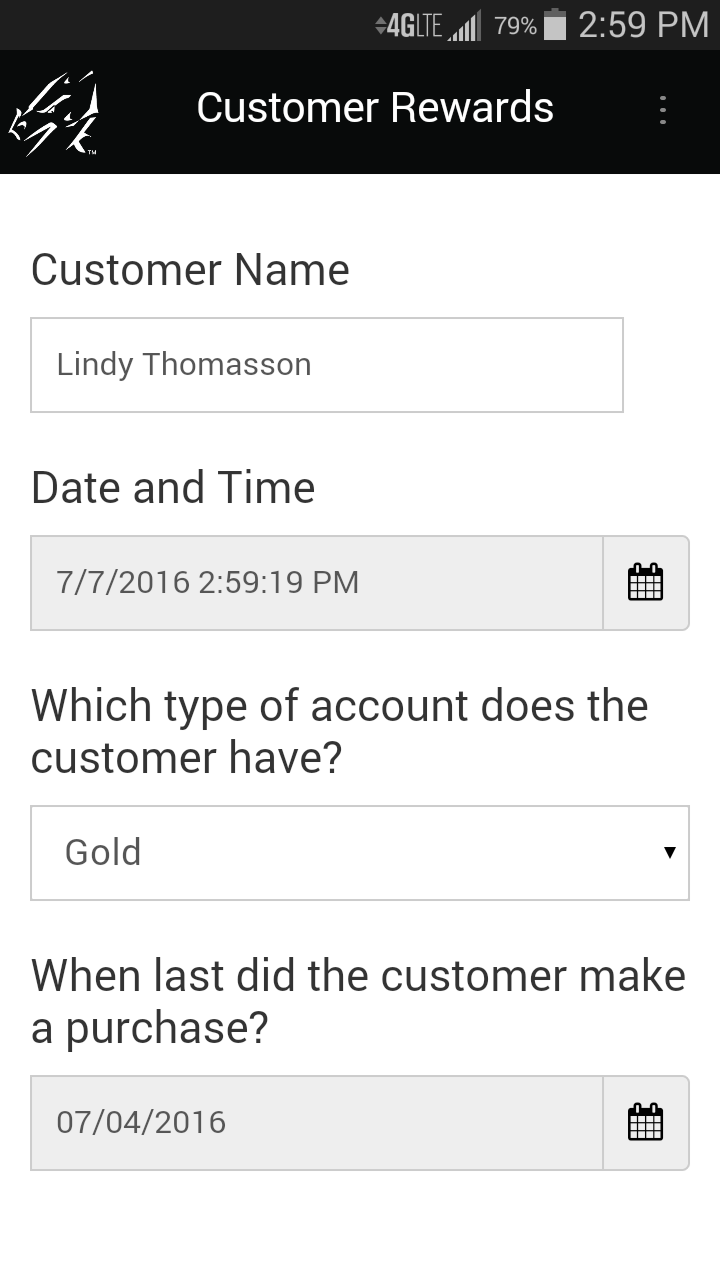
Selecting Gold in Field 3...
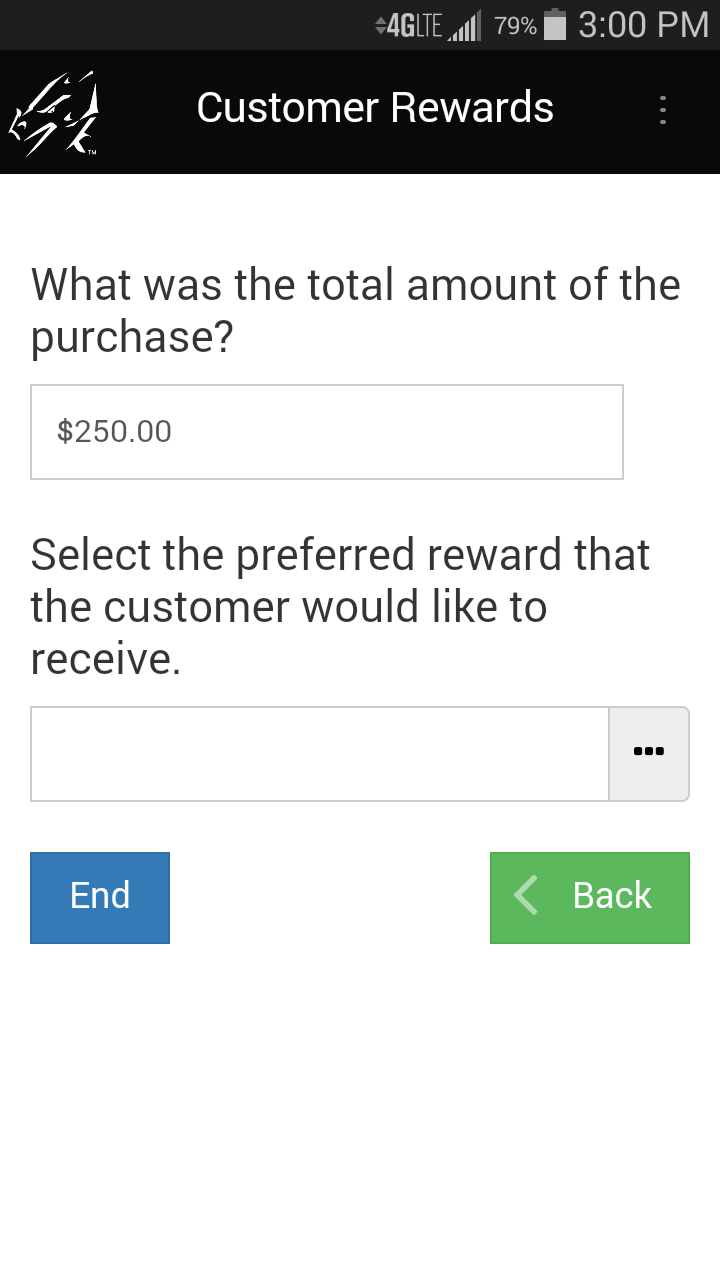
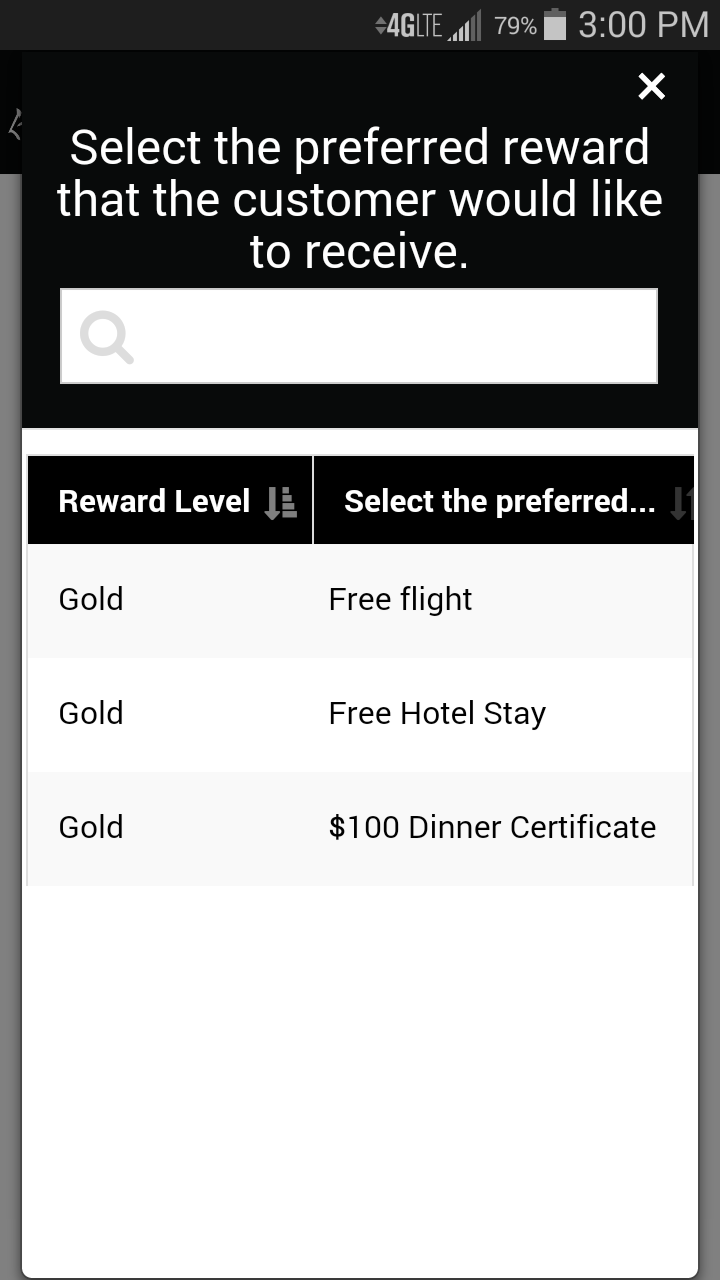
Displays all the records in the Reference form that have a Reward level of Gold.
Using Scripts to do a Double Cascading Lookup
A Double Cascading Lookup enables you to select records from a Reference Form based on two criteria instead of one as in a regular Cascading Lookup. For example, you might want to create a form in which you select a State, then select a City, and then see a list of customers in that City + State.
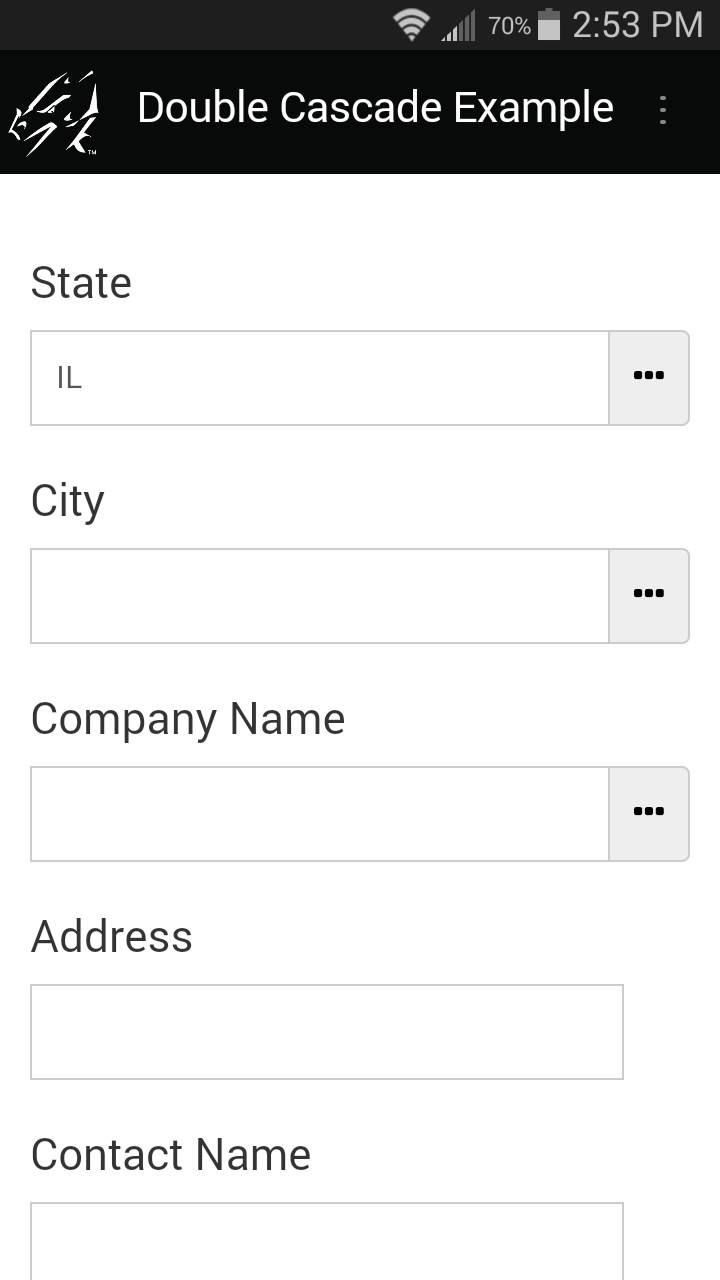
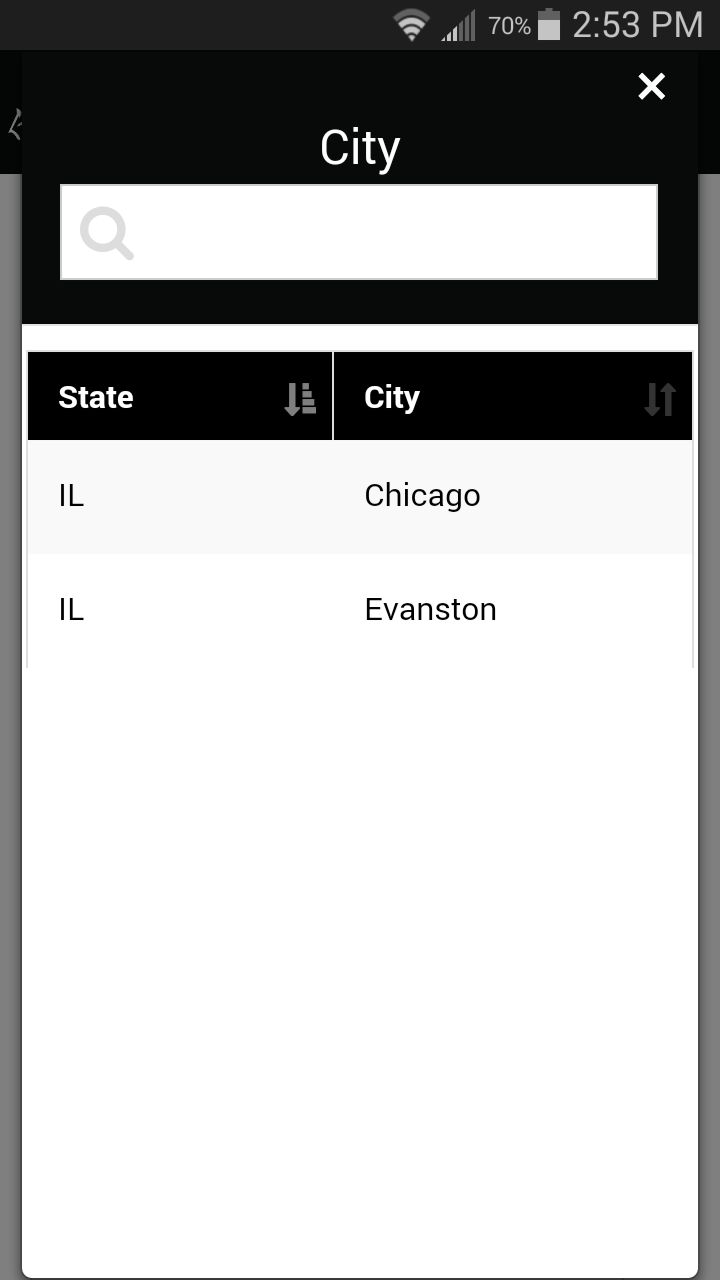
Tapping in the City field brings up a list of Cities in the selected State.
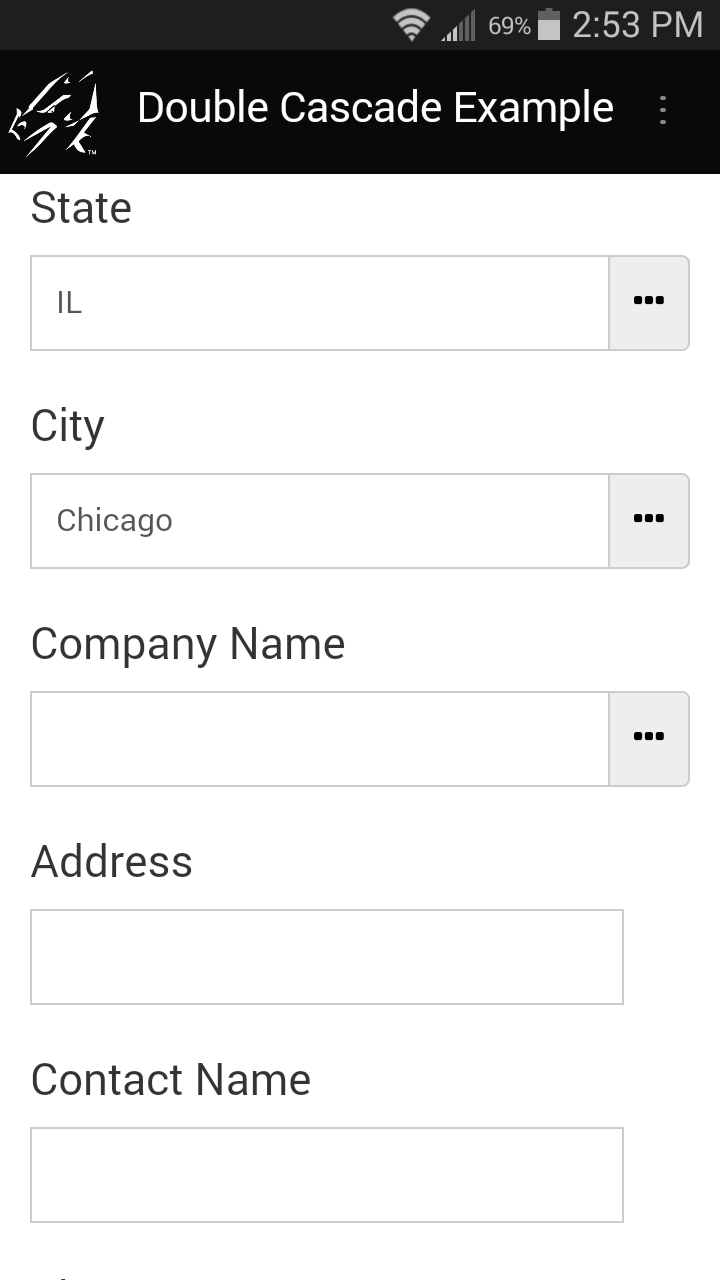
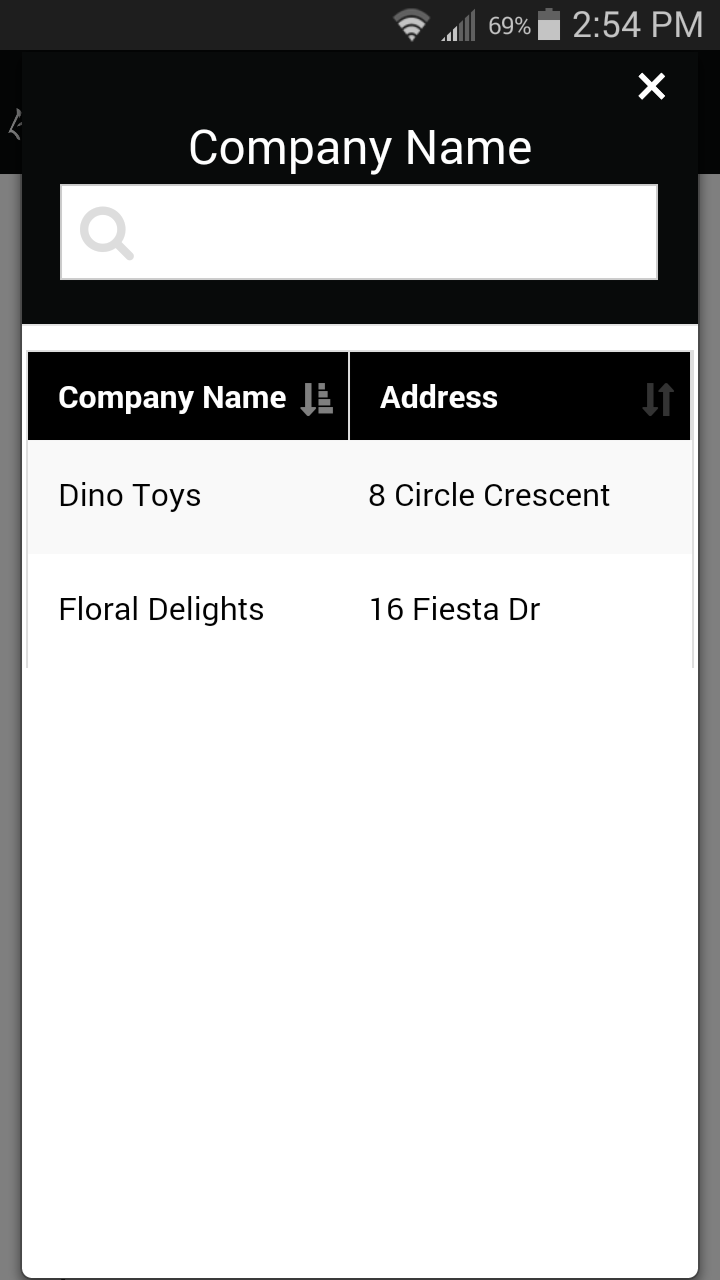
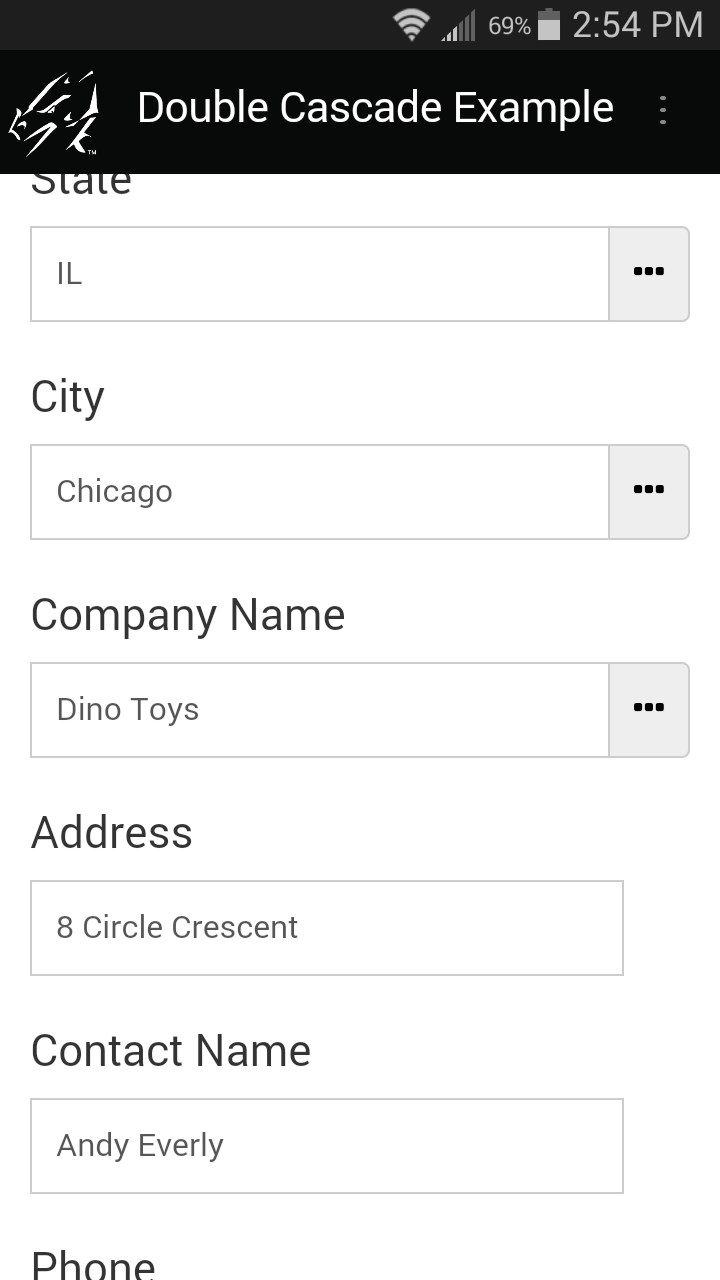
Tapping in the Company Name field displays a list of companies in the selected State and City. Selecting a company copies that company’s information into the form doing the lookup.
Three special fields and two Reference forms are required to do a Double Cascading Lookup.
One field is used to lookup a State. This field is just a regular Lookup List with a list of all the states.
The second field, City, does a single Cascading Lookup to look up the cities for the selected State. A Reference Form called “Cities and States” is used.
The third field, Company Name, does a Double Cascading Lookup to look up all the companies that match the two criteria of City and State. A Reference form called “Customer List” is used. The Reference Form needs a separate field for each criteria that you want to select.
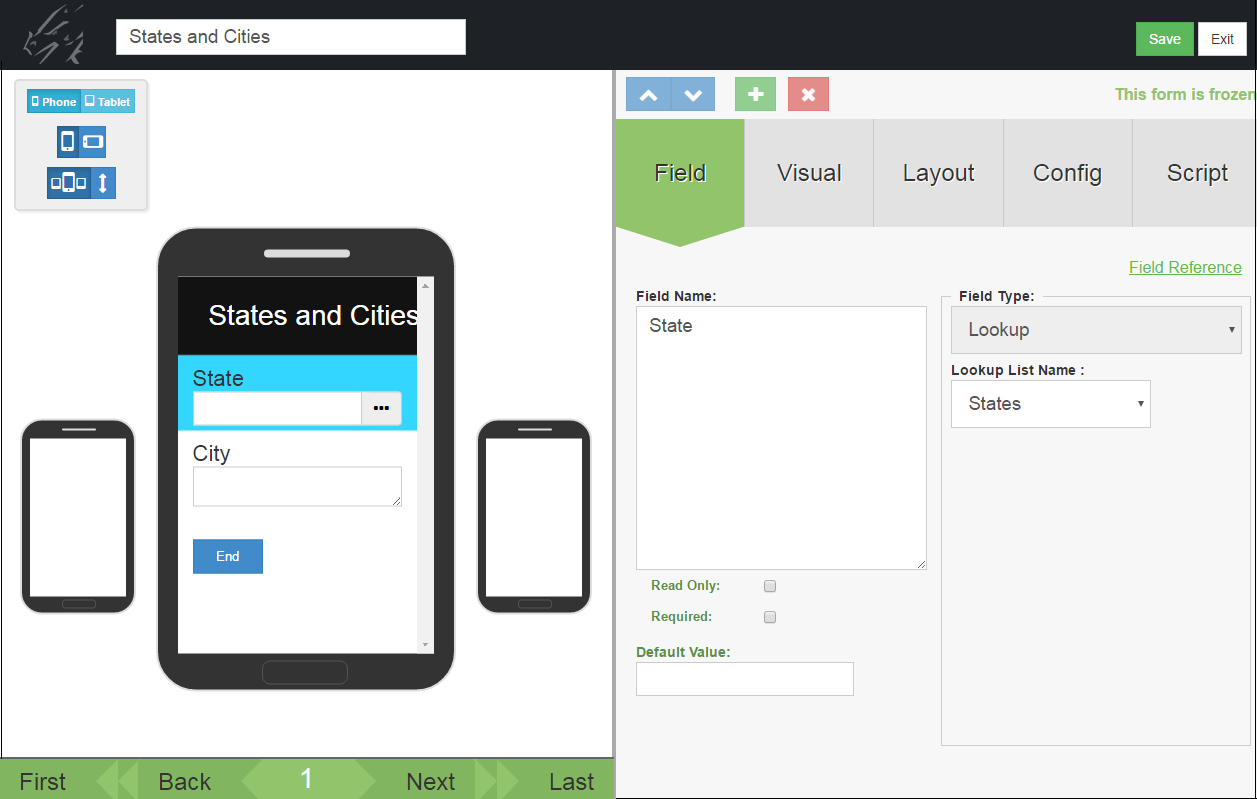
This is the first Reference form, “Cities and States” that is used to look up a City once a State has been selected. Note that to copy fields into the form that is doing the lookup, the field names and field types have to match between the two forms. (A Text field can also copy into a Lookup List field.)
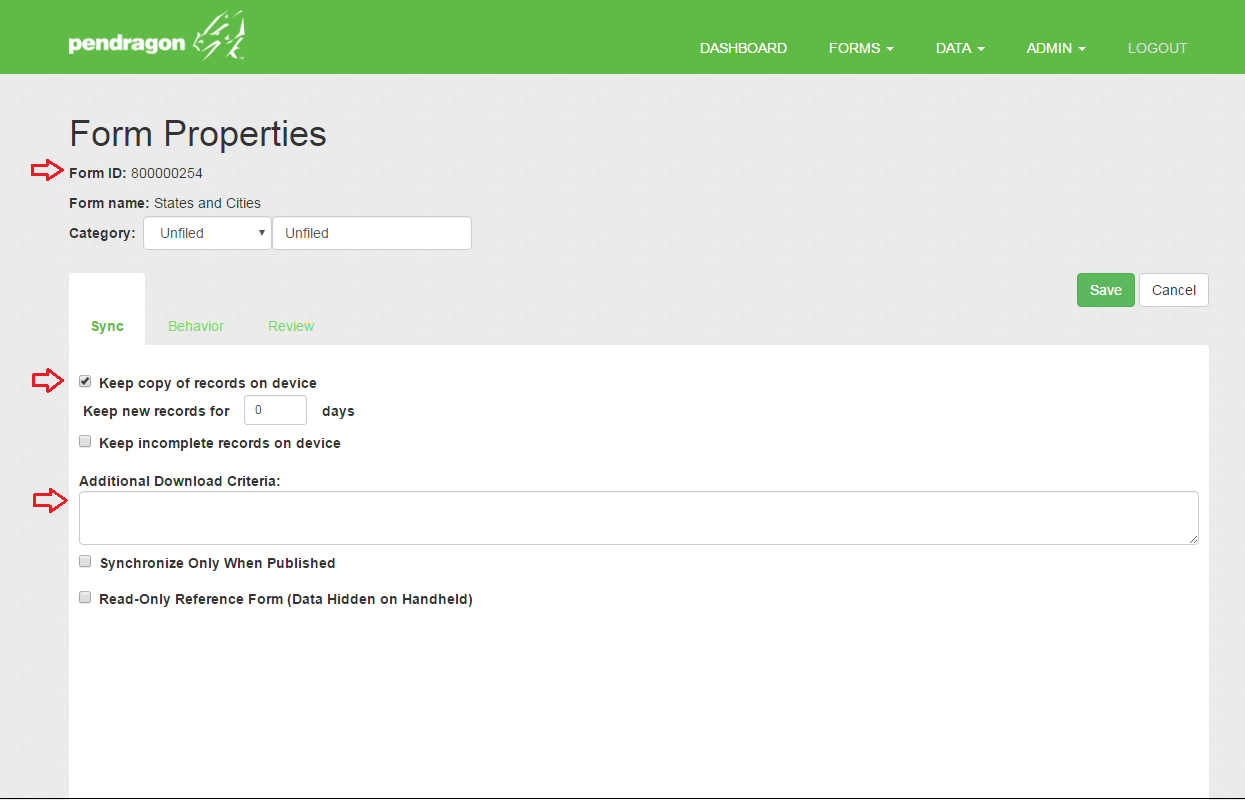
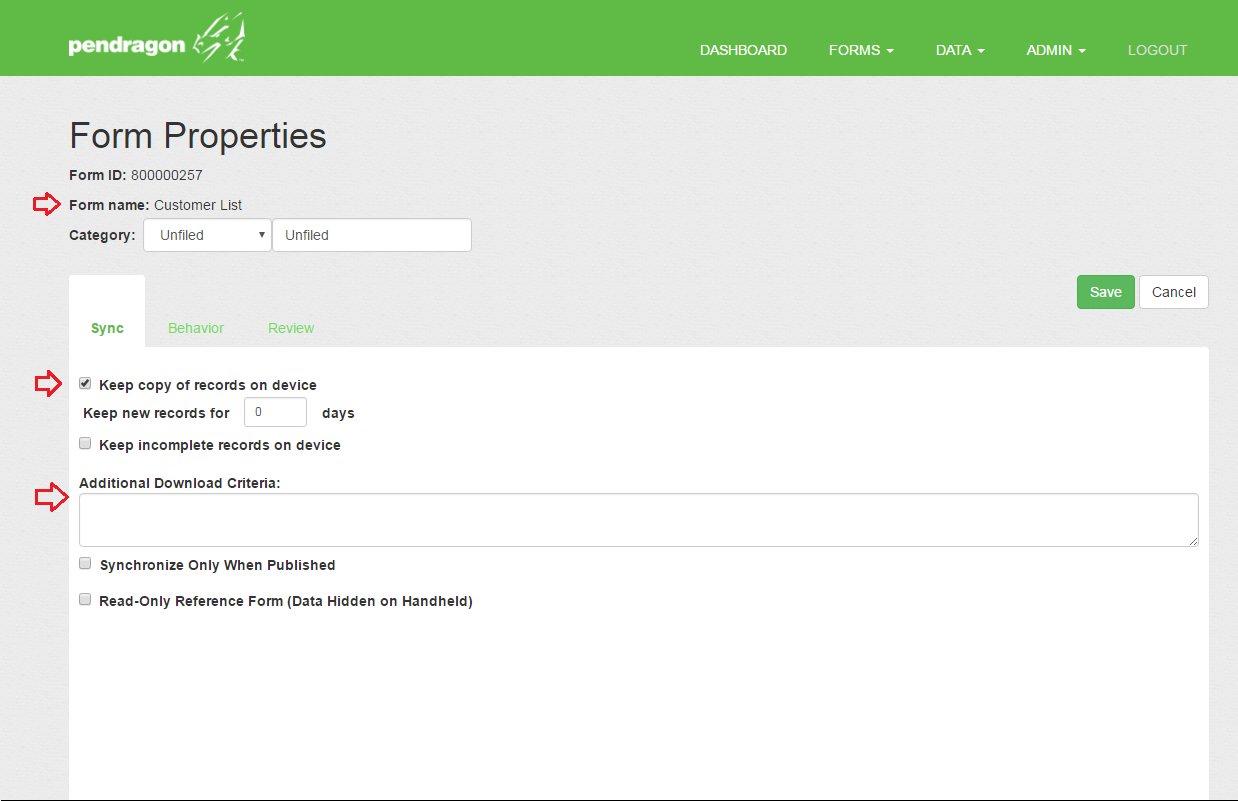
In the Forms List, click the Properties icon next to the first reference form, in this case the “Cities and States” form. On the Form Properties screen check to Keep Copy of Records on Device. Also delete the default Additional Download Criteria of Username = ##USERNAME## to allow records to go to all devices.
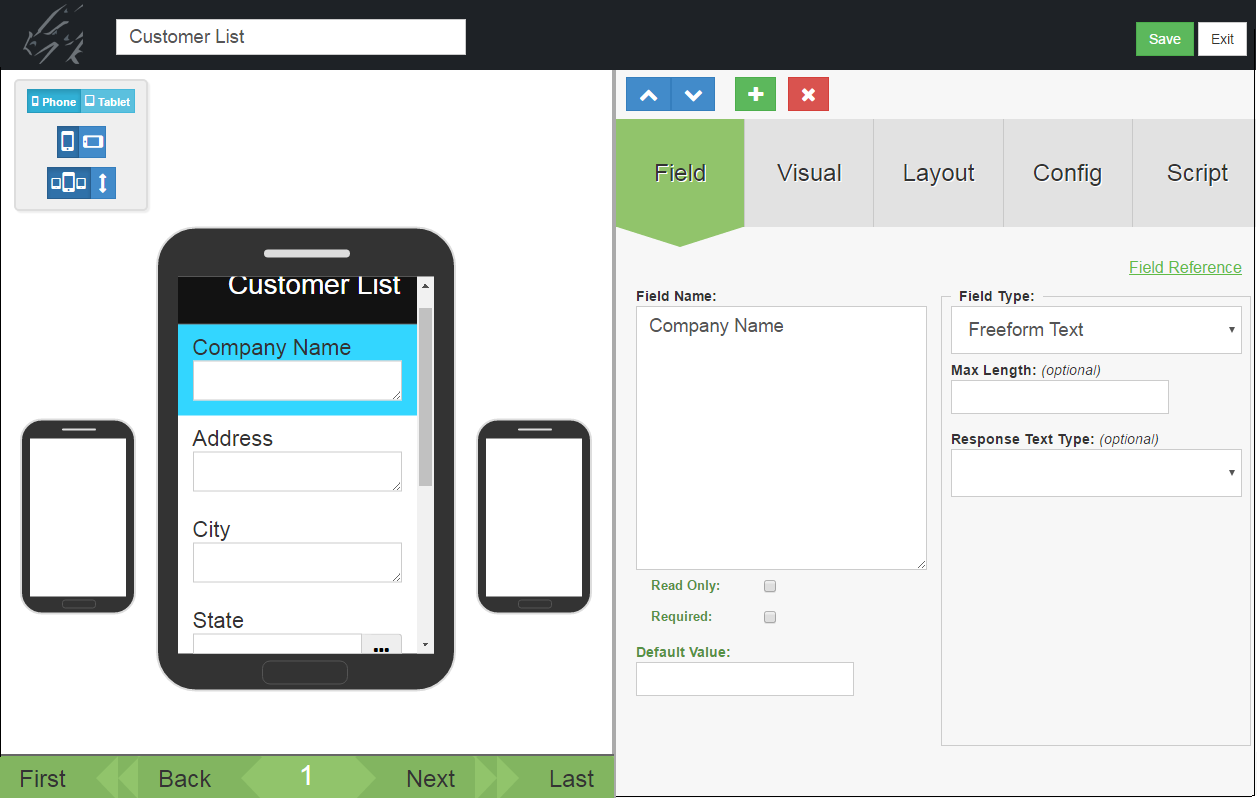
This is the second Reference form, called “Customer List”. The names of the fields on this form have to match the names of the fields on the form doing the lookup in order for data to copy from this reference form to the form doing the lookup.
As with the first Reference form, the Form Properties of the “Customer List” Reference form have to be set to Keep Copy of Records on Device, and the default Additional Download Criteria of Username = ##USERNAME## has to be deleted to allow all records to go to all mobile devices.
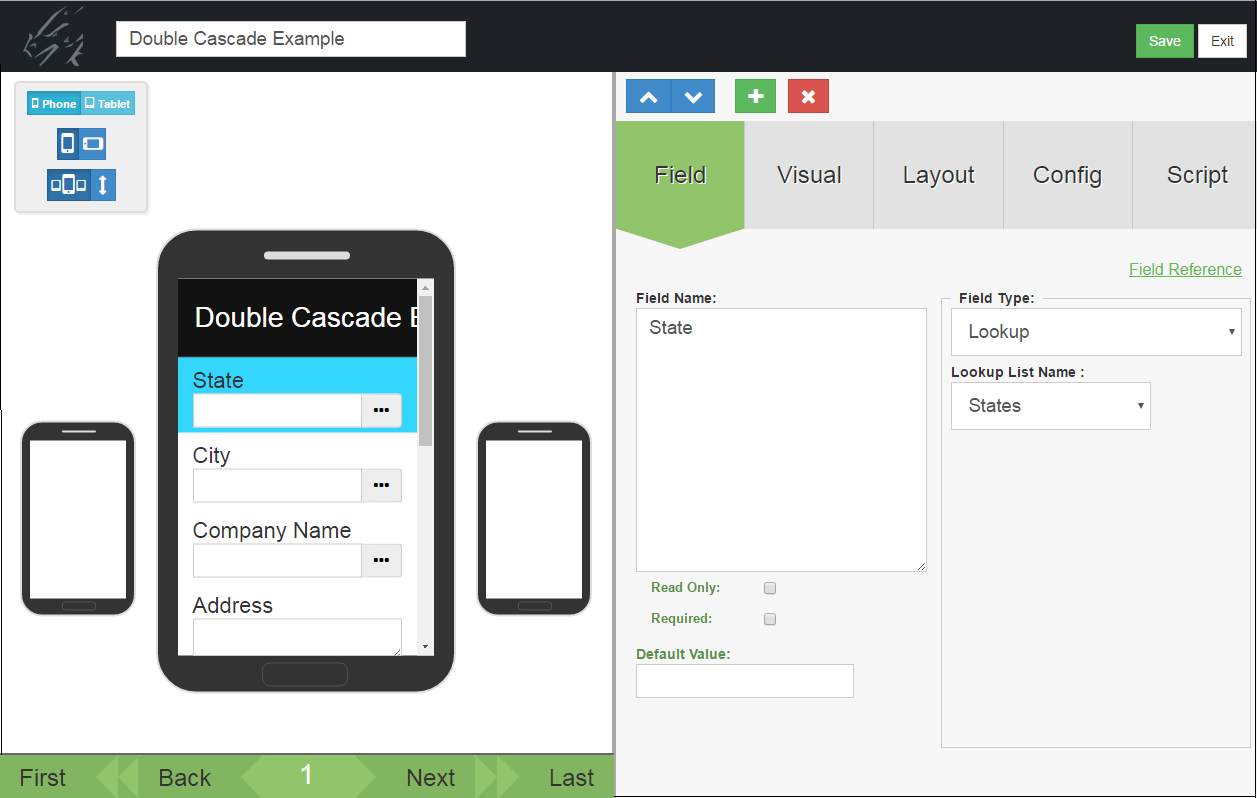
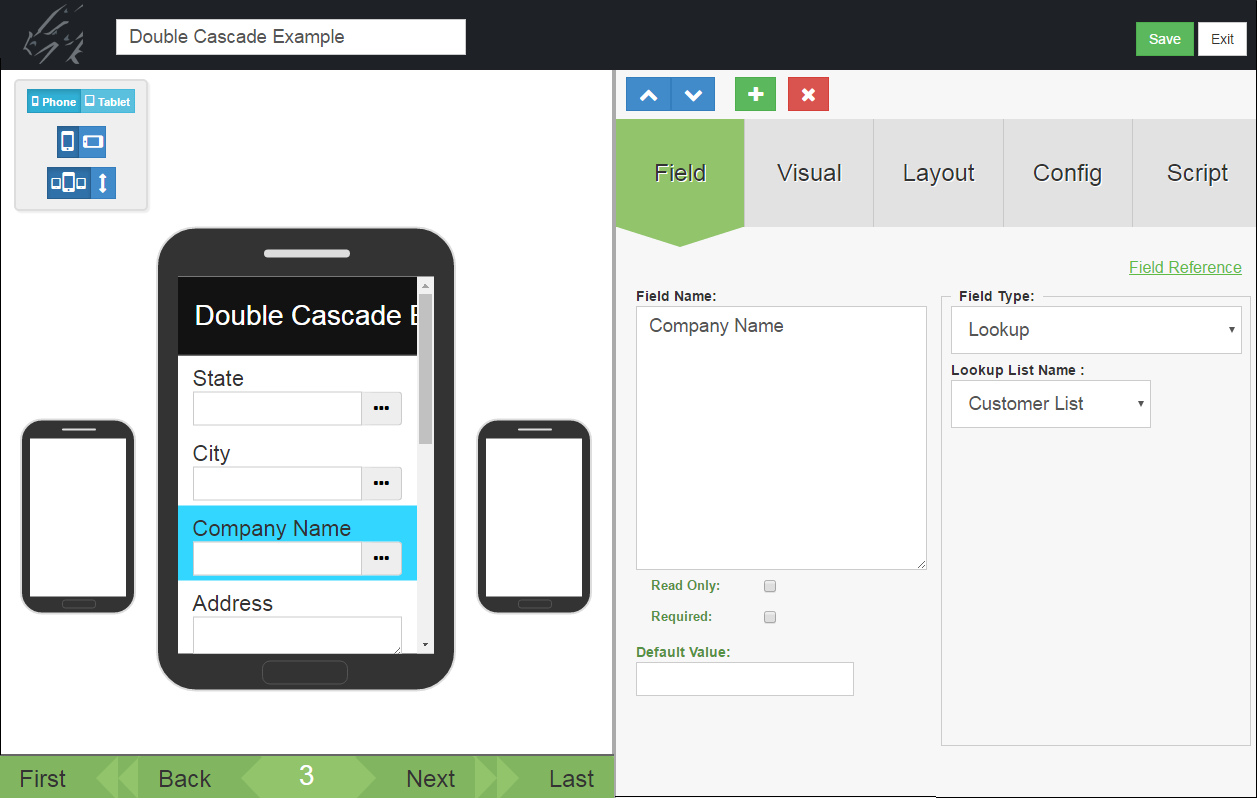
Now take a look at the form that is doing the Double Cascading Lookup. This form has the 3 fields needed to do the Double Cascading Lookup.
Field 1 is called State and is just a Lookup List field referencing a Lookup List called States with a list of states.
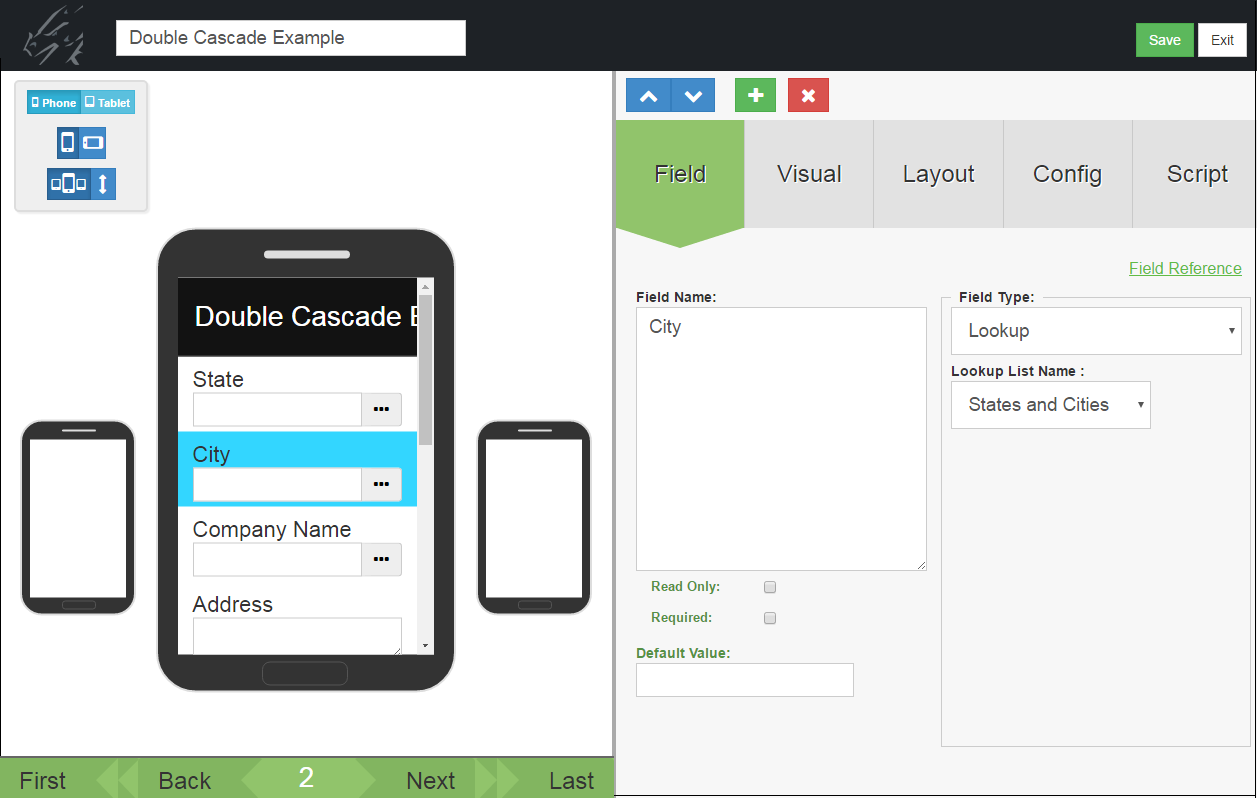
Field 2 is called City, and is a Lookup List field that instead of referencing a Lookup List, references the first Reference form which is called States and Cities.
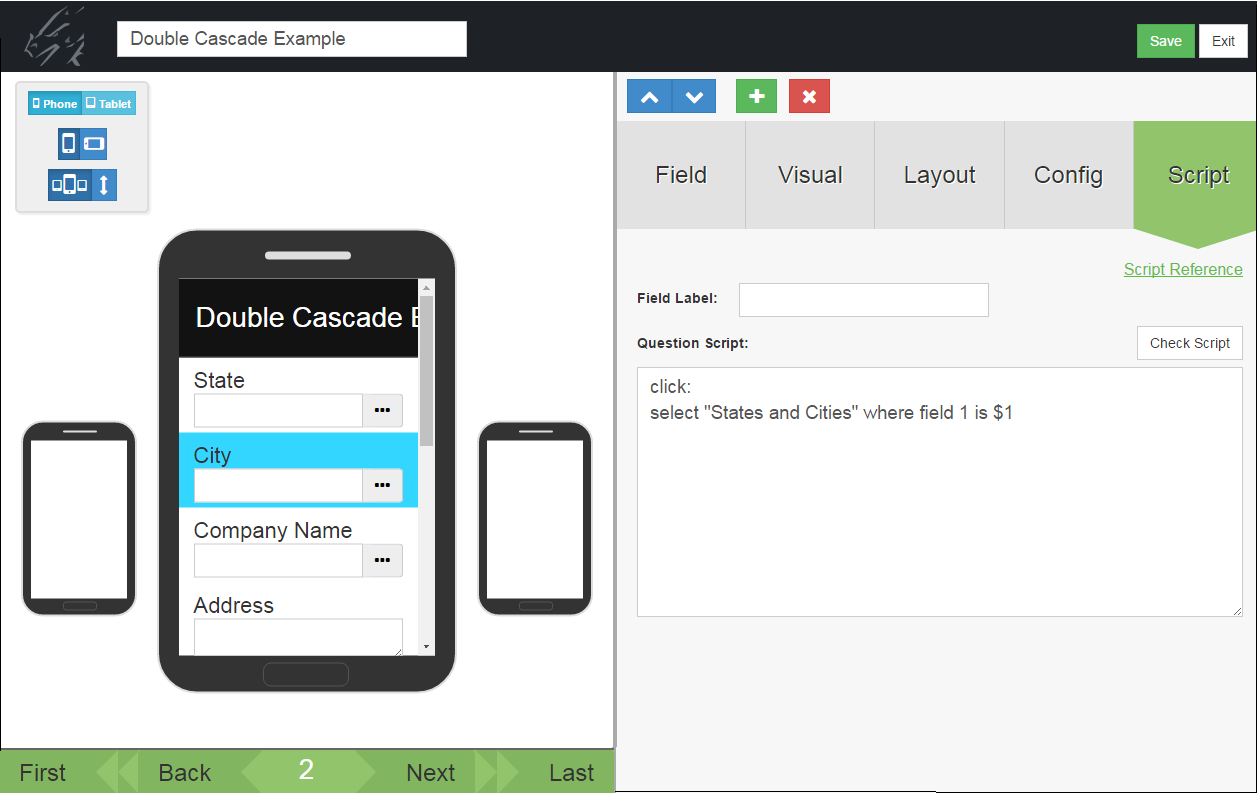
Still in Field 2, on the Script tab is the script that selects all the cities that match the state from field 1.
The script is:
click:
select “States and Cities” where field 1 is $1
This script selects all the records from the “States and Cities” form in which Field 1 of that form matches $1 which is Field 1 (State) of the current form.
Field 3 of the form doing the lookup is the field that does the Double Cascading Lookup. It is a Lookup List field that references the “Customer List” Reference Form. Next look at the Script tab of this field.
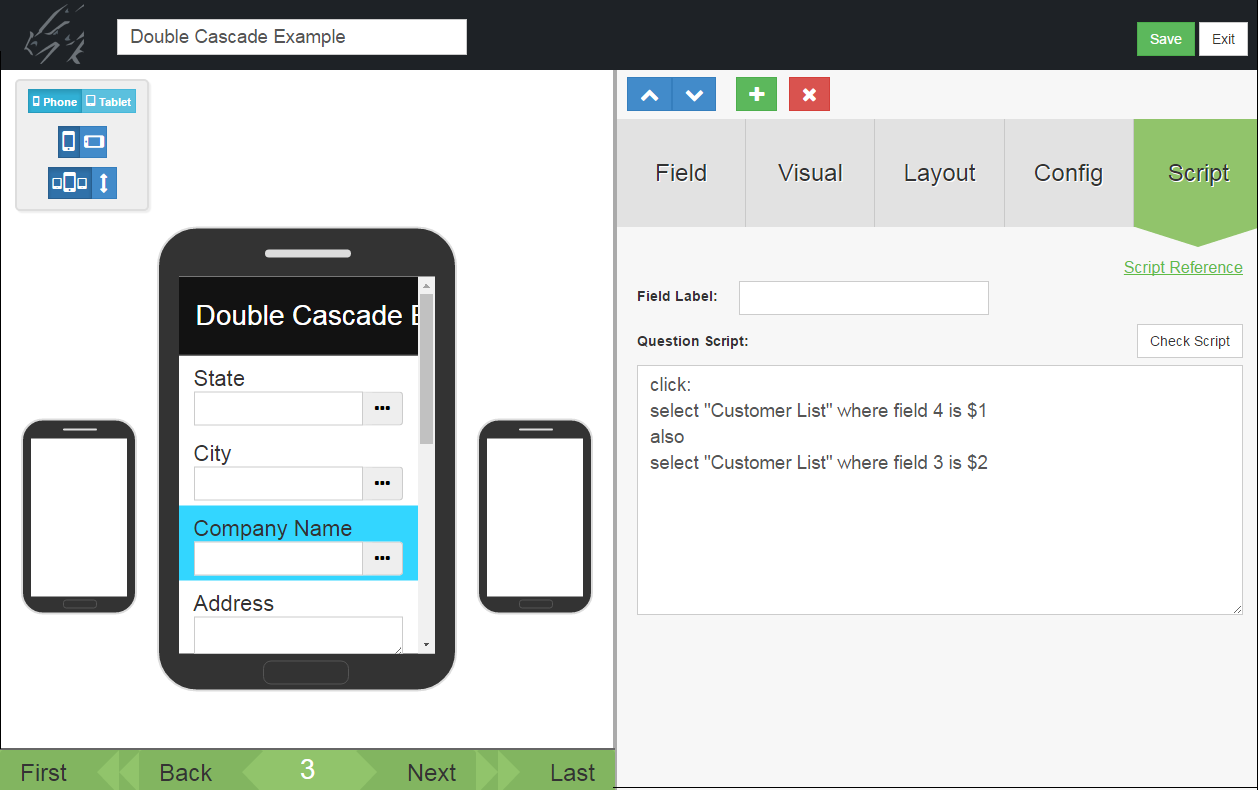
This is the script that performs the Double Cascading Lookup:
click:
select “Customer List” where field 4 is $1
click:
select “Customer List” where field 3 is $2
The click: event runs when the user taps in the Company Name field to make a selection.
The first select statement selects records from the “Customer List” form in which Field 4 of “Customer List” (the State field) matches the State in $1, Field 1 of the current form.
The also statement combines two select statements. The second select statement acts on the records already selected by the first select statement. The second select statement selects records from the “Customer List” form that, having matched on State, also match field 3 of “Customer List” (the City field) to $2 – Field 2 of the current form, i.e. the City field.
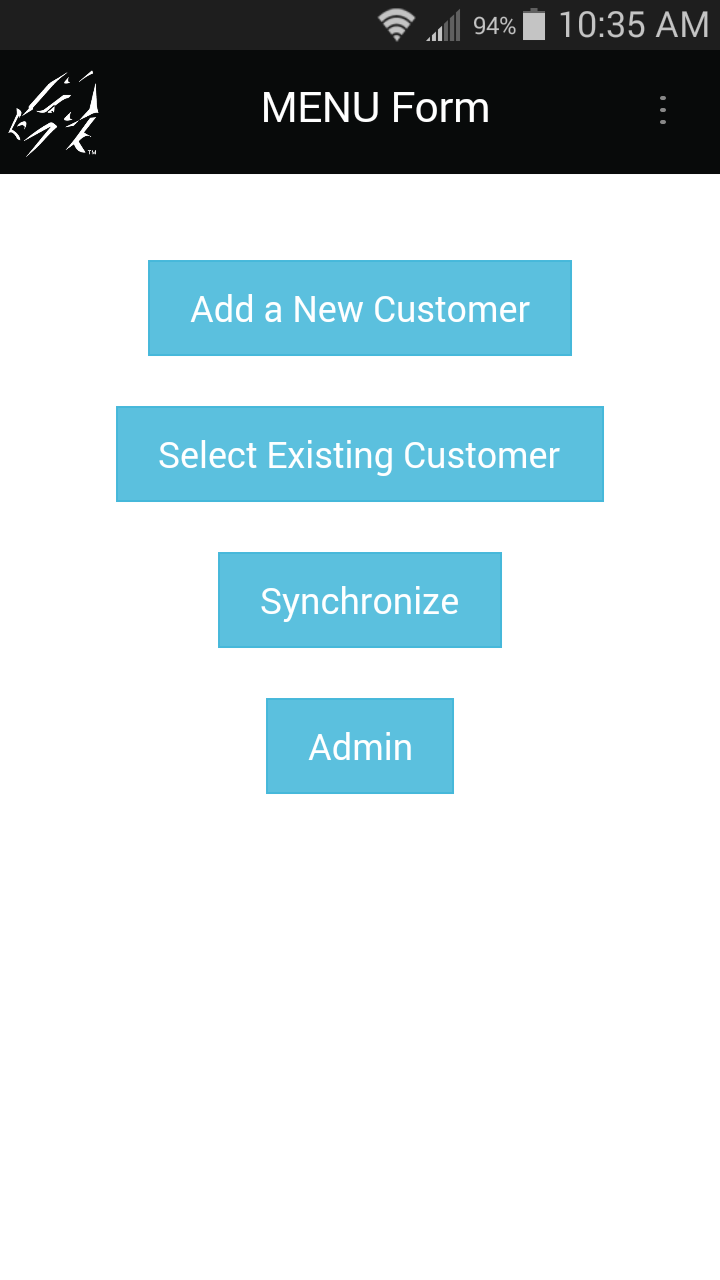
Custom Main Menu
A Custom Main Menu is a form that acts as a Main Menu and replaces the standard Pendragon Forms main menu screen that shows the list of form designs.

Features of a Custom Main Menu Form
A Custom Main Menu form is a Pendragon form with one special attribute:
- The name of the form must begin with the word MENU in uppercase.
Only one form on the mobile device can start with the word MENU in uppercase.
Typically, Custom Main Menu Forms feature Button fields or Section fields (typically with pictures) that are used to direct the user to different forms.
Creating Custom Menu Options
To start, create a new form whose name begins with the word MENU in uppercase letters.
For each option on the Custom Main Menu form, create a Section field or a Button field. You can add a picture to a Section field.
- Add a new record to a form.
- Review existing records for the form.
- Optionally, the ability to delete records from the mobile device.
- Synchronize the mobile device.
- In case of a problem with the Custom Main Menu form, include a way to access the standard Pendragon Forms main menu screen.
Each of these menu options is described on the pages that follow.

Creating a Menu Option for Adding Records
In the MENU Form shown below, a Button field called Add a New Customer is created. A click: event script in the Button field allows users to add a new customer record.
The gotosubform "formname" new statement jumps the user to the specified form, and creates a new record for that form.
The following script is in field 1 of the form shown below (the 'Add a New Customer' menu option):
click:
gotosubform "Customer Info" new
This means that when the user taps in the Add a Customer button, the script will go to the form named "Customer Info" and create a new record.
After creating the Custom Main Menu form, remember to create all the other forms that the Custom Main Menu form refers to in each script.
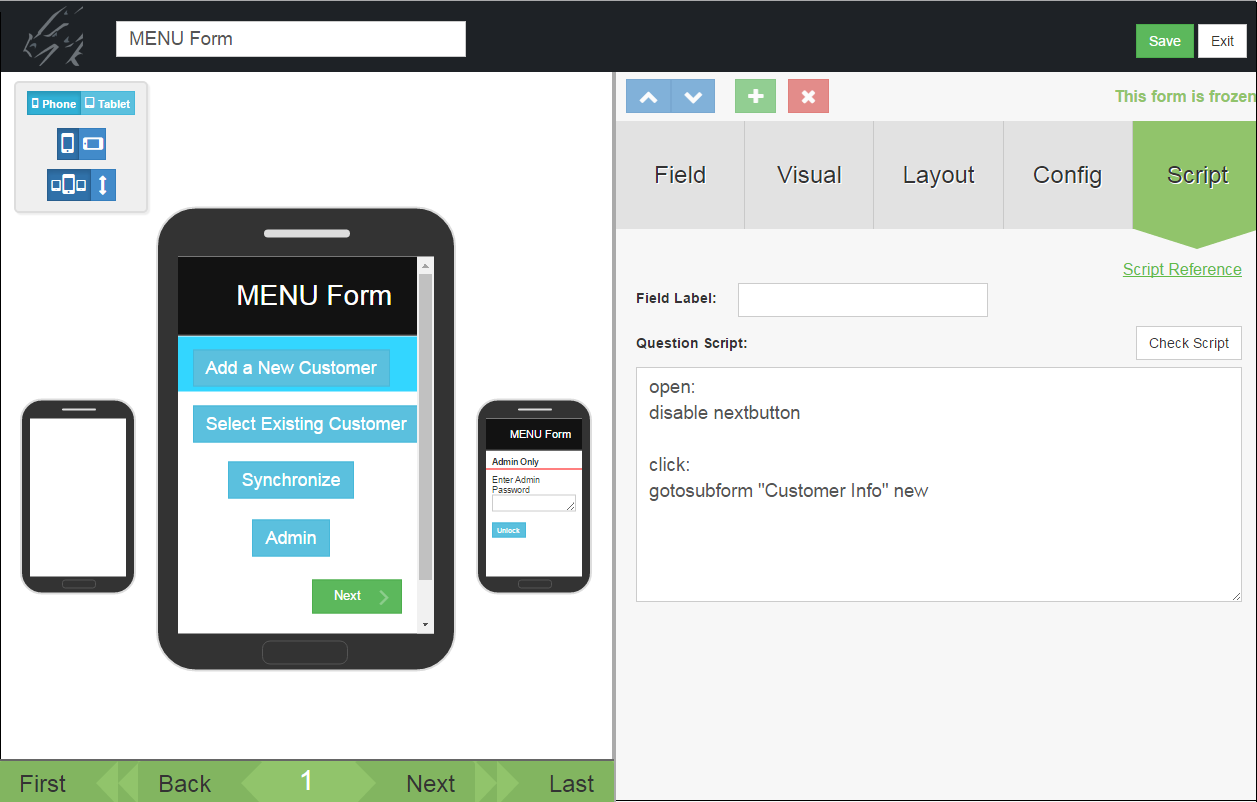
Tip: In this example, the contents of the MENU form that the mobile user needs to access all fit on one screen. In this case, you can hide the End, Previous, and Next buttons so that the MENU form looks like a single screen.
The End and Previous buttons can be hidden via the Advanced Form Properties screen. To hide the Next button, an open: event script is written in Field 1 of the MENU form. An open: event is used as it will run every time the mobile user opens the MENU form. The script is:
open:
disable nextbutton
Creating a Menu Option to Review Existing Records
To create a menu option for reviewing existing records of a form:
The select all "formname" statement selects all the records of the specified form.
The review "formname" statement lets the user review the selected records for the specified form.
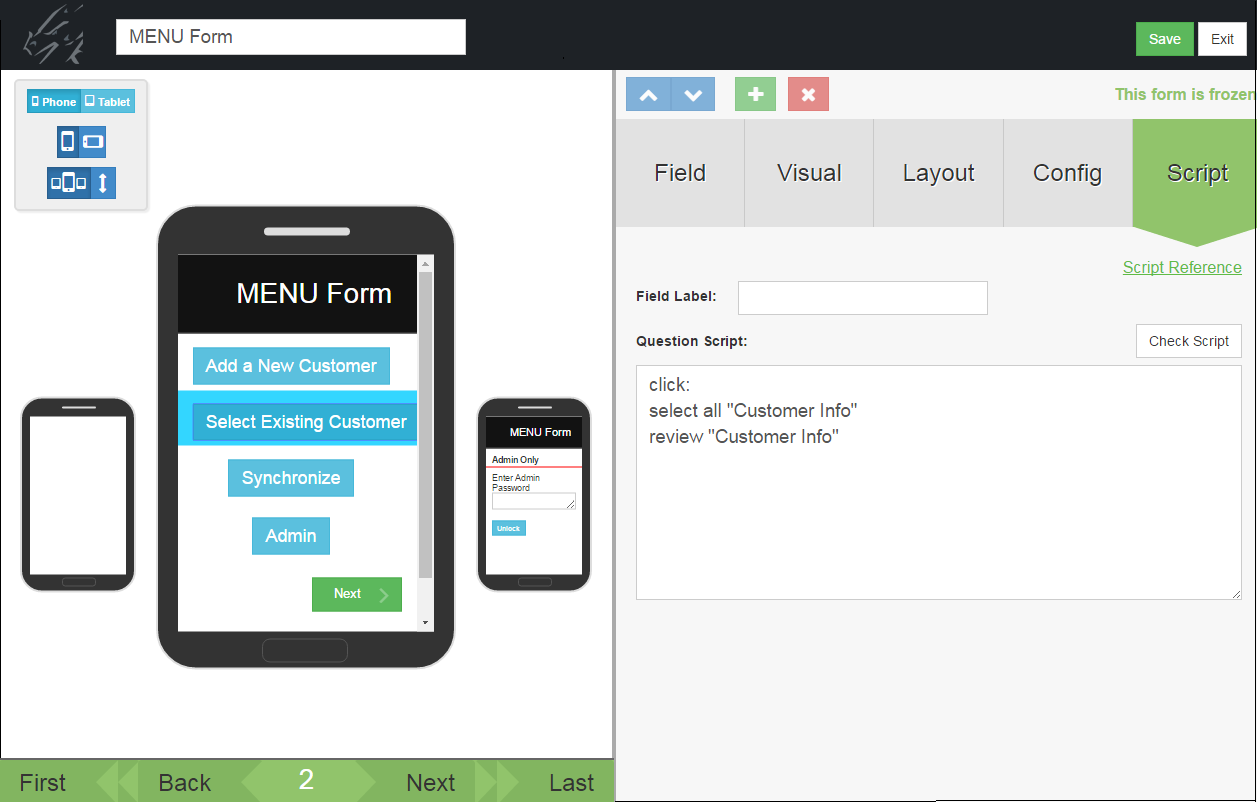
The following script is in Field 2 of the form shown below (the Select an Existing Customer menu option):
click:
select all "Customer Info"
review "Customer Info"
This means that when the user taps the Select an Existing Customer button, the script will select all the records in the form named "Customer Info" and display a Review screen. The user can tap on a record on the Review screen to go to that record.
Creating a Menu Option to Synchronize Pendragon Forms
If you are using a Custom Main Menu form, you will need to provide mobile users a way to synchronize their data.
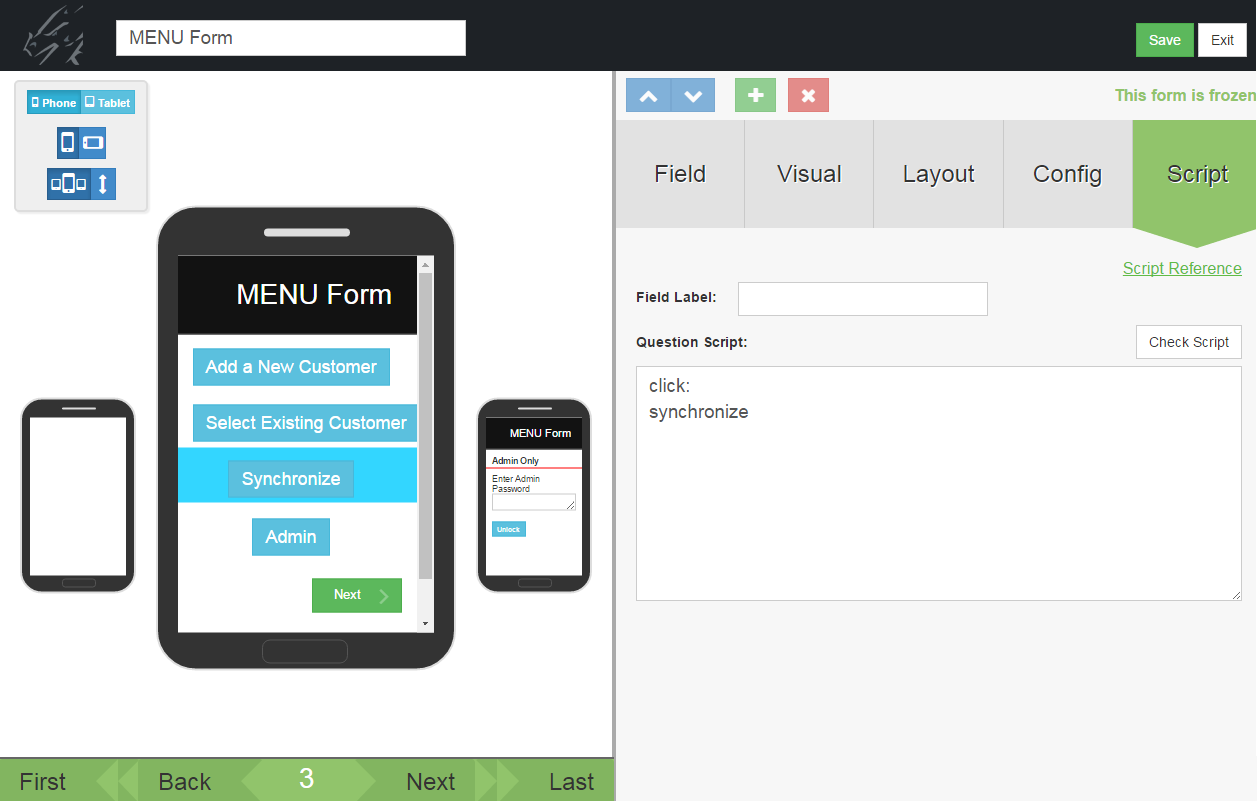
In the example below, a Button field called Synchronize is created to allow users to synchronize the mobile device.
The script in the Button field to start synchronization is:
click:
synchronize
Creating a way to access the Pendragon Forms main menu
With a Custom Main Menu form, the mobile user has no way to access the standard Pendragon Forms main menu screen that shows the list of forms.
It is strongly recommended that you add to your Custom Main Menu form a way to access the Pendragon Forms main menu. In the event that there is a problem on the mobile device, you can direct the user to revert to the Pendragon Forms main menu to troubleshoot things like verifying how many form designs are on the device, or verifying what the form ID numbers are.
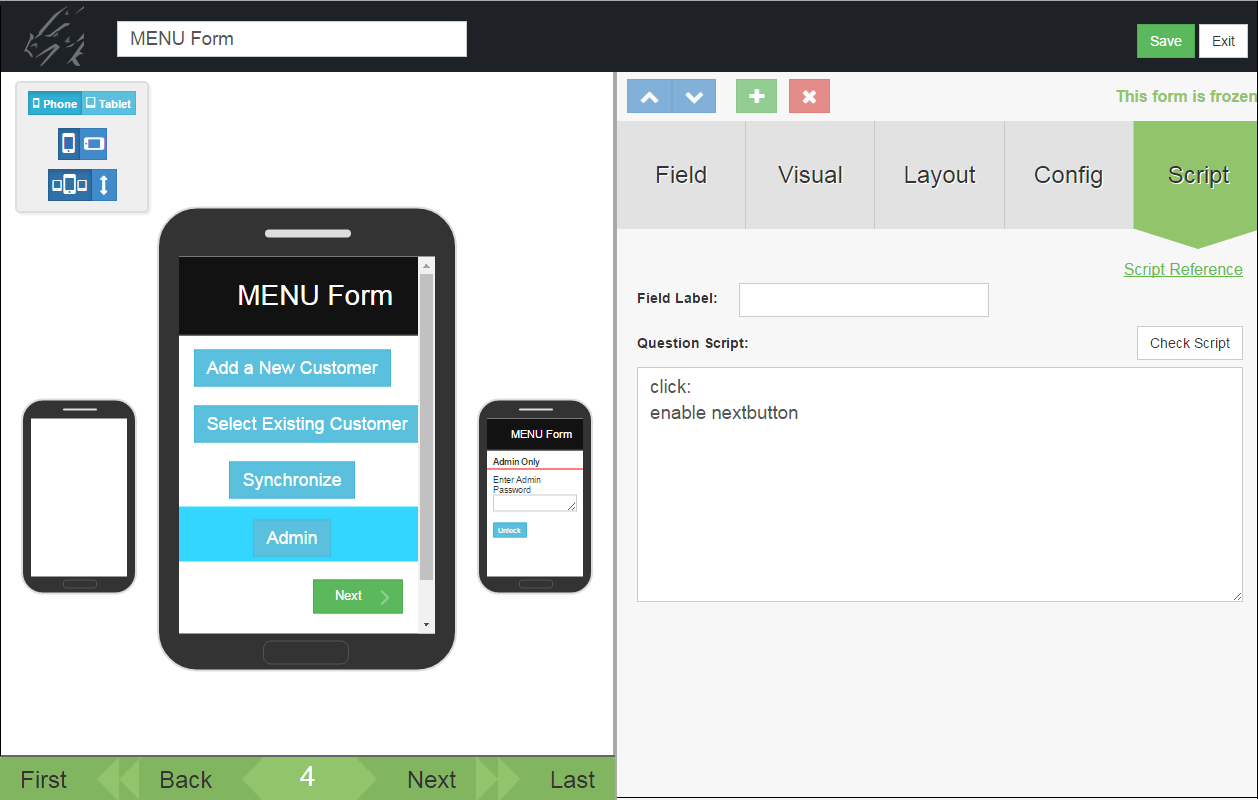
In the MENU Form example below, the End, Previous and Next buttons have been hidden from the user to make the MENU form appear to occupy a single screen. However, to access the Pendragon Forms main menu, the Next button first needs to be made visible so that the user can go to the second screen. A Button field named Admin is added to the form, and when the mobile user taps the Admin button, the Next button at the bottom of the screen is displayed. The script in the Admin button is:
click:
enable nextbutton
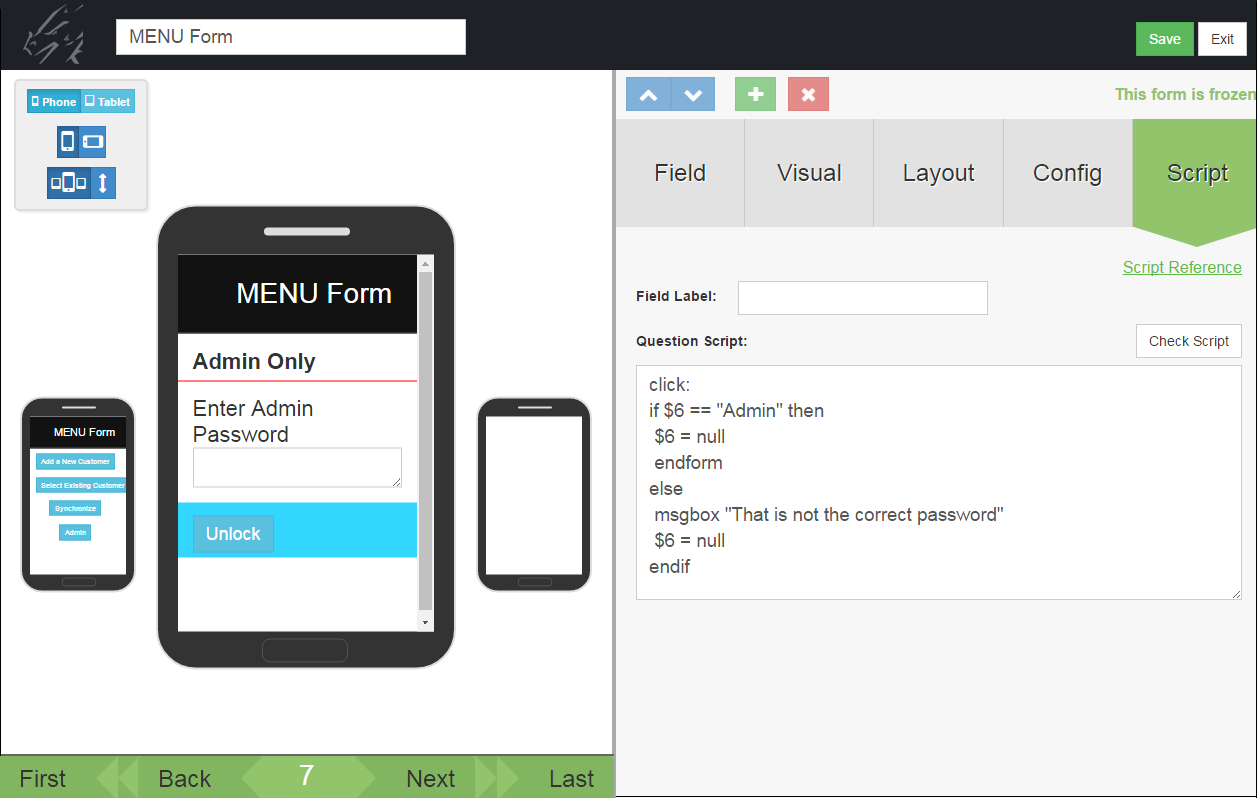
On the second screen of the MENU Form, a Text field is used to store a password, and a Button field is used to validate the password.
In the form shown below, the script in Field 7, the Button field, is as follows:
click:
if $6 == "Admin" then
$6 = null
endform
else
msgbox "That is not the correct password."
$6 = null
endif
If Field 6 (the password field) is equal to the phrase "Admin", the field is set to null to erase the password, and the endform statement ends the current form, which is the Custom Main Menu form. The user reverts to the standard Pendragon Forms main menu. If the password is not correct, a message is displayed.
If you have set up an administrative password to access the standard Pendragon Forms Main Menu, then entering the password and tapping the button to unlock the Custom Main Menu form will end the Custom Main Menu form and revert to the standard Pendragon Forms Main Menu that shows the list of forms on the mobile device.
Creating One Menu Option for Adding and Reviewing Records
Button fields and subforms can be used to create a custom menu option that allows the mobile user to jump to a form and then once in that form, have the choice of reviewing existing records or creating new records.
As always with Custom Main Menu forms, the form name must start with the word MENU in uppercase letters.
If a subform is being used, then the Custom Main Menu form will act as the parent form, and the rules governing parent forms and subforms will apply. In particular:
- In order to link the parent form to the subform, the two forms must have at least one field in common - (that is, the same field name and field type) - within the first 10 fields of the form. The common field can be hidden on both parent and subform.
- The linking field must be filled in on the parent form in order to automatically copy down to the subform. One way to achieve this is to set a Default Value in the field on the parent form.
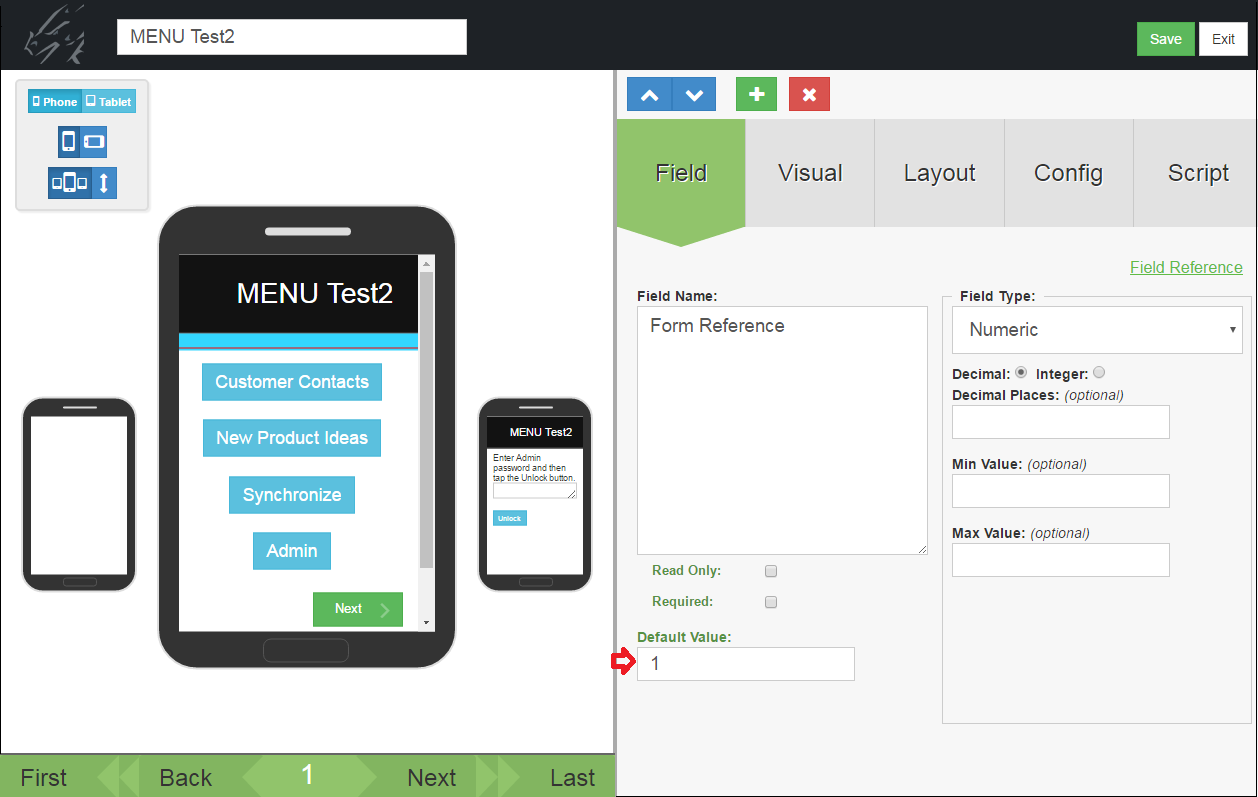
In the picture below, Field 1, called Form Reference, is going to be used as the linking field between parent and subform. The field is a Numeric field that is made hidden, and a value is pre-populated by setting a Default Value of 1.
A Button field is added to the custom menu form to allow the mobile user to jump to each subform.
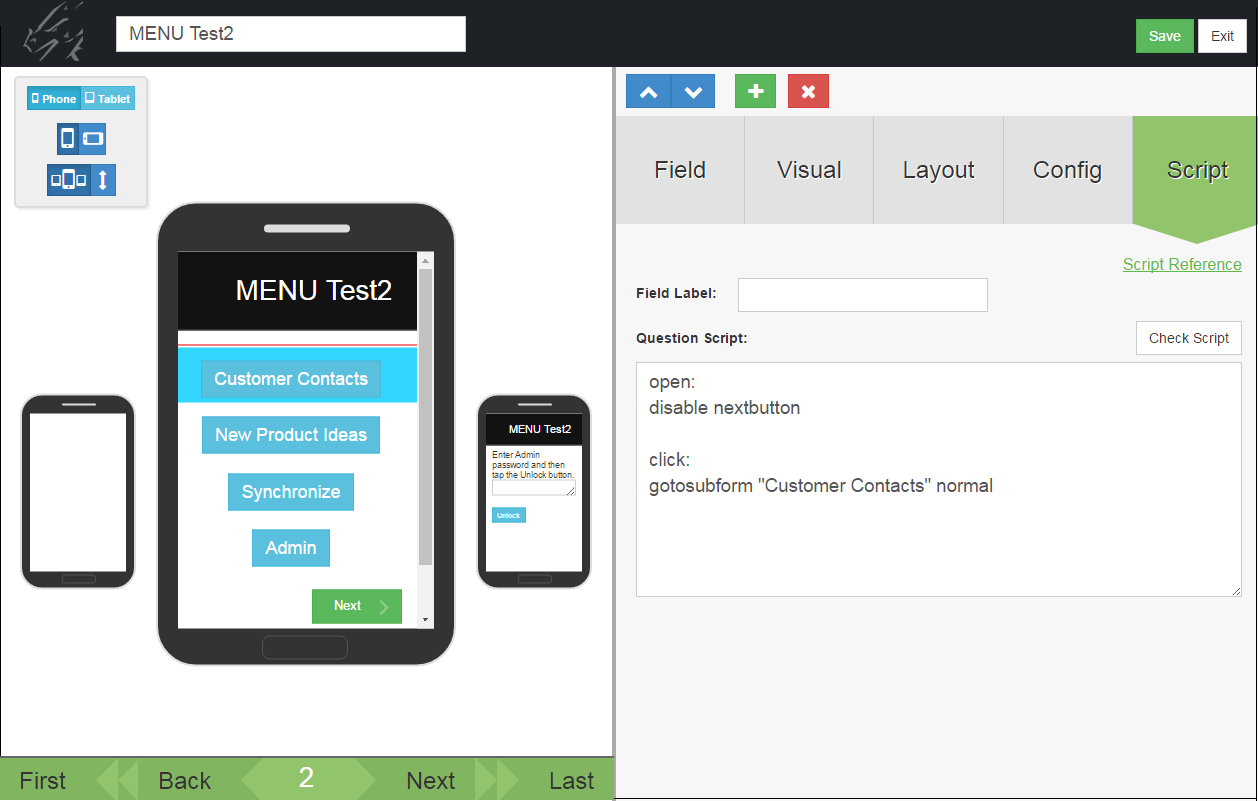
The scripting statement gotosubform "formname" normal jumps the user to the specified subform.
In the picture below, the script in Field 2 is:
click:
gotosubform "Customer Contacts" normal
This script takes the user to a subform called Customer Contacts.
Notes on the Custom Main Menu form:
If all the buttons that the mobile user needs can fit on one screen, then:
- The End button and the Previous button can be hidden by setting the appropriate Advanced Form Properties for the form.
- If the mobile user only needs to see the first screen of the Custom Main Menu form, you can use a script to hide the Next button as well. The open: script in Field 1 is:
open:
disable nextbutton
If you needed to show the Next button on some screens and not on others, you could instead use enterscreen: events to disable nextbutton or to enable nextbutton.
On the subforms that you create for the Custom Main Menu form, you must add at least one field that the subform has in common with the parent form. The linking field must have the same field name and field type as on the parent form, and must occur within the first 10 fields of the subform.
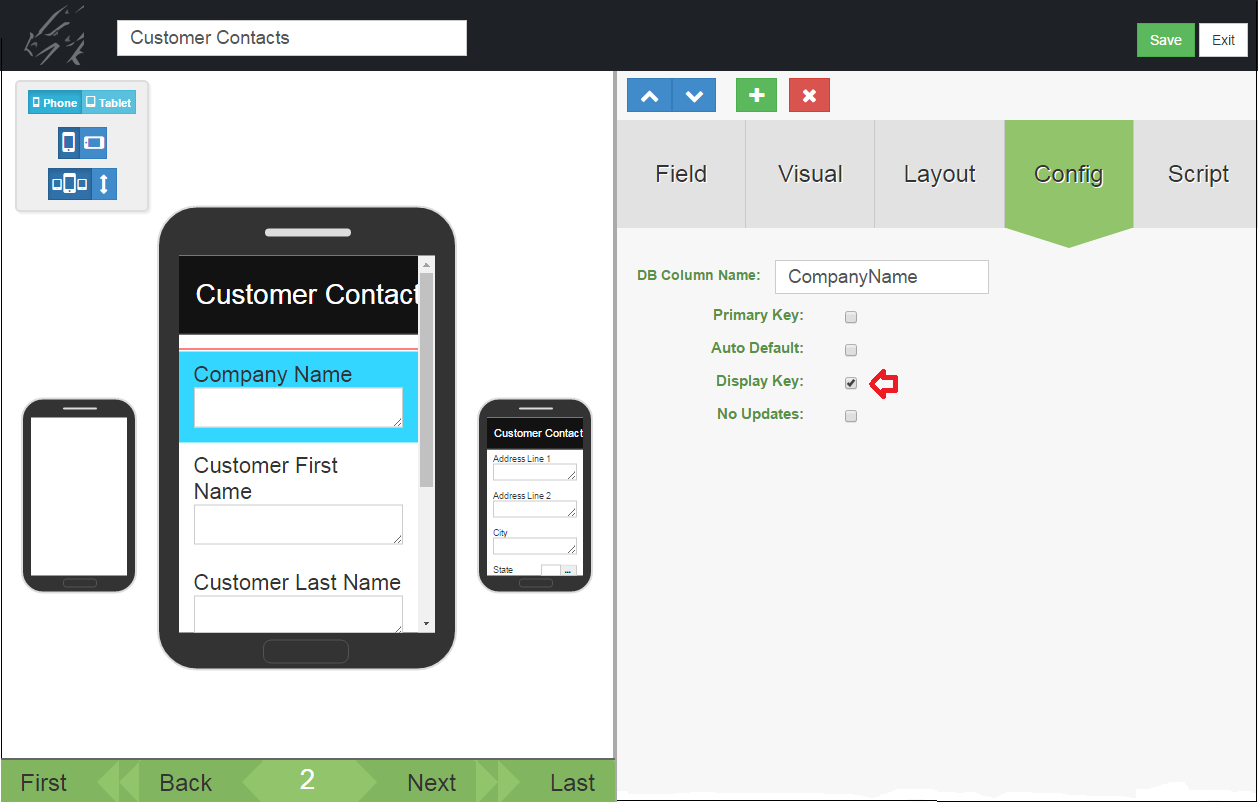
In the Subform A picture below, the field that is used to link with the parent form is Field 1, called Form Reference, which is made hidden. Field 1 of a form is typically used for displaying records when reviewing a form, but since Field 1 is hidden in this case, a different field on the form is set as the Display key field. In this instance, Field 2, Company Name is set as the Display key field.
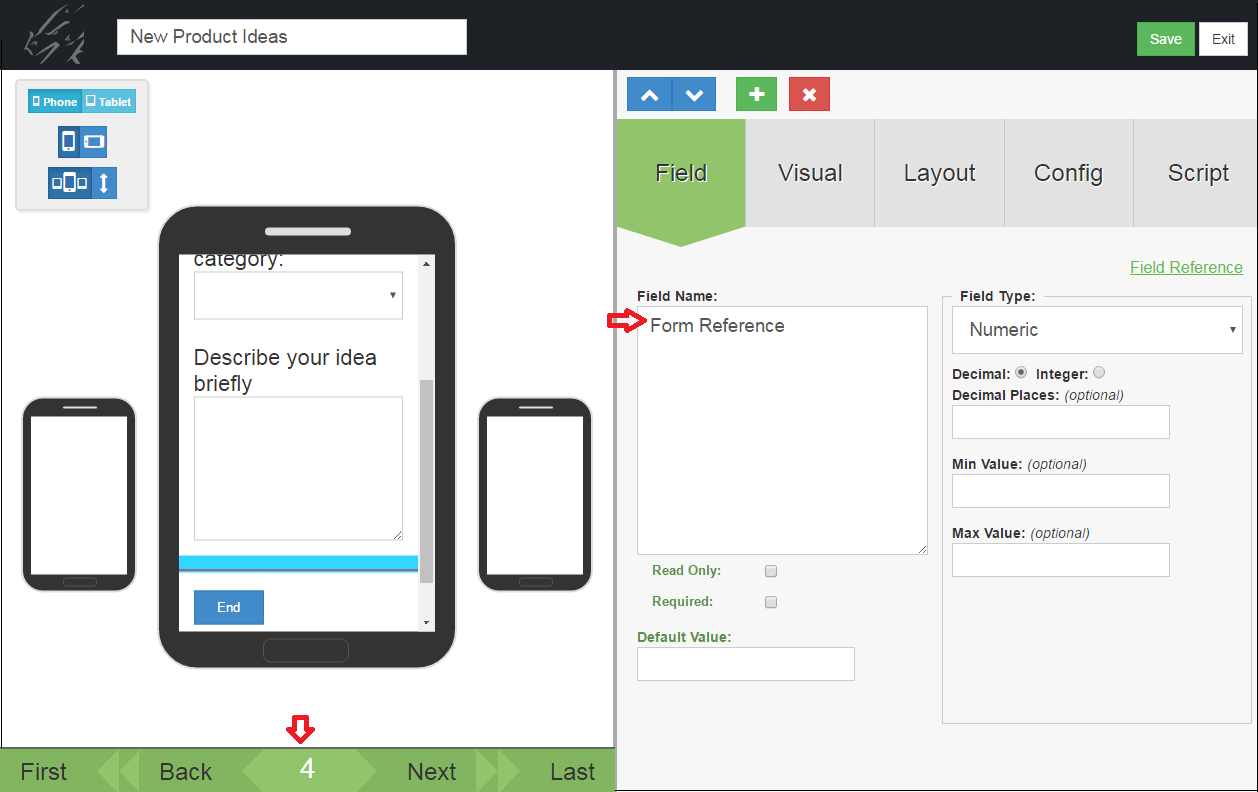
In the Subform B picture below, the linking field between parent and subform is not the first field on the subform.
On the mobile device, the user can tap a button to jump to the subform of their choice. The user can tap the New button to add a new record or tap on an existing record to review that record. Tapping the End button on the subform returns the user to the subform review screen, and tapping Done on the review screen returns the user to the Custom Main Menu form.
Using a Custom Main Menu form to Filter Records
If records of a form are pre-loaded onto the mobile device, a Custom Main Menu form can be set up as a way to filter the records. That is, the Custom Main Menu form acts as a place to enter selection criteria.
The review statement preserves any select statement filters that have been set by a script. The also statement is used to combine select statements.
In the form below, Field 1 stores a Zip code, and Field 2 stores a Maximum Price that a potential customer wants to pay for a house. Field 3 is a Button field with a click: event that lets the user view records based on the criteria set up in Fields 1 and 2. The script in Field 3 is:
click:
select "House Listing 1" where field 2 is $1
also
select "House Listing 1" where field 3 < $2
result = result & “Matches”
msgbox result
review "House Listing 1"
In this script, "House Listing 1" is the name of a form that contains one record per house on sale. Field 2 of "House Listing 1" is a Zip code, and Field 3 is the Asking Price of the seller.
The first select statement in the script selects all records in "House Listing 1" that match the zip code entered on the Custom Main Menu form. The also statement saves the currently selected records, and applies the next select statement on top of the existing selected records.
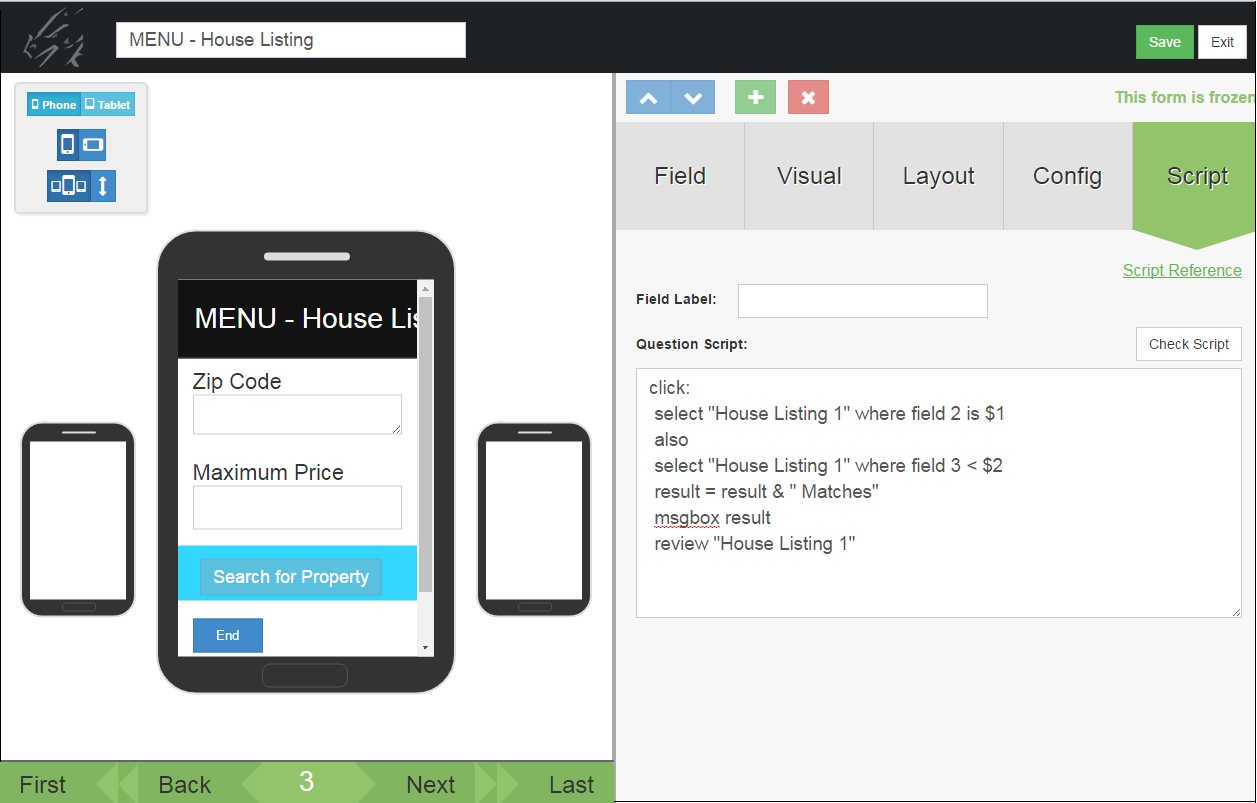
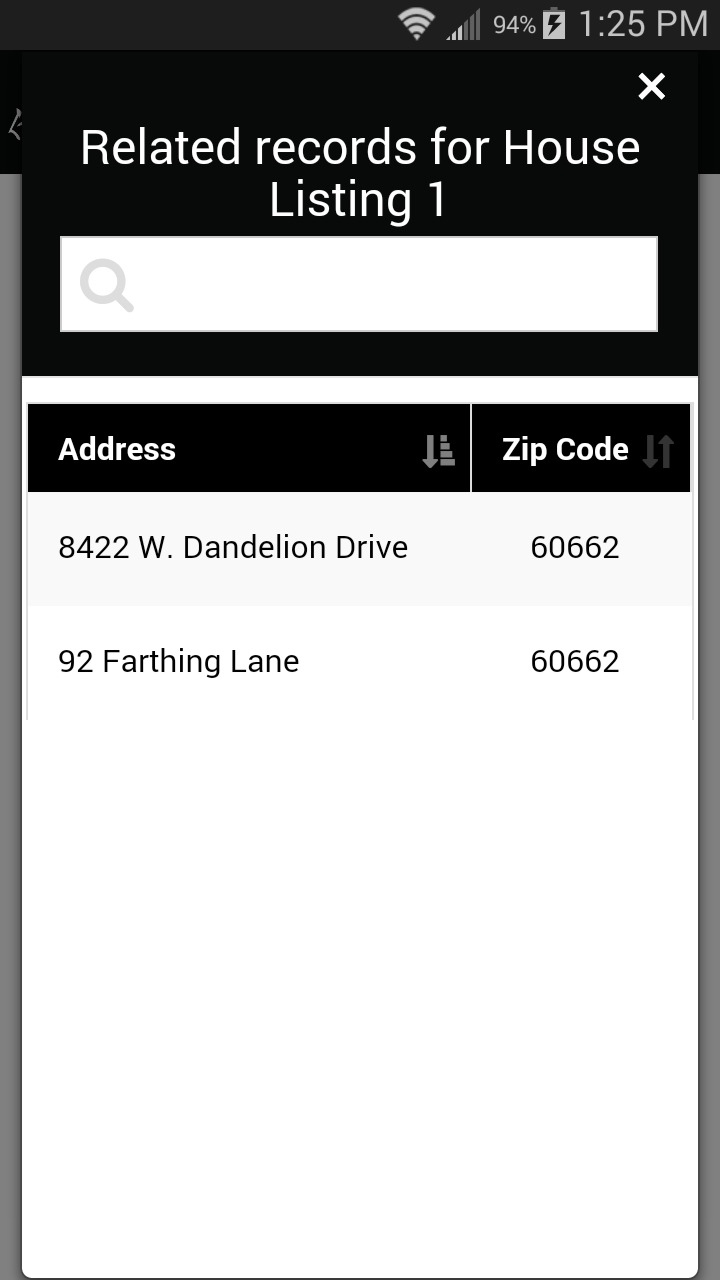
The review statement then displays the selected records, that is, all records within a certain Zip code and where the seller's asking price is less than the buyer's maximum price.
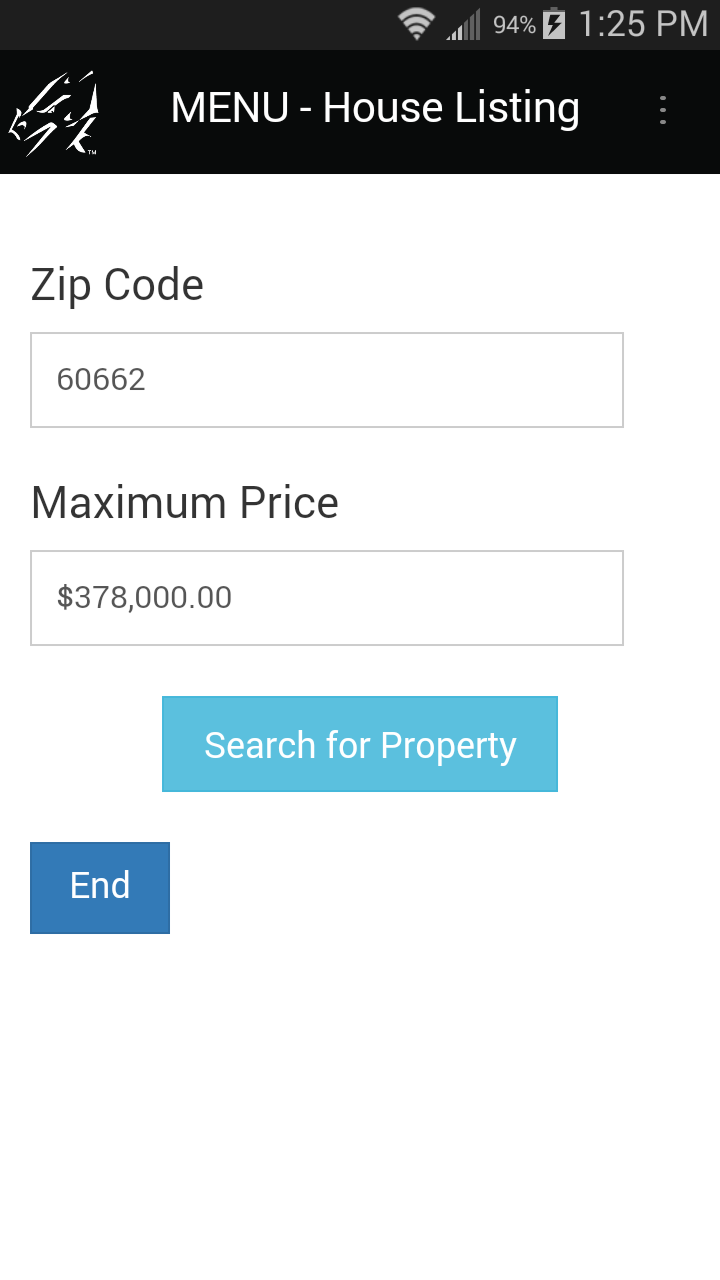
On the mobile device, when the user enters a Zip code and a maximum buyer's price and then taps the Section field to perform a search, a list of available houses that meet the criteria are displayed. The user can tap on a record to select it and view details.
Advanced Form Properties to Set on the Custom Main Menu
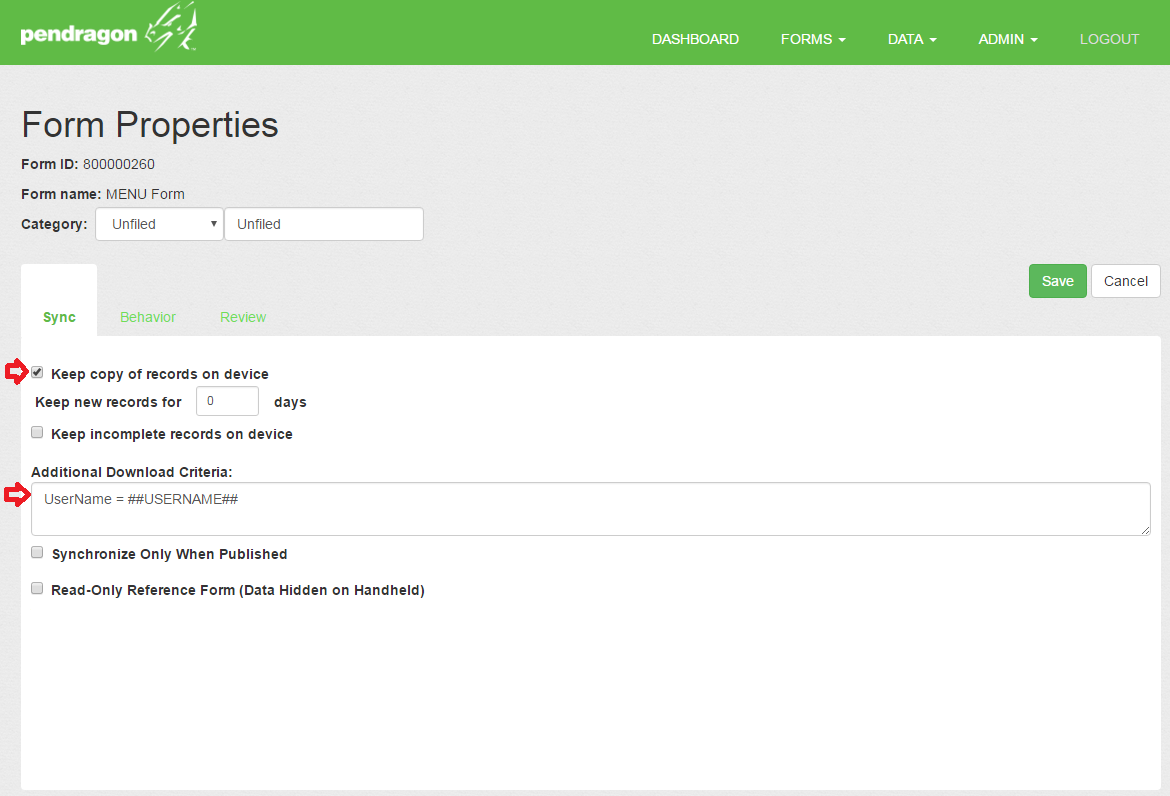
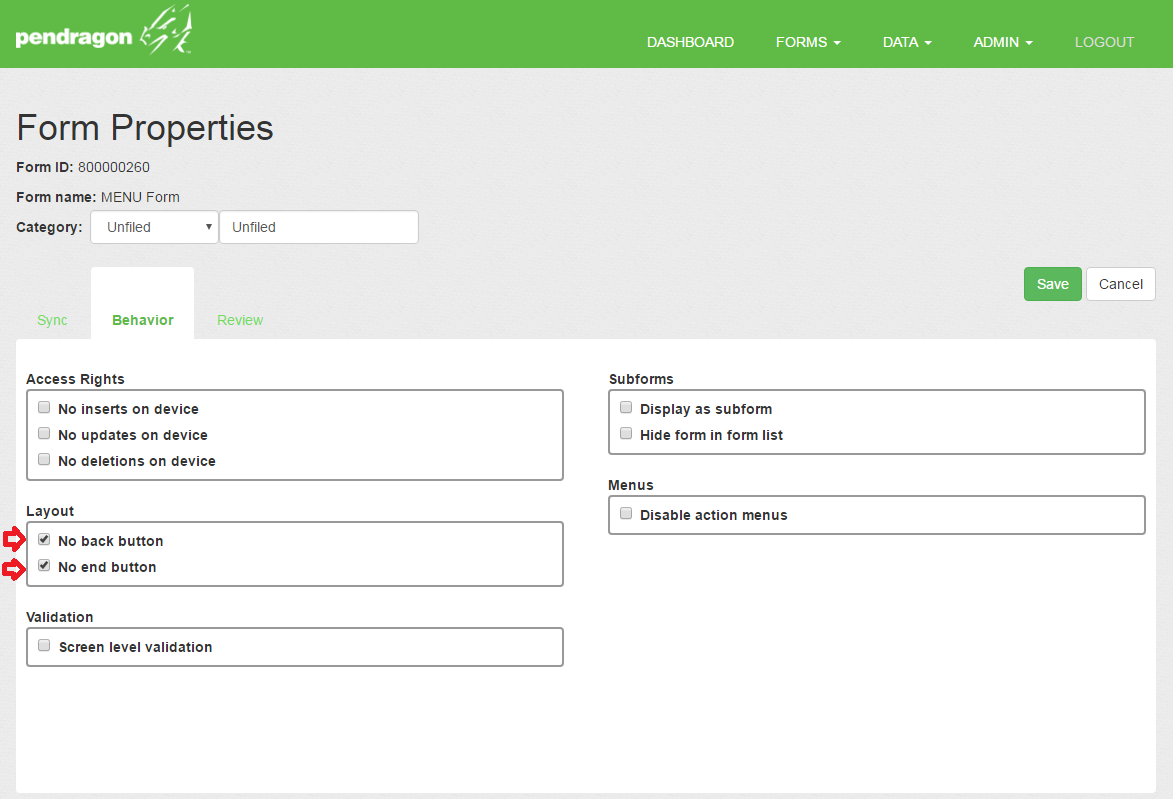
On the Sync tab, check the box to Keep a Copy of Records on Device. This causes there to be one record per user. Also keep the Additional Download Criteria of Username = ##USERNAME## so that the user’s MENU form record is sent to the mobile device.
If your MENU form is only 1 screen in size, then on the Behavior tab of the Forms Properties screen, you can check the boxes to hide the End button and the Back (Previous) button.
Muiltiple Forms Integration
Depending on the application that you are trying to build, you may need more than one form on the handheld to implement your solution. Pendragon Forms supports the following:
Parent and Subform
A parent form and a subform (or child form) are used if you need to be able to create many child records for every parent record. Visiting the same customer or patient more than once, or taking several readings from the same piece of equipment may require you to create a parent form for the information that stays constant (e.g. the customer’s name or the equipment serial number), and create a subform for the information that changes (e.g. the details of a customer visit, or the equipment reading on a particular day).
Lookup to Another Form
If you want to maintain a reference list, such as inventory item numbers and prices, or employee names and addresses, and you want to select from the list and copy the data into a form, then you need to maintain two forms and do a Lookup to Another Form.
Example: Taking Orders on the Handheld
Creating an application to allow mobile users to take customer orders is an example that requires multiple forms.
To start, you will need a form for taking orders. However, since you cannot predict whether a given order will be for one item or for several items, you may want to split the order-taking form into two: a parent form for the customer information, and a subform for the line items being ordered. A new subform record is created for each item being ordered.
If you have a list of customers, you may want the user to pick from a list to select a customer. To achieve this, you can use a lookup to a customer form from the order-taking parent form.If you have a list of items for sale, you may want the mobile user to pick from the list to select an item being ordered. To achieve this, you can do a lookup from the subform to the list of items form.
The forms needed for this application and their relationship to each other is shown in the diagram below.
|
V
Form for Taking Orders
| | |
V V V
Items Being Ordered
|
V
List of Items Being Sold
To perform a lookup from the parent form to the reference form:
- Fields that you want to copy from the reference form must have the same field name and same field type as on the parent form. The only exception is that a Text field on the reference form can copy into a Lookup List field on the parent form - but not more than 50 characters.
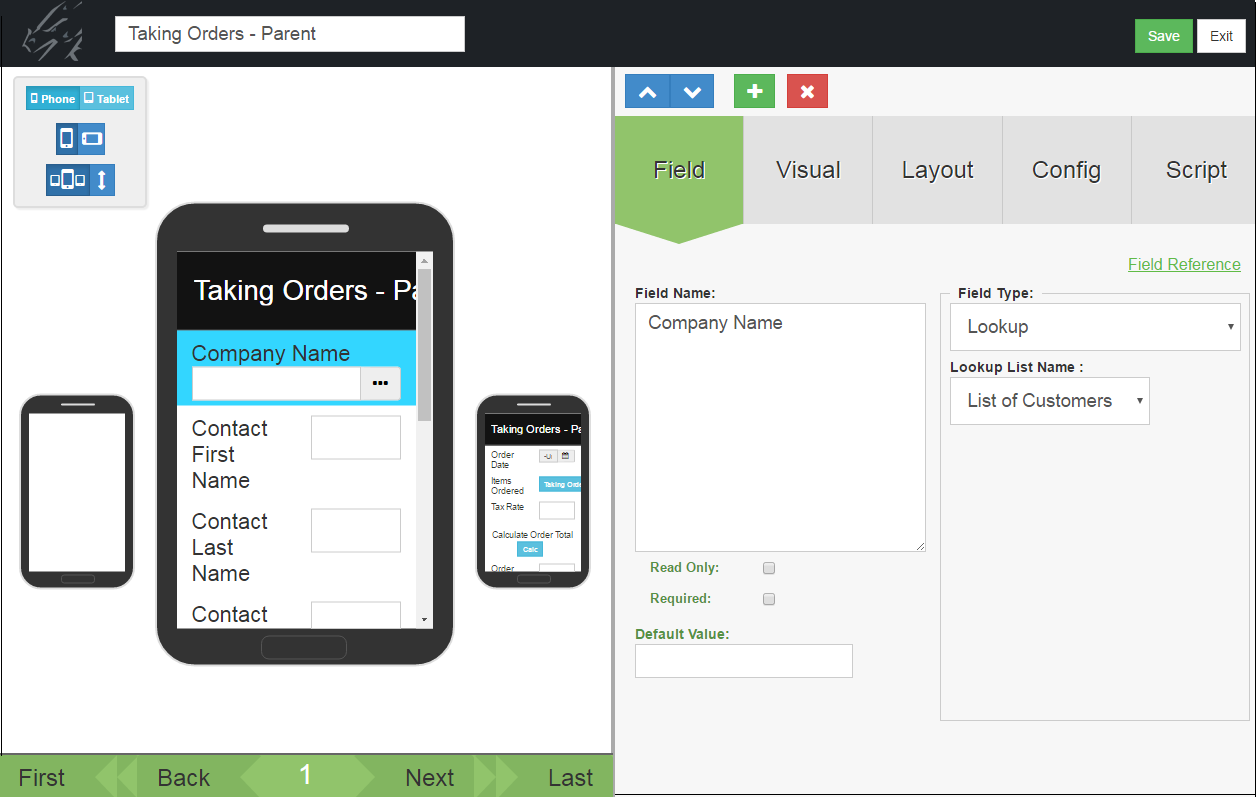
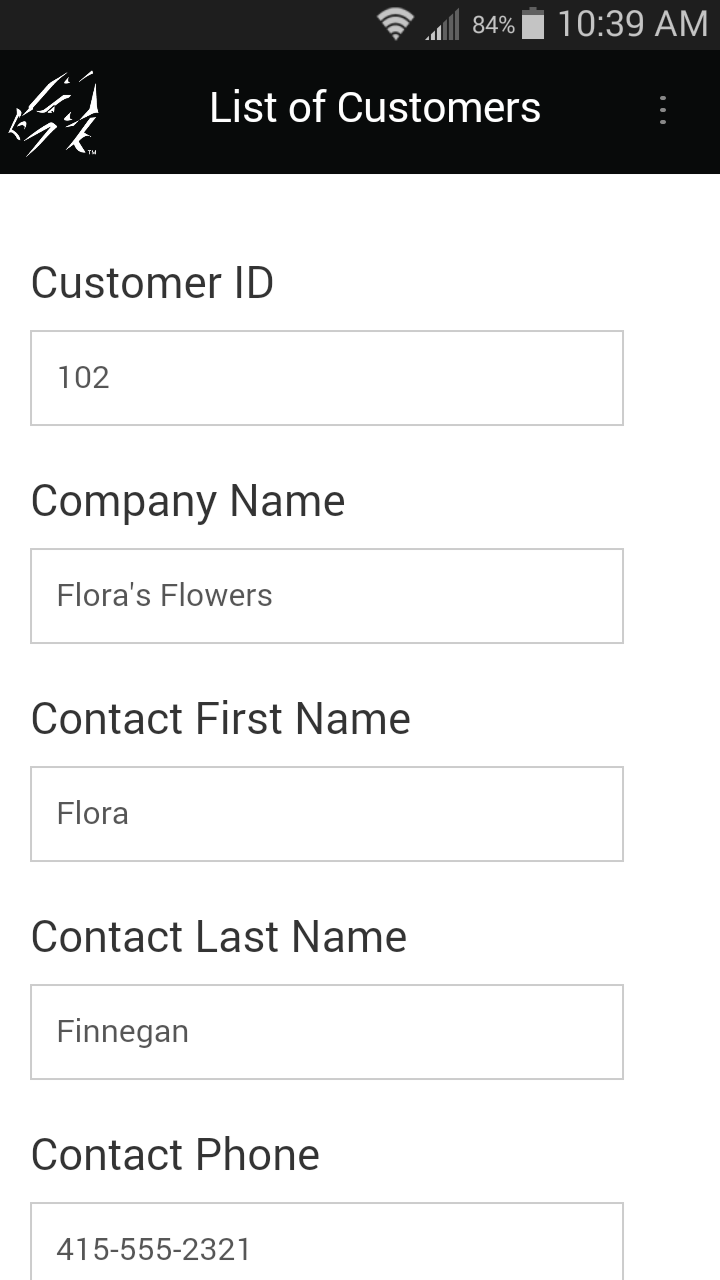
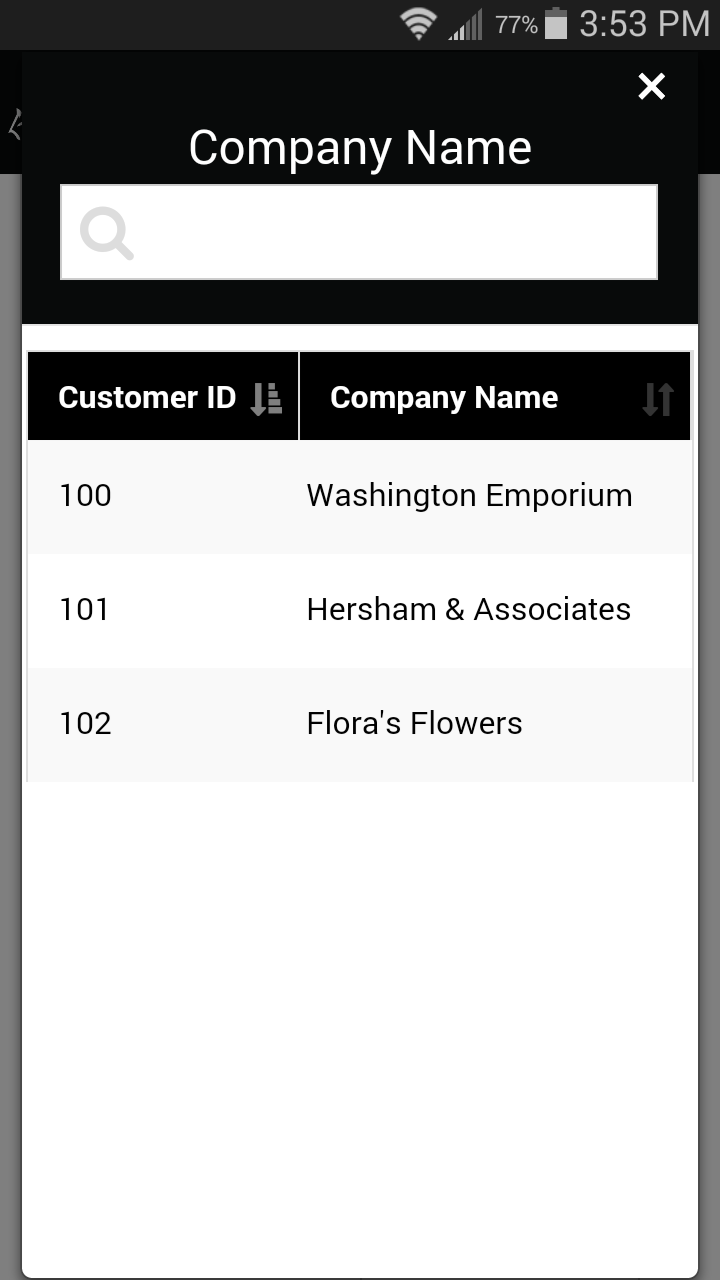
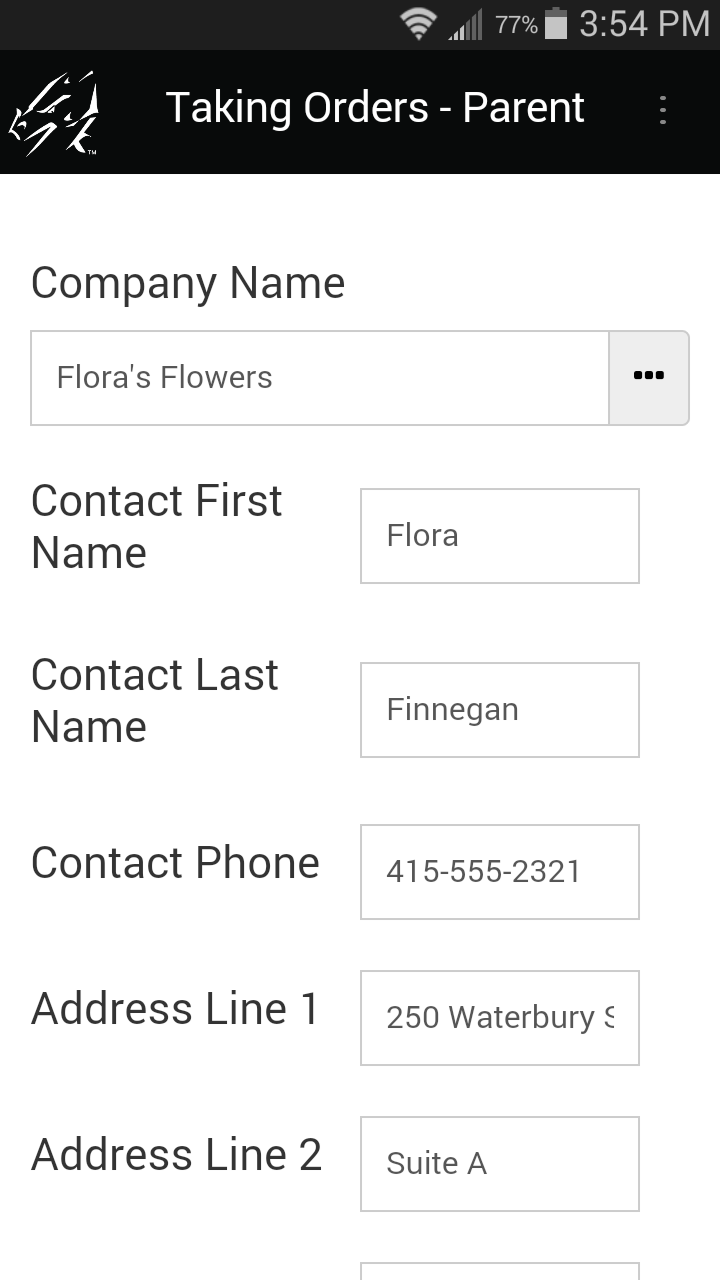
- To display the list of records in the reference form, one field on the parent form must be a Lookup List field. Instead of referencing a Lookup List, reference the name of the reference form. In the example below, the Company Name field on the parent form is a Lookup List field that references the name of the reference form, which in this case is called List of Customers.
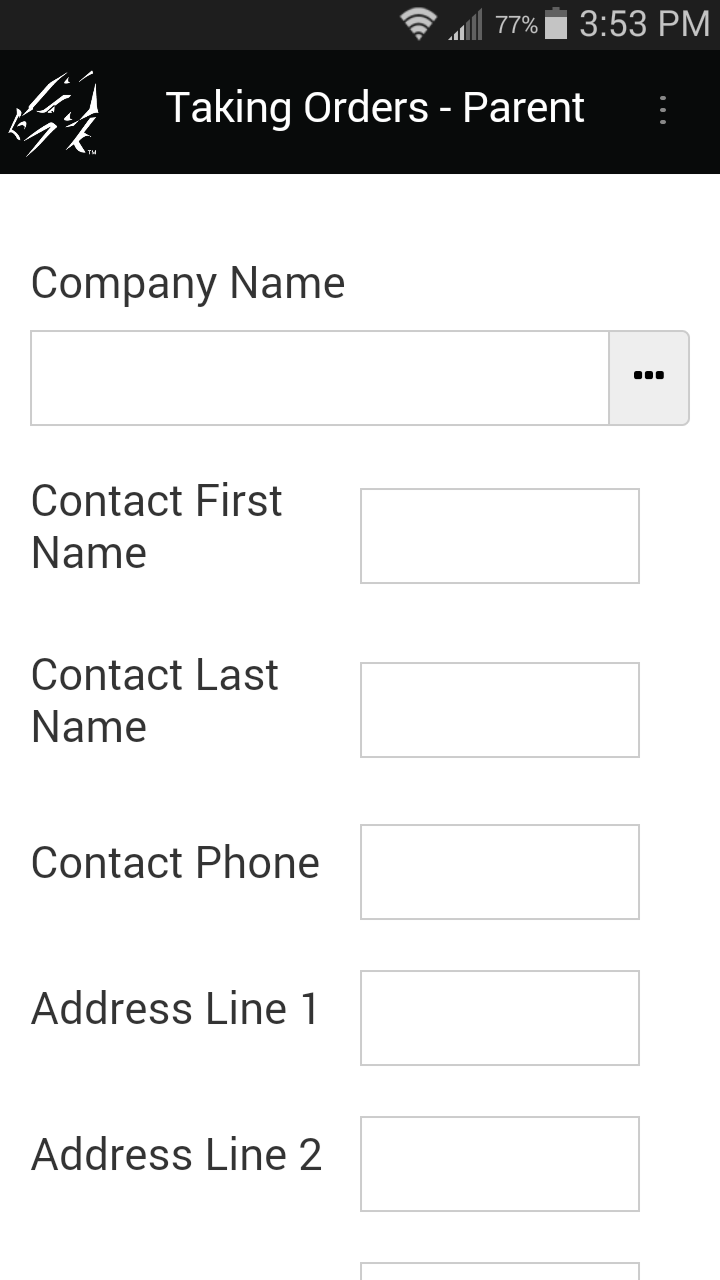
Once a customer has been selected from the reference form and copied into the order-taking parent form, a subform is used to select each item being ordered.
To create a parent and subform relationship between two form designs:
- One or more fields within the first 10 fields have to match in field name and field type on both the parent form and the subform. These fields will copy from parent to subform when a new subform record is created. Never change the values of the matching fields on the subform, or you will lose the link to the parent form.
- To jump from the parent form to the subform, the parent form must have a Subform List field that references the name of the subform.
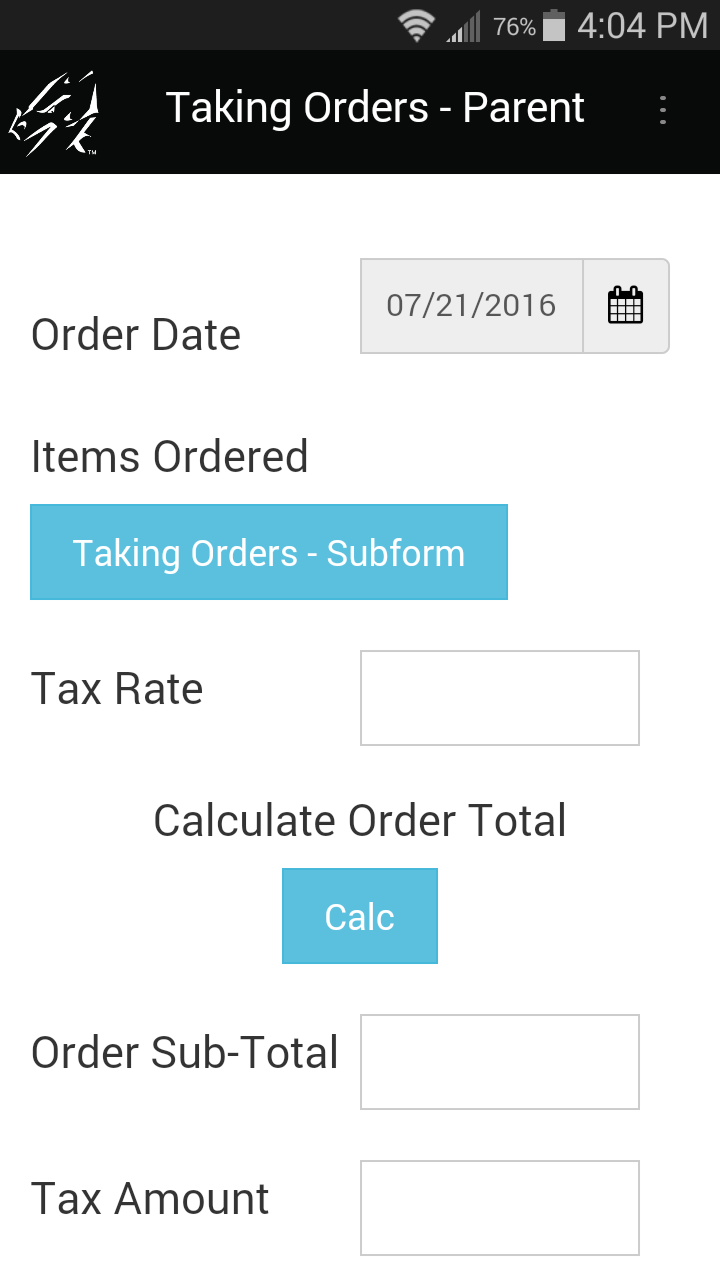
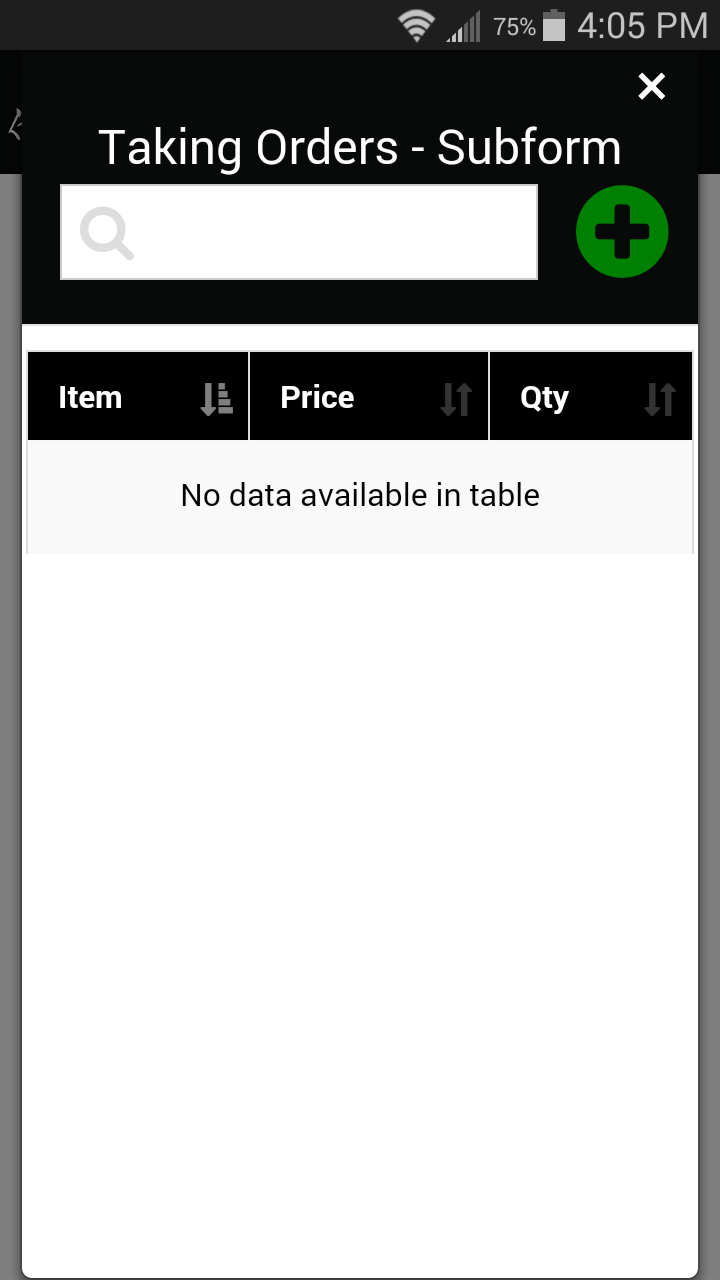
Tap the New button to create a new subform record. Tap an existing subform record to review.
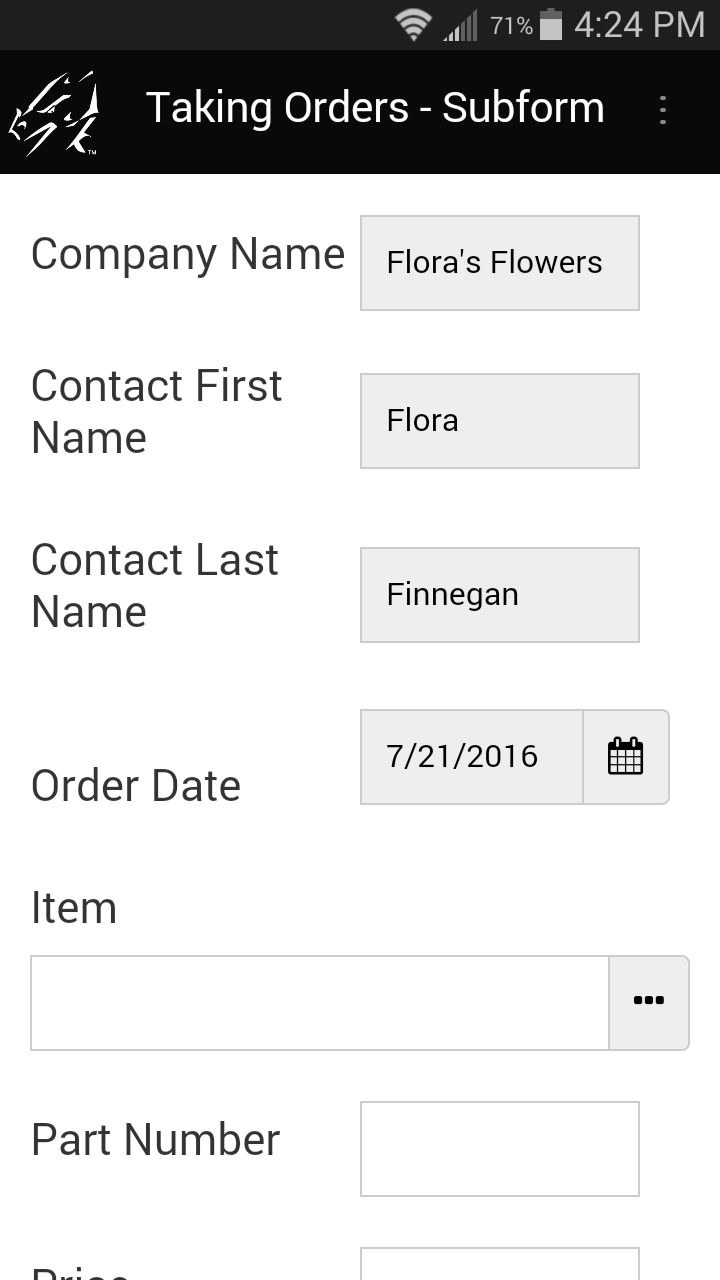
In this example, the first four fields of the parent form are copied into the subform.
To perform a lookup from the subform to a reference form of items in stock:
- Since this is a lookup from one form to another, fields that have to be copied must have the same field name and field type on the reference form and on the subform.
- One field on the Subform has to be a Lookup List field that specifies the name of the reference form.
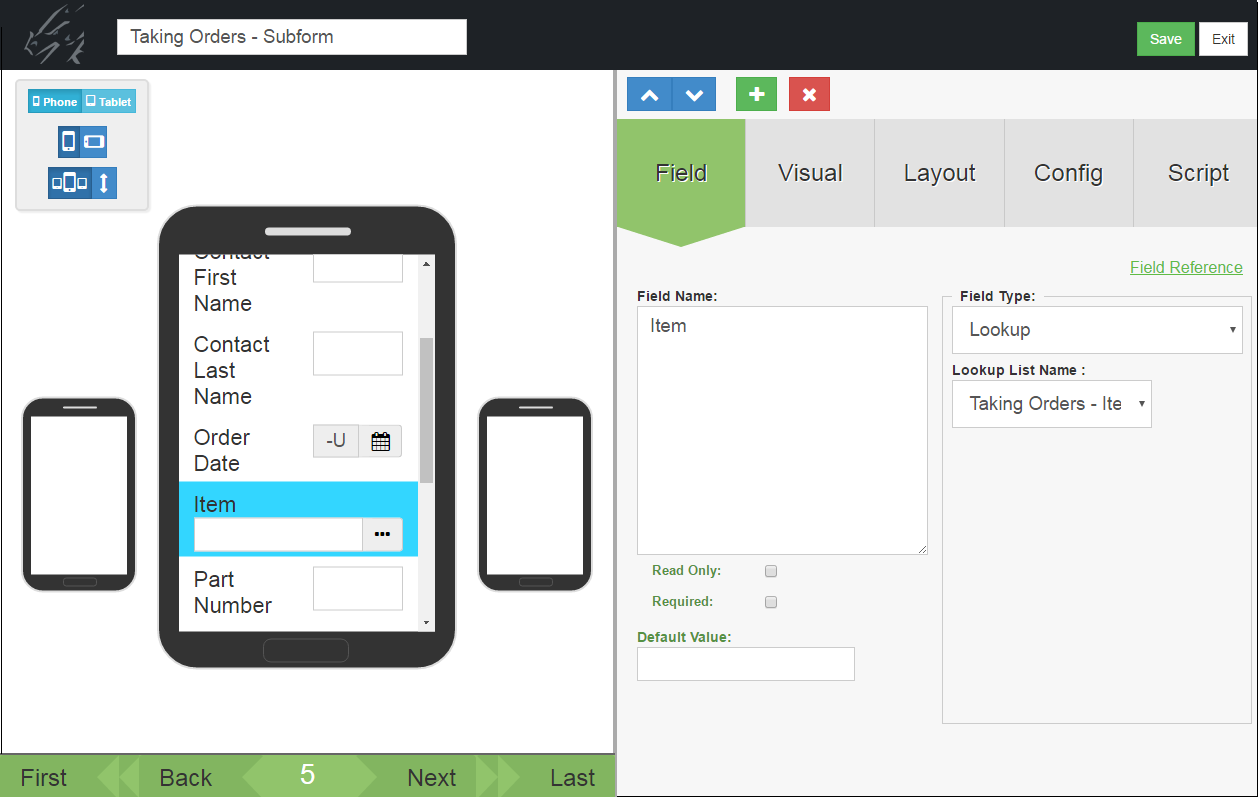
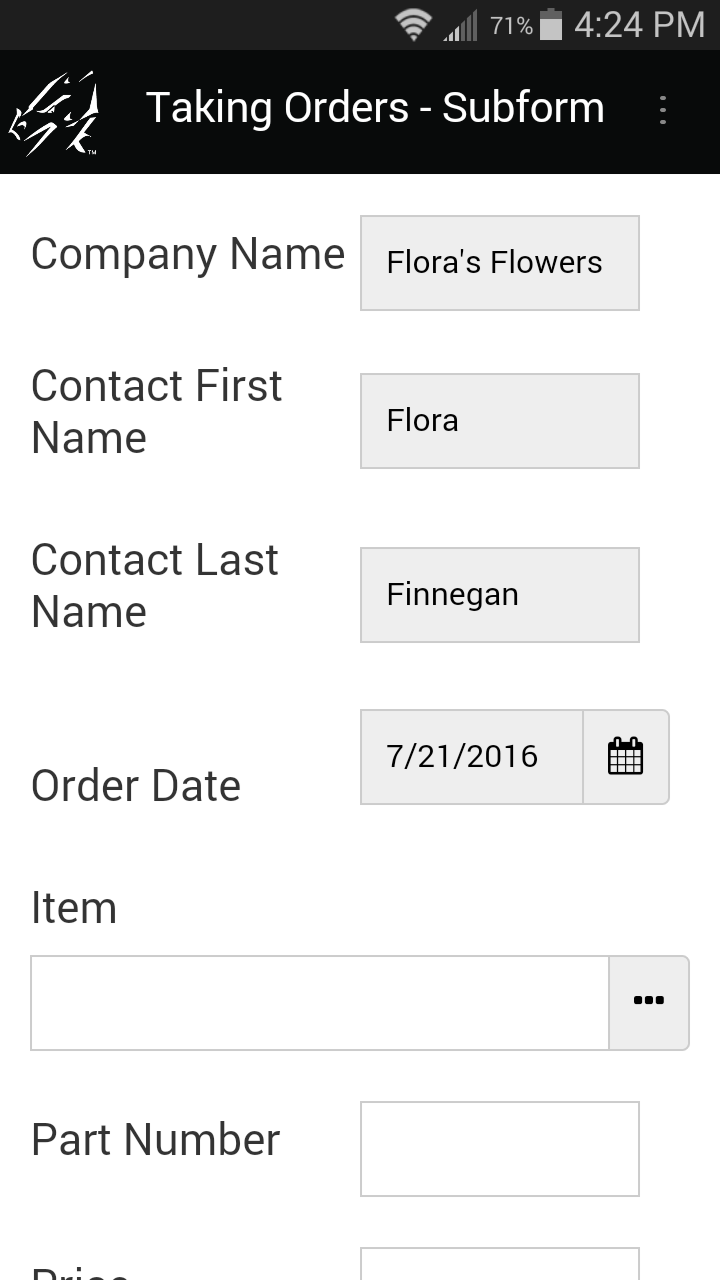
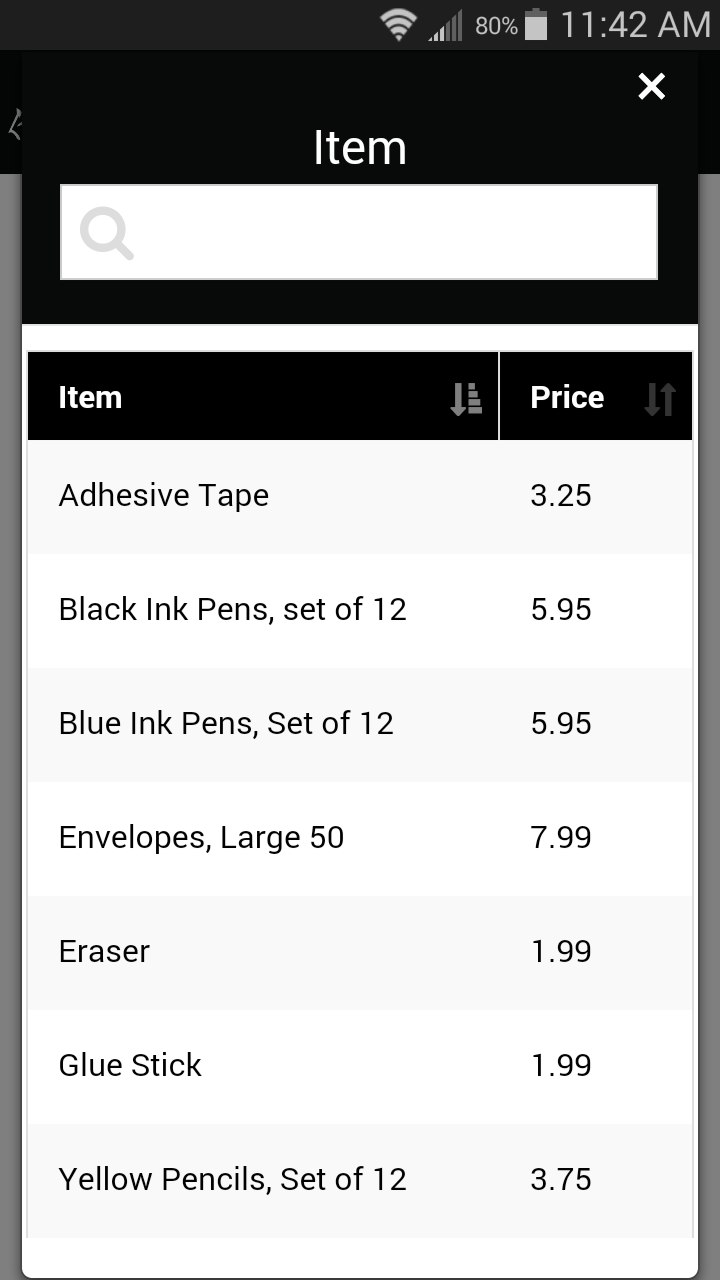
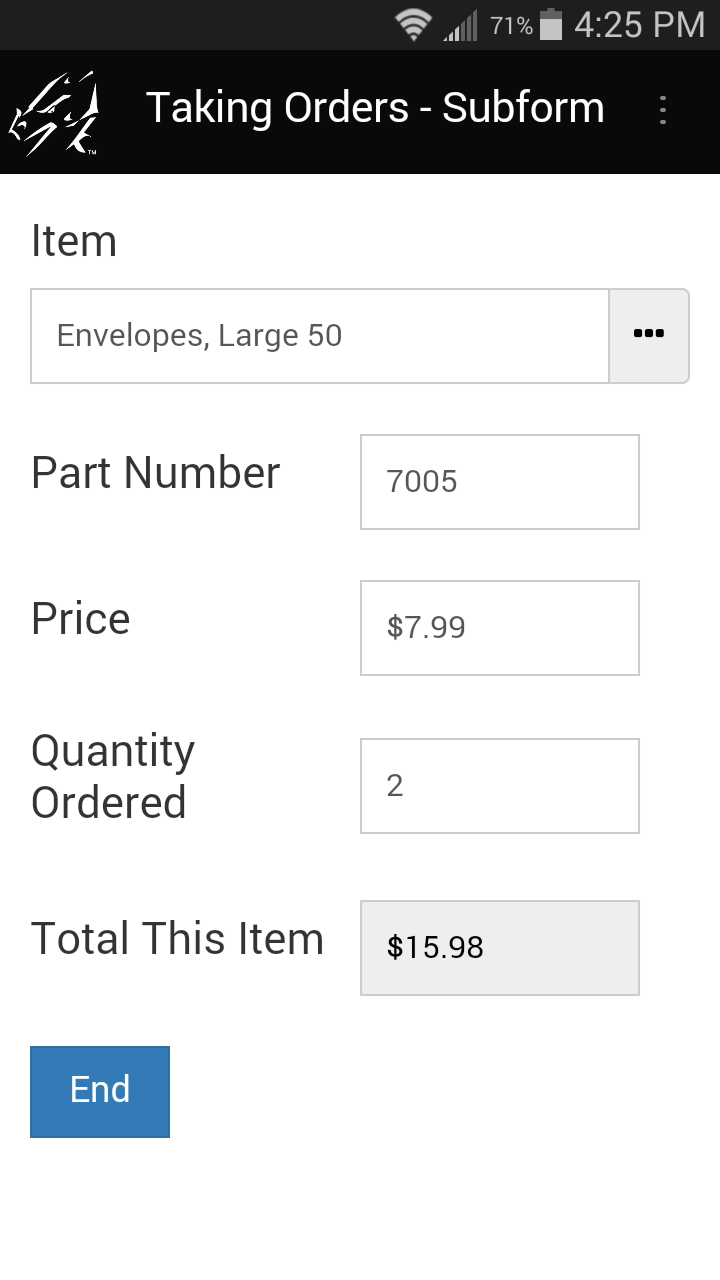
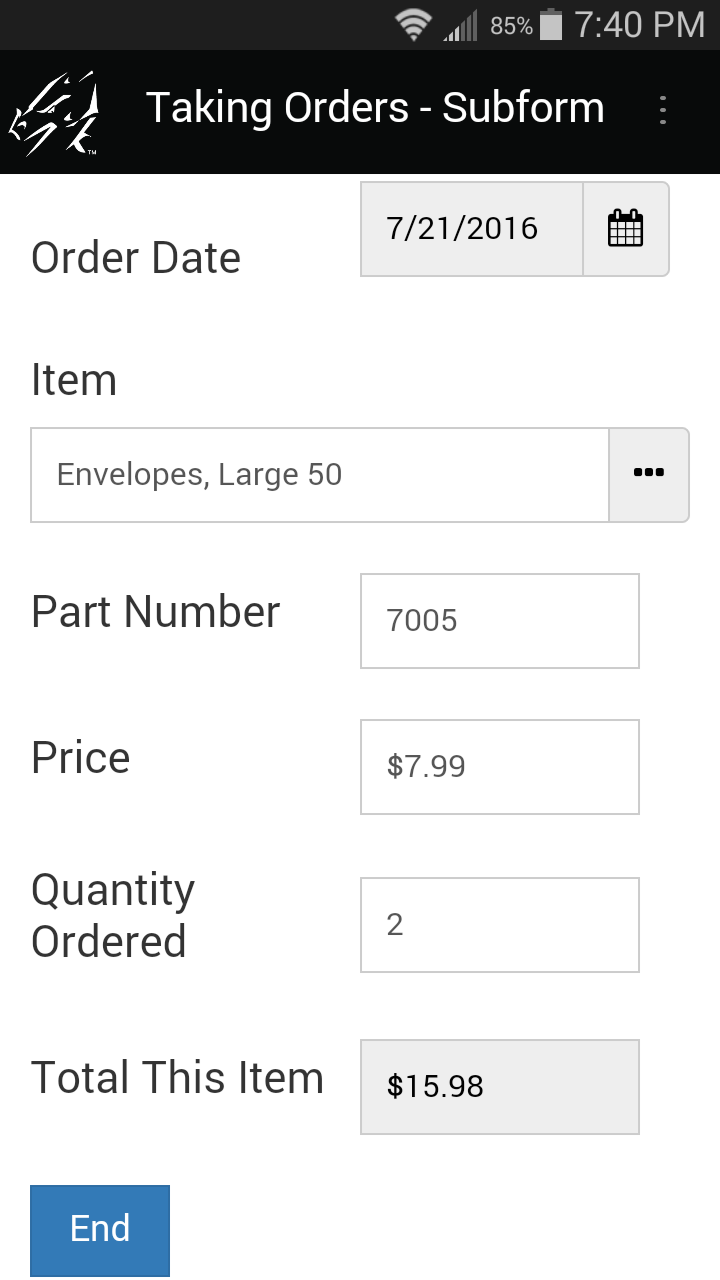
Once the item details have been copied into the subform, the mobile user can enter the quantity of items being ordered. To calculate the sub-total for this line item of the order, a script is added in Field 9 of the subform:
calculate:
if $8 > 0 then
answer = $7 * $8
endif
To place an Order Total on the Parent form:
- A Button field is added to the Parent form so the user can calculate the order total across subform records.
- A click: event script is written in the Button field, and the subformsum statement is used to add up sub-totals across all subform records, and place the order total on the parent form.
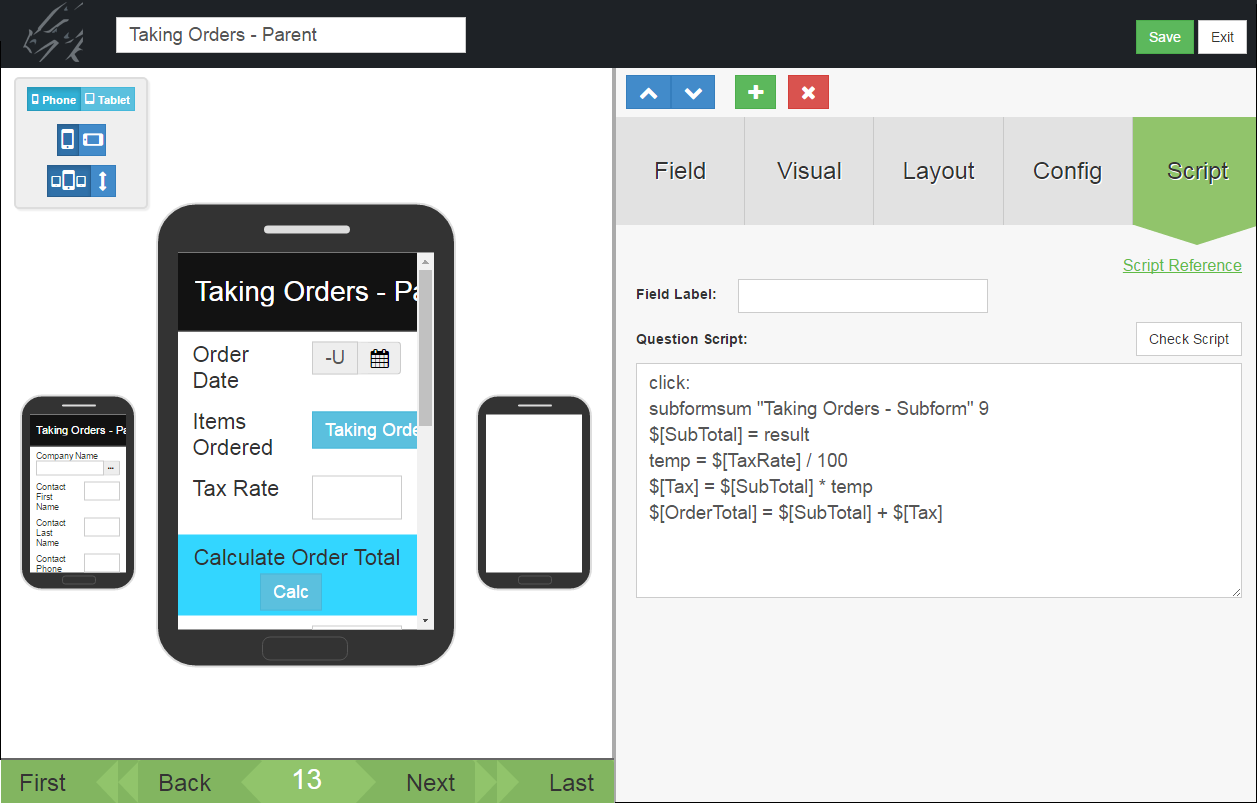
The script in Field 13 (the Calculate Button field) on the parent form is:
click:
subformsum “Taking Orders - Subform” 9
$[SubTotal] = result
Where 9 is the field number to be added across subform records. The subformsum statement places the result of the addition across subform records into the result variable, and the statement $[SubTotal] = result places the calculated result into Field 14 of the Parent form (this field has been given a field label of SubTotal).
The remainder of the script:
temp = $[TaxRate] / 100
$[Tax] = $[SubTotal] * temp
$[OrderTotal] = $[SubTotal] + $[Tax]
This calculates the sales tax for the order, based on a number entered in the Tax Rate field, and calculates the Order Total as the sum of the SubTotal and the Tax. See next page for an example.
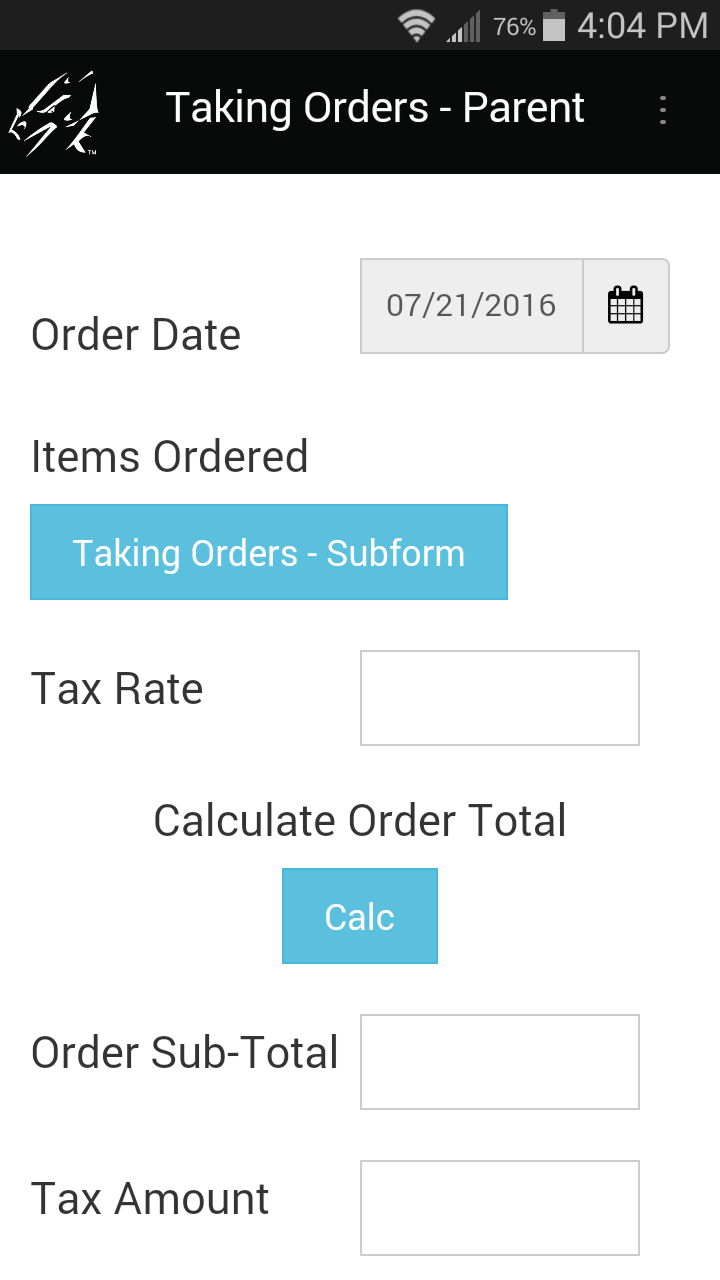
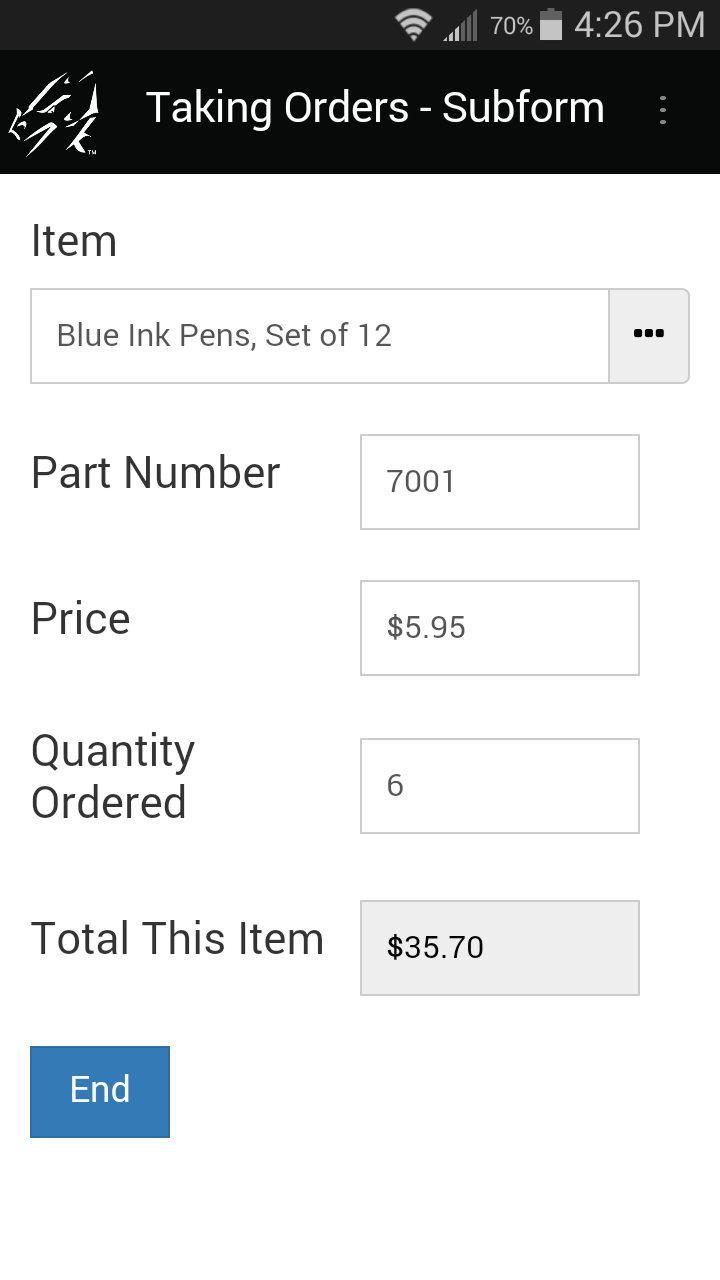
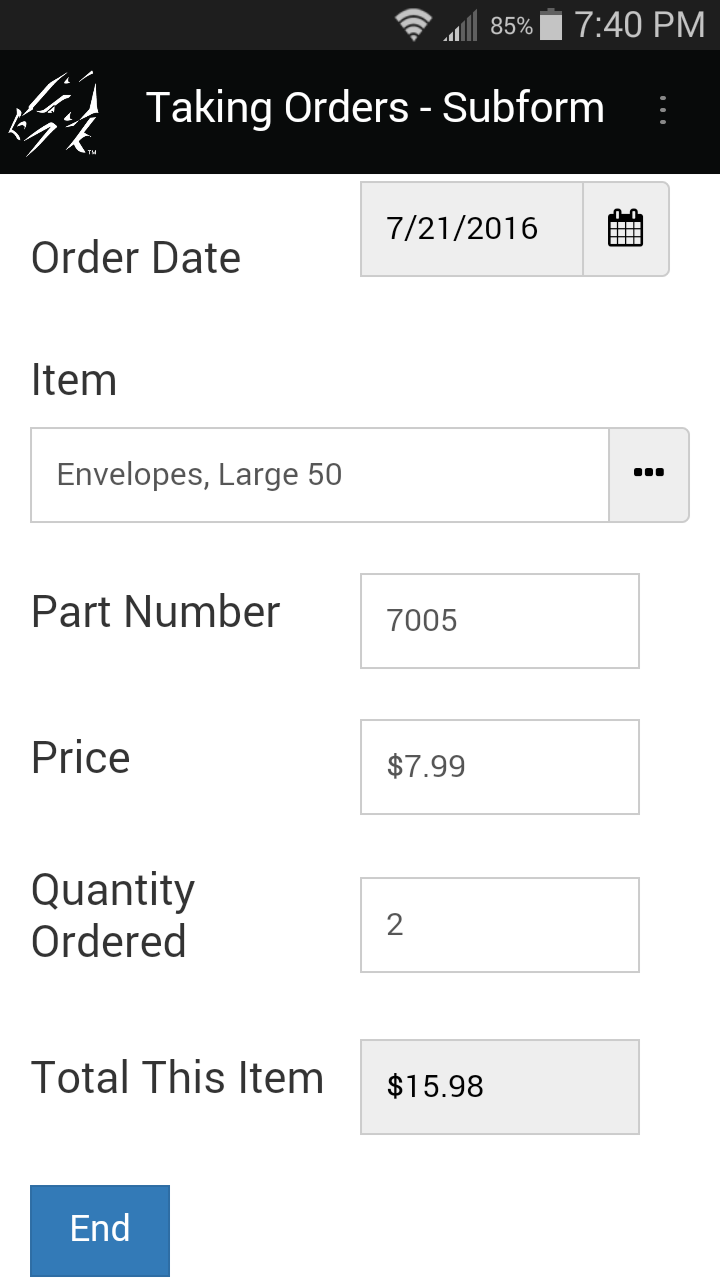
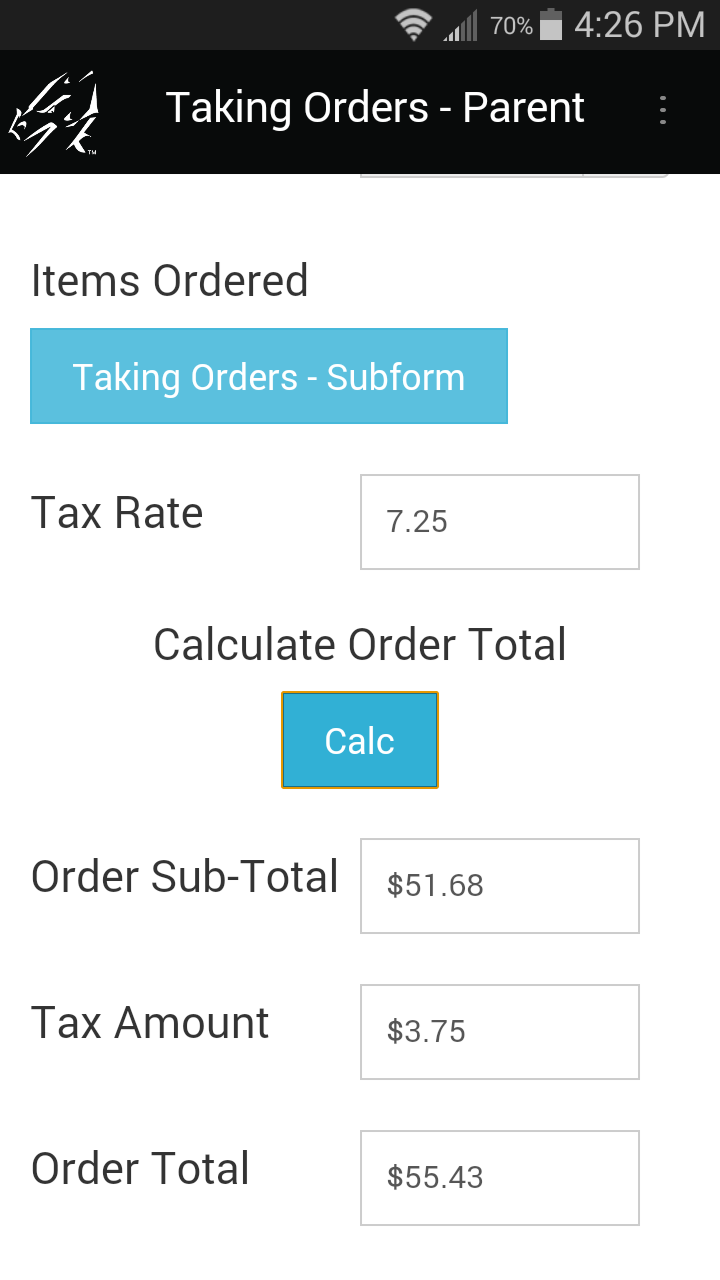
After entering a tax rate (e.g. 7 for 7%), tapping the Calculate button on the parent form runs a script to add all the sub-totals across the subform records, and place the Order total on the parent form.
Advanced Scripting
There are some advanced scripting statements that are designed for working with multiple forms. Some of the advanced scripting statements include:
also
column number
delete
gotosubform formname { new | review | normal }
insert into formname
keycolumn number
lookup value within formname
select all formname
select matching formname
select formname where field field-number is expression
update field number = expression
Performing a Cascading Lookup to Another Form
A Cascading Lookup to Another Form allows you to specify a selection criteria in one field, and then display only the records in a reference form that match the selected criteria. Advanced scripting is required to do this.
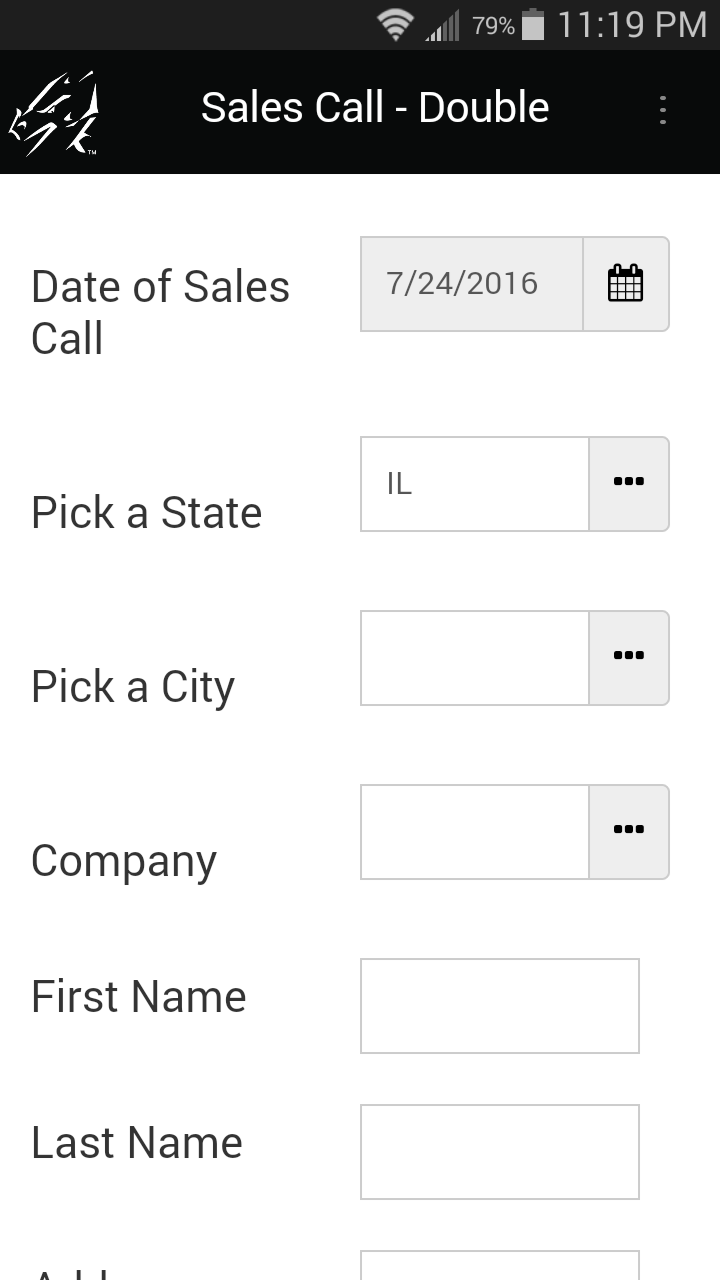
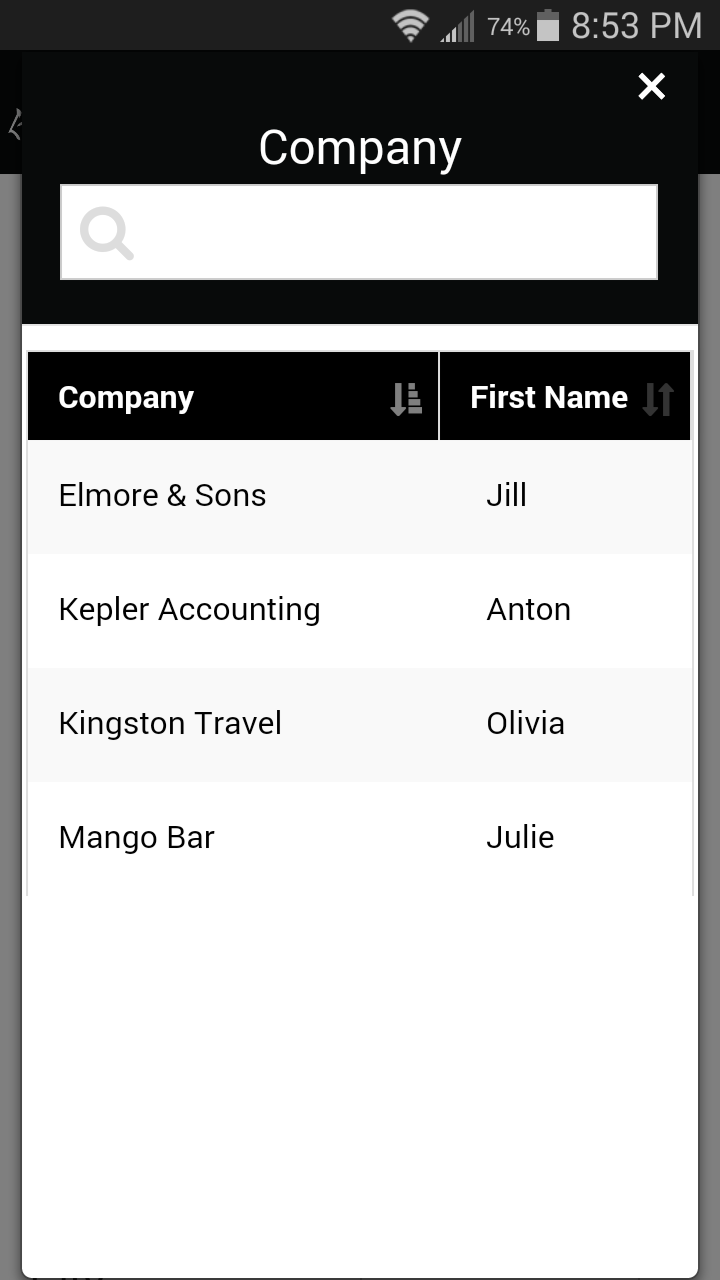
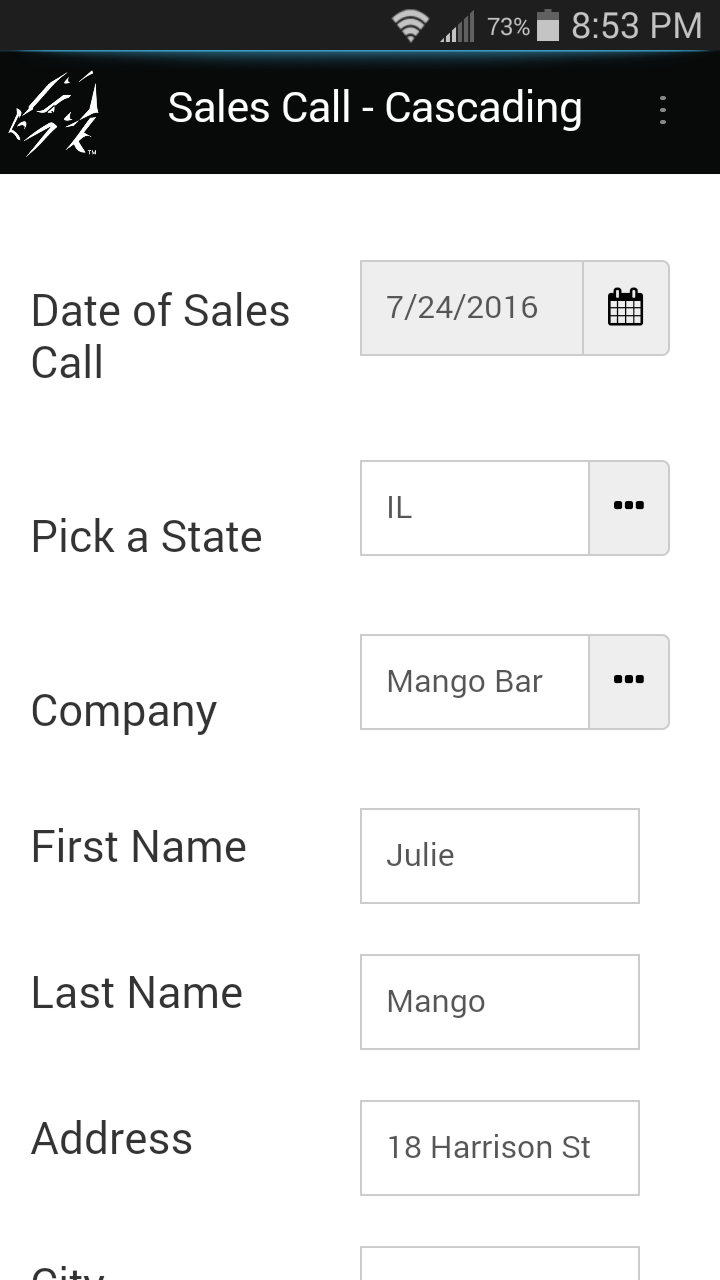
To achieve the cascading lookup to another form, an extra field has to be added to allow the user to specify the selection criteria. In this example, Field 2 is a regular Lookup List containing a list of all states. The state that the user selects will be the selection criteria.
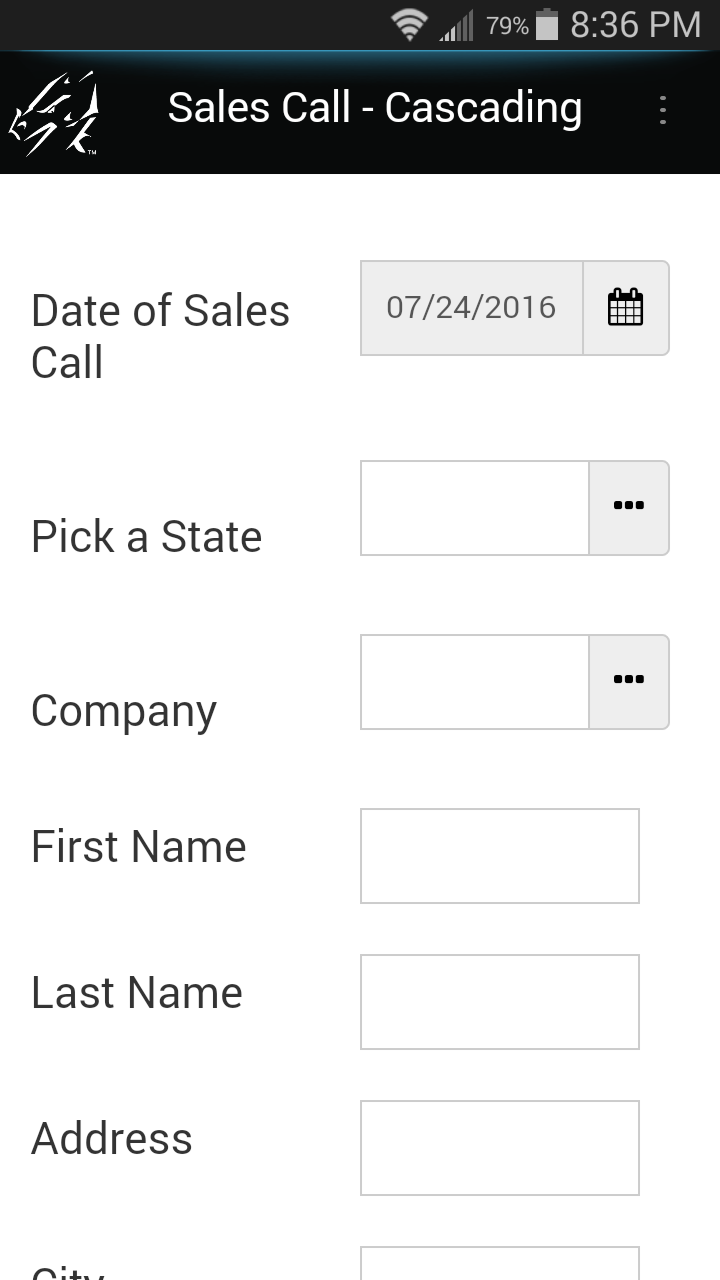
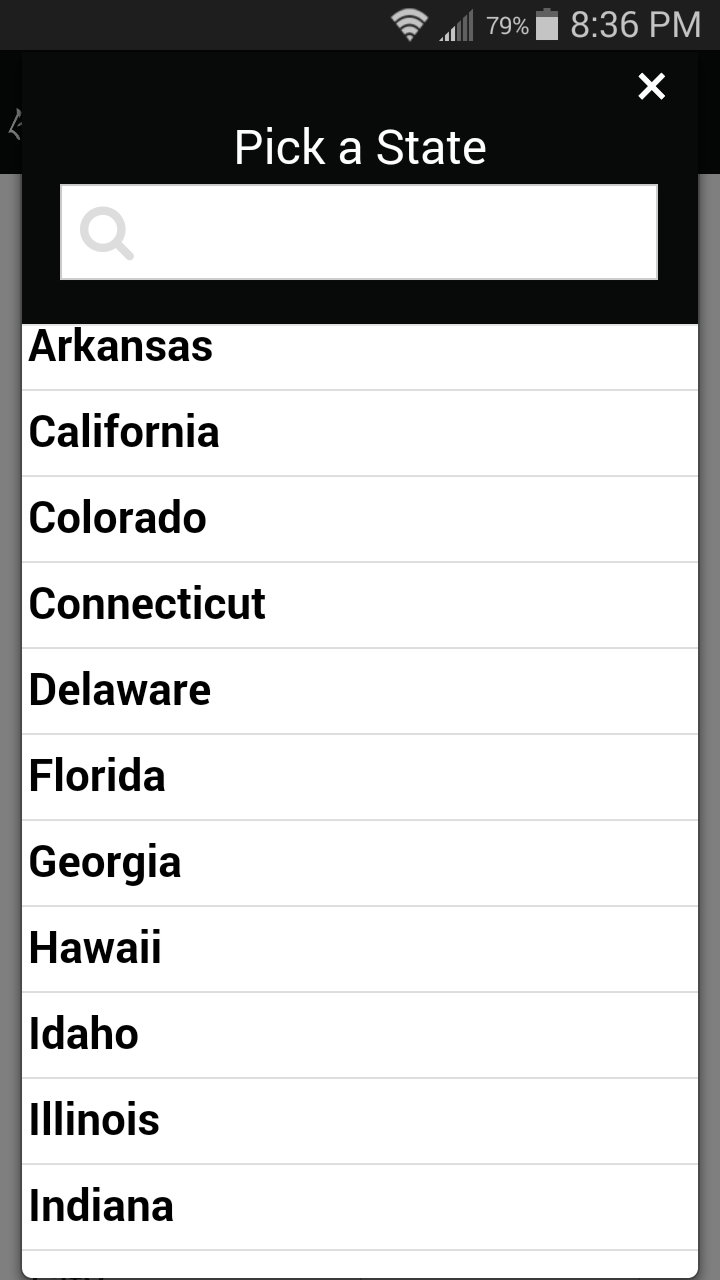
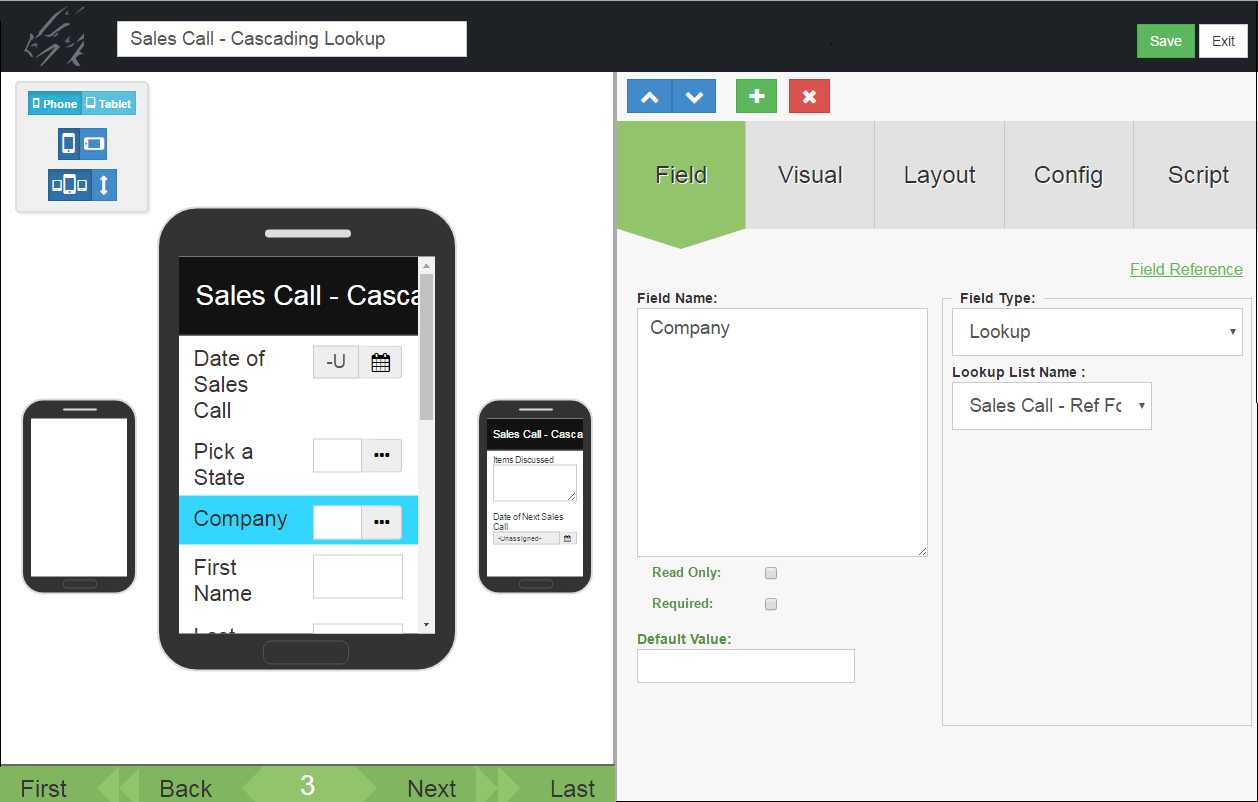
To perform the selection of records from the reference form, Field 3, the Company field, is a Lookup List field that references the name of a reference form. In this example, the reference form is called: “Sales Call - Ref Form”.
In addition, a click: event script is added to Field 3. The click: event runs when the handheld user taps in the Company field, and the select statement in the script does the record selection.
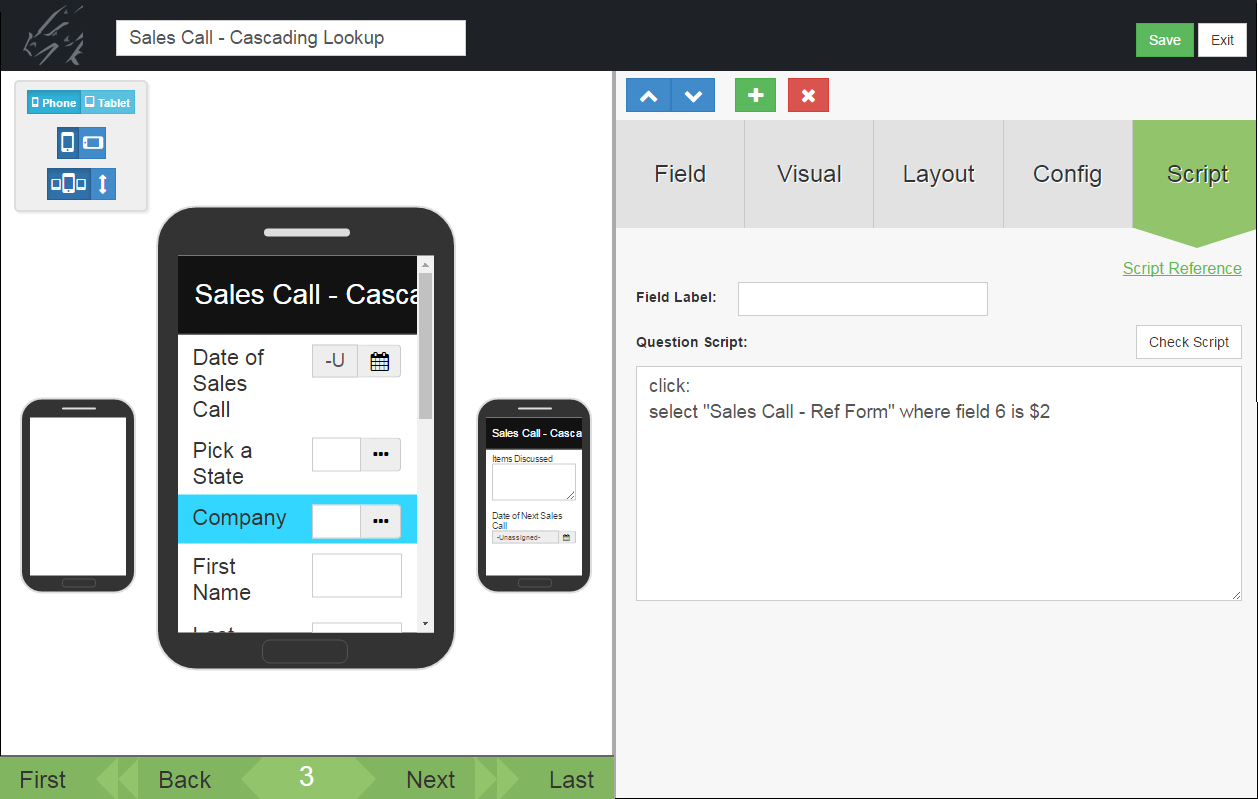
click:
select “Sales Call - Ref Form” where field 6 is $2
The script selects all the records in the “Sales Call - Ref Form” reference form, where Field 6 of the reference form matches Field 2 of the current form.
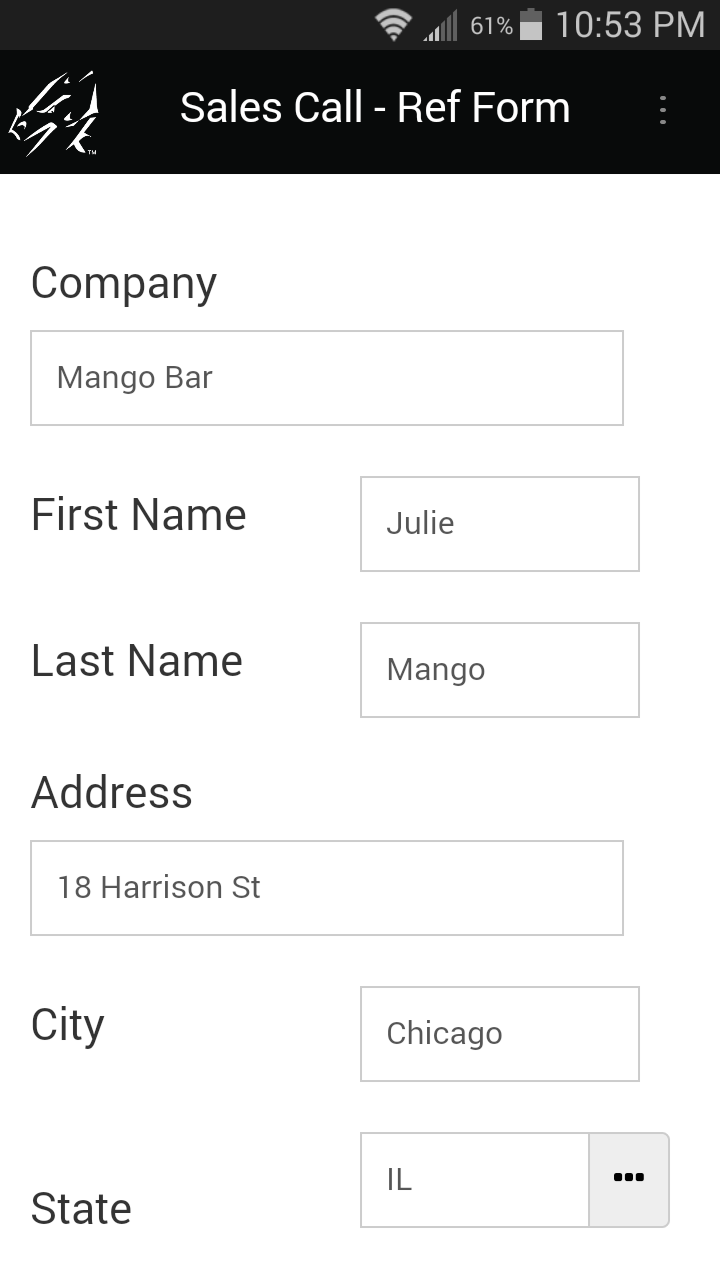
In the reference form, Field 6 is State, so the select script selects all records where the State field matches the State selected in Field 2. In the previous example, the selected state was IL (Illinois), so all the records in the reference form matching IL are displayed when the user taps in Field 3, the Company field.
Once a record is selected, all the fields in the reference form that are named the same as fields on the current form are copied from the reference form to the current form.
Performing a Double Cascading Lookup
A double cascading lookup enables you to use two selection criteria to choose which records from a reference form are displayed when doing a lookup to another form.
- Two reference forms are needed for a double cascading lookup.
- Since two criteria are being used, two fields are reserved to allow the handheld user to enter each criteria.
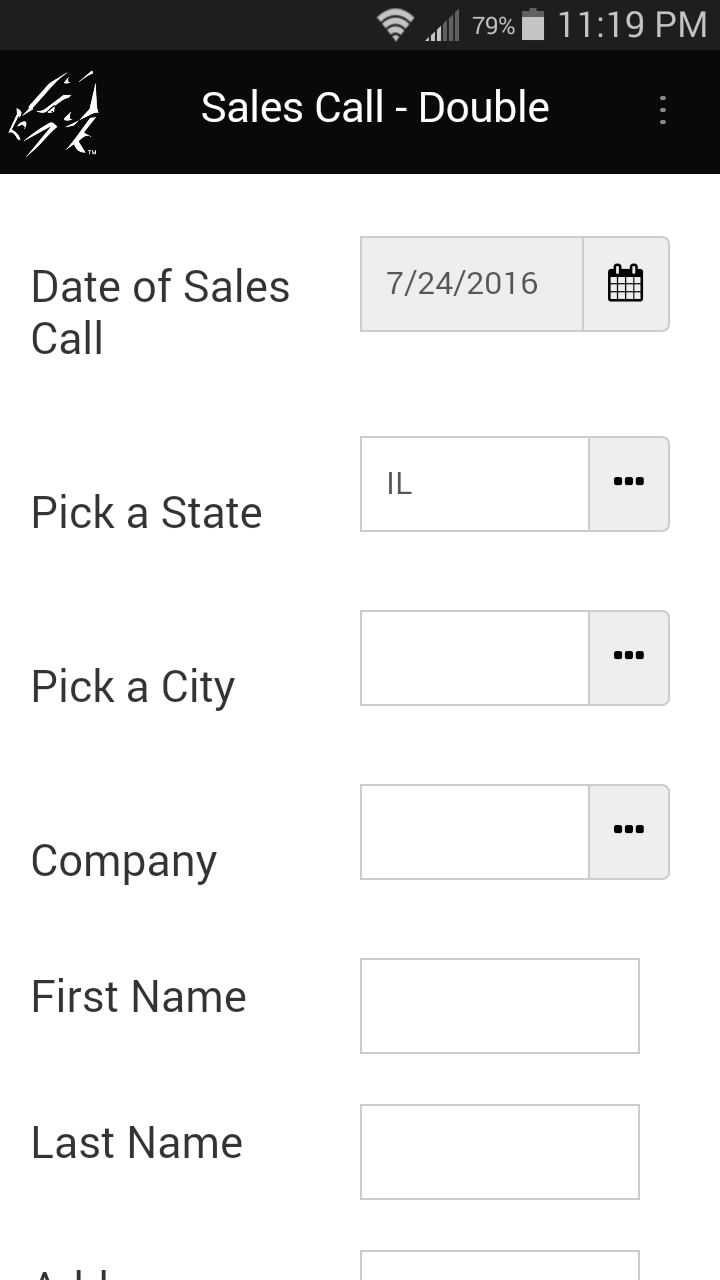
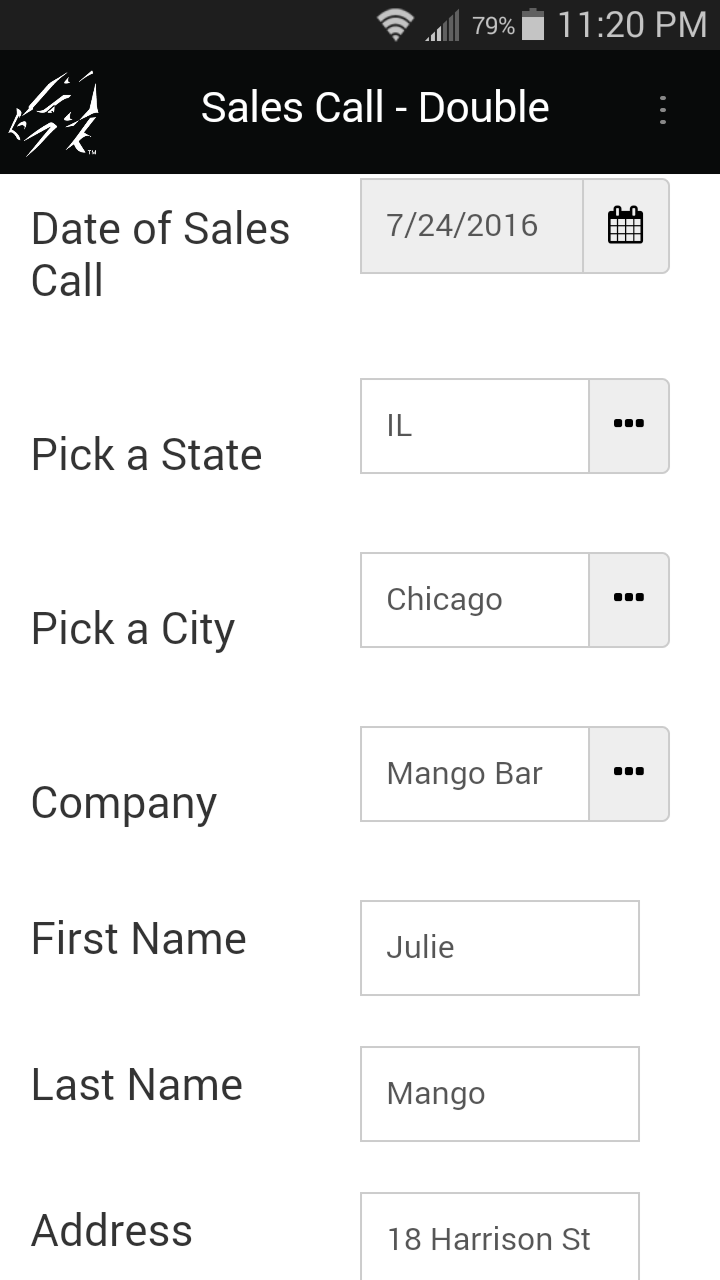
In this example, selecting a State in Field 2 determines which cities are displayed in field 3. One reference form is used to lookup the City.

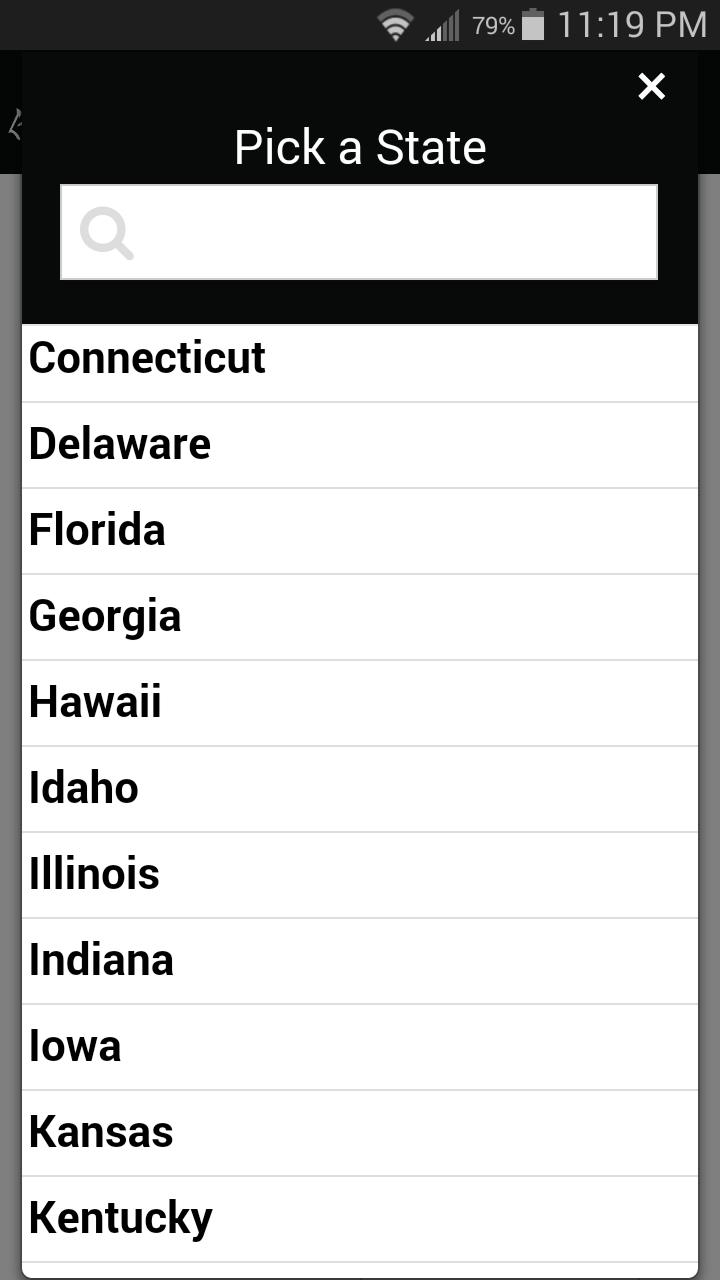
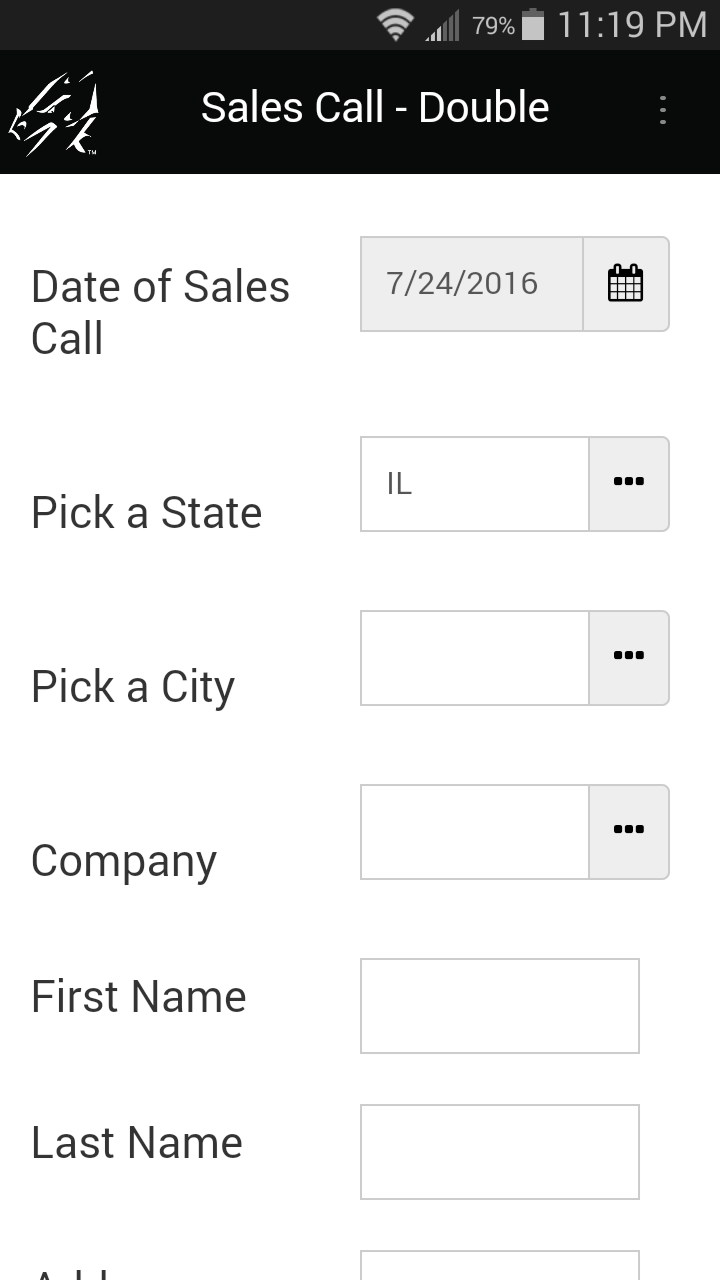
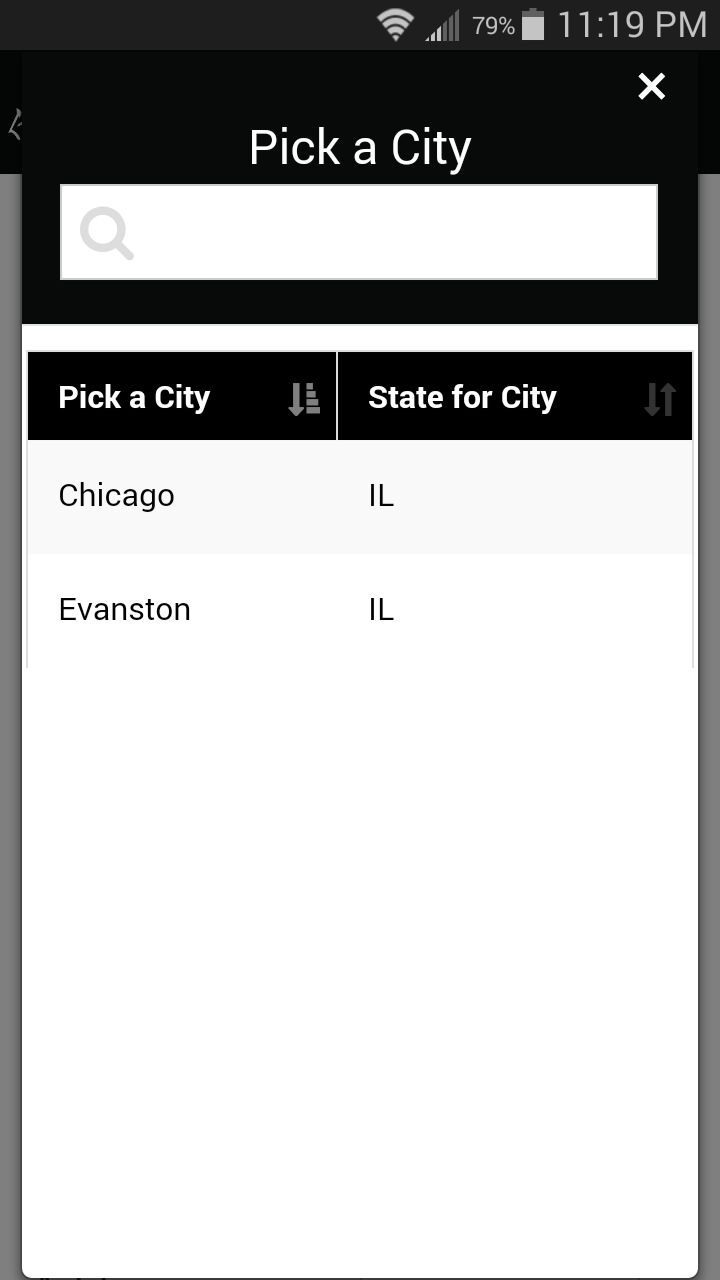
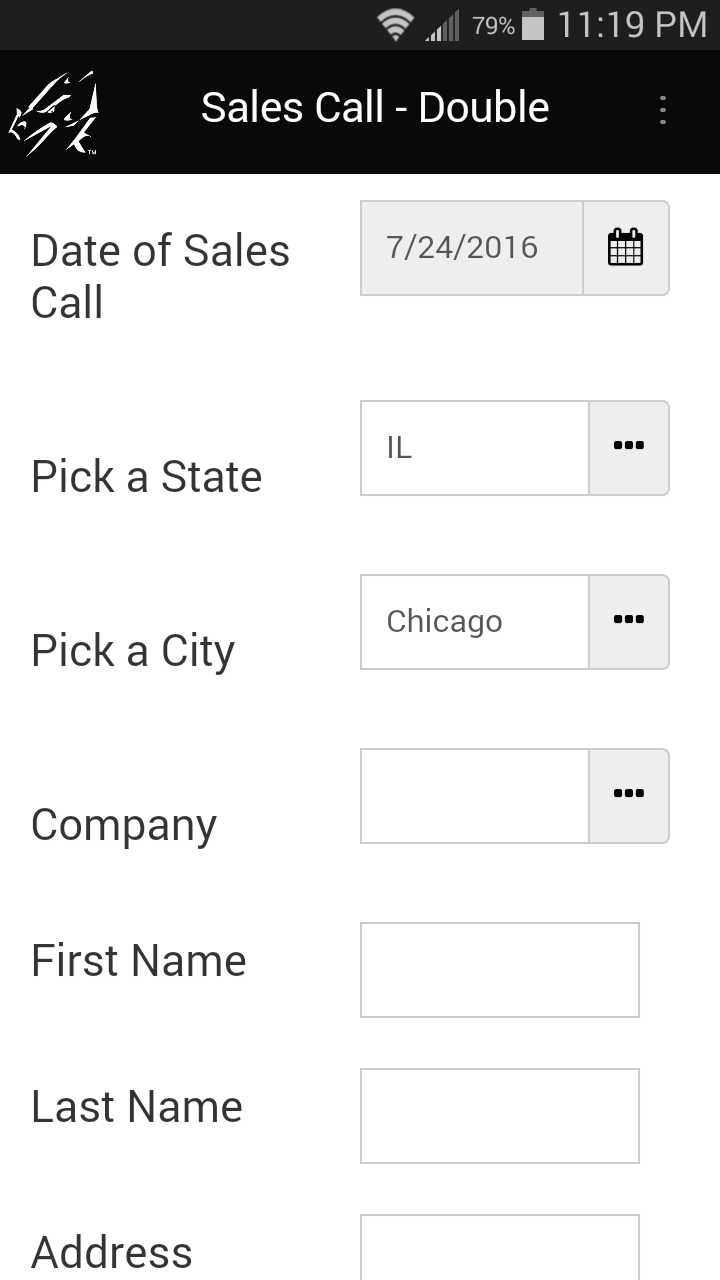
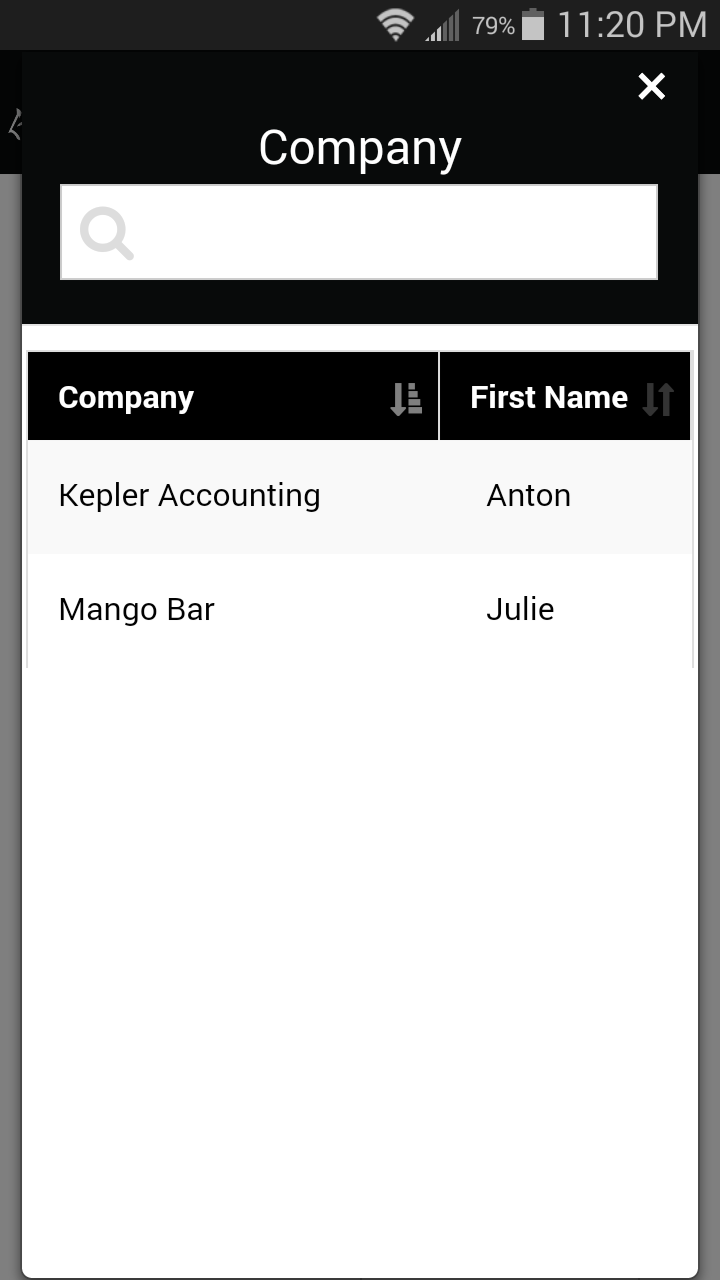
Selecting a city in Field 3 determines which companies are displayed in Field 4. A second reference form is used to lookup the Company. Only records that match on State and City are displayed.
Selecting a Company copies all the commonly named fields from the company reference form into the current form.
Here is how the double cascading lookup from the previous page is achieved:
Step 1:
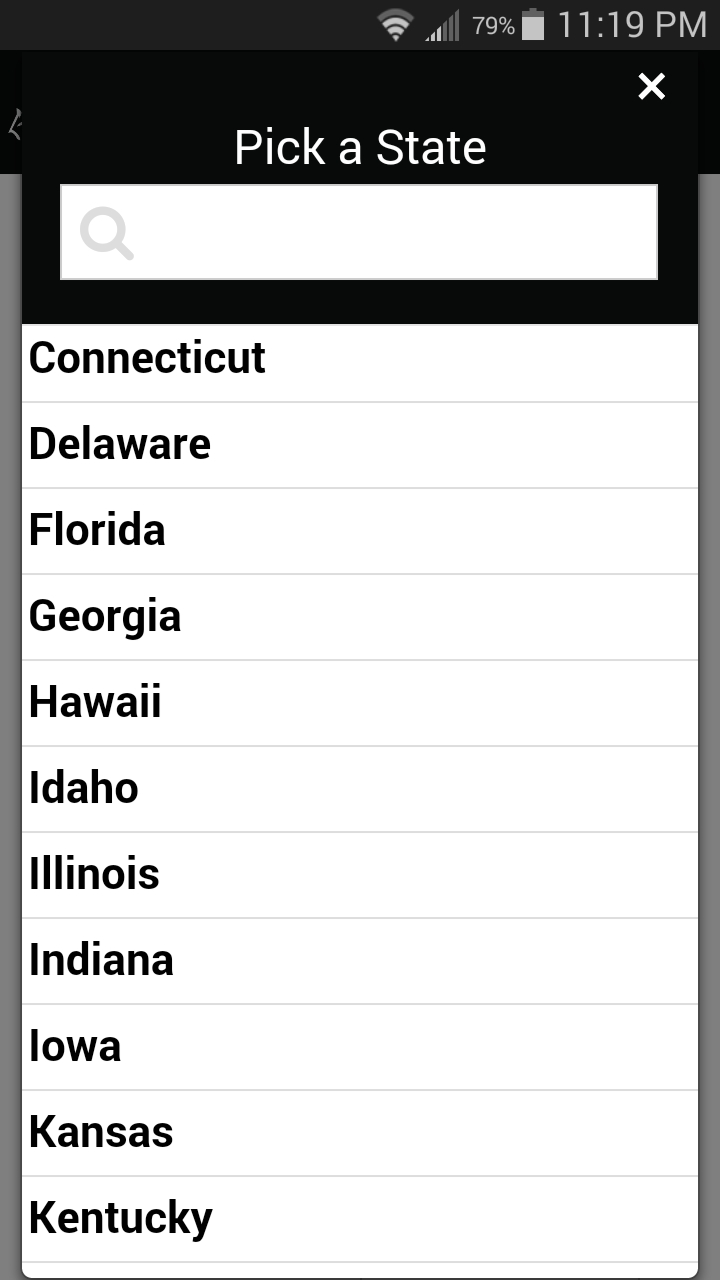
To allow the mobile user to select a State, Field 2, which is called “Pick a State” is a regular Lookup List field that contains a Lookup List of all the states.
If necessary, this could have been made a lookup to another form, but in this case a regular Lookup List is sufficient.
Step 2:
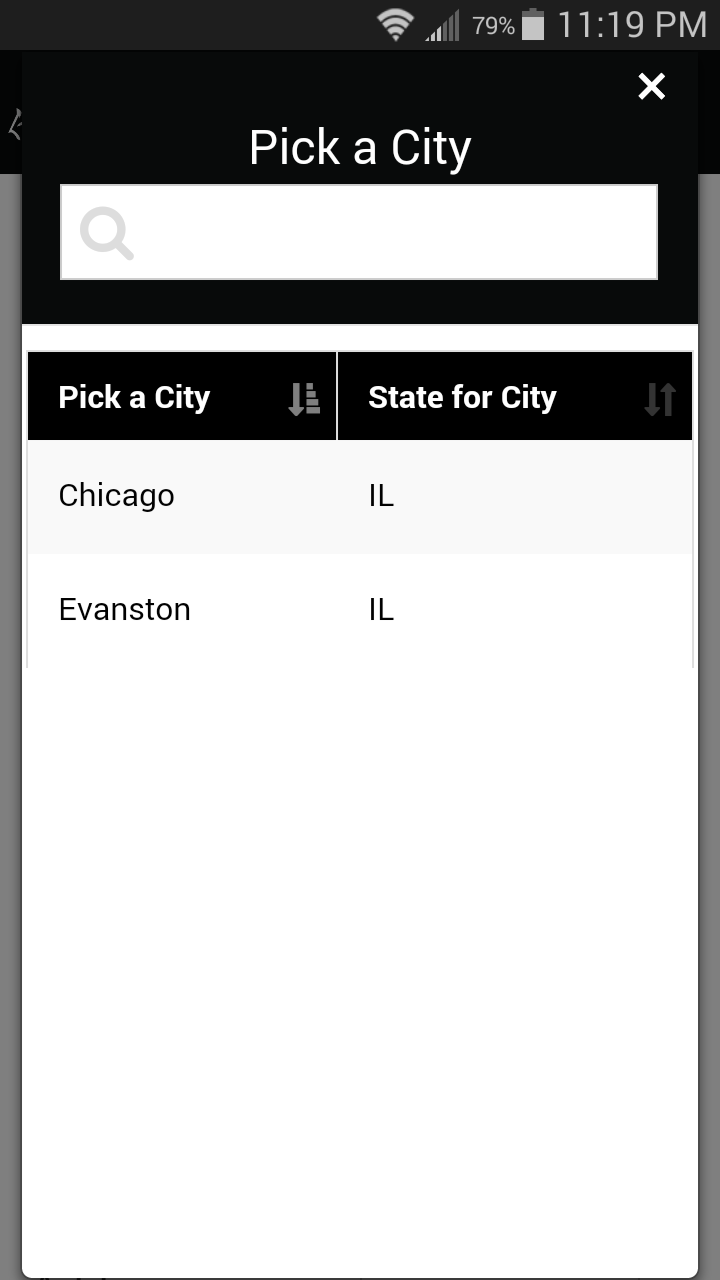
To perform a lookup of cities, a reference form is created with two fields, one field for the city and one field for the corresponding state. There must be a record in this form for every city that the user might need to select.
Since the main form has a field called “Pick a City”, this reference form also has a field called “Pick a City”. This will allow the selected city to be copied into field 3 of the main form.
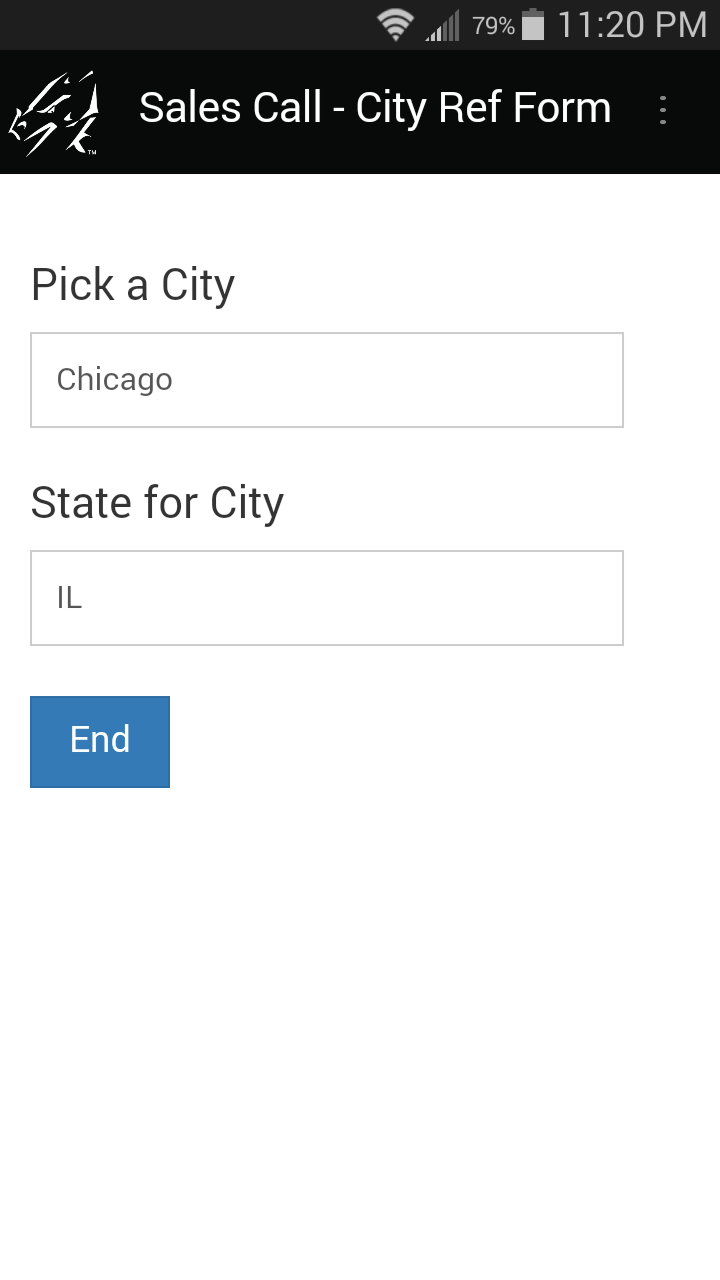
If you do not want to copy the state from this reference form into the main form (because the user has already selected a state in Field 2), then name the state field something different from the main form. In this example, the state field is called “State for City” instead of being called “Pick a State” or “State” as in Fields 2 and 9 of the main form.
Step 3:
To display only the cities within the state that the user selects, field 3, “Pick a City” on the main form is a Lookup List field that references the name of the Cities reference form, which in this example is called “Sales Call - City Ref Form”. The following script is added to Field 3 of the main form:
click:
select “Sales Call - City Ref Form” where field 2 is $2
Step 4:
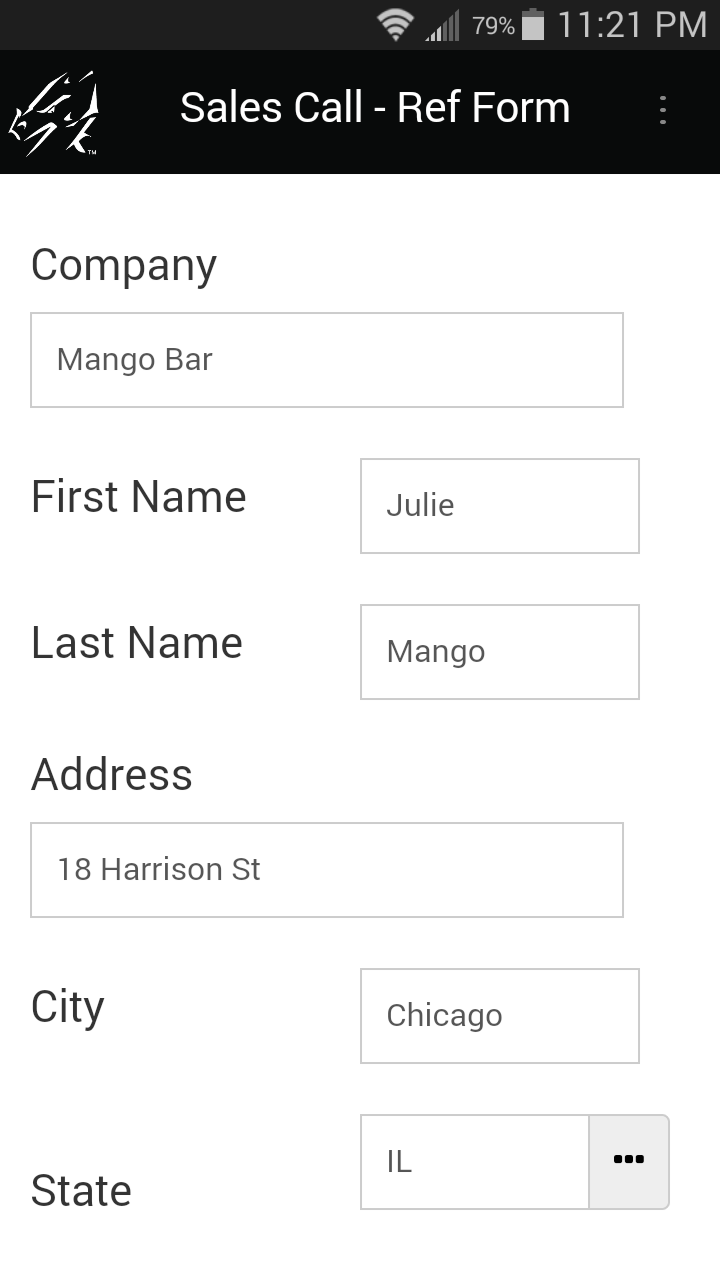
To perform a lookup of companies, a reference form is created with fields for all the data that is to be copied into the main form.
To copy the company name into the main form, Field 2 on the reference form is called “Company”, to match the field name of Field 4 on the main form. Other fields to be copied such as Address, City, State, Zip Code and Phone must be named the same and have the same field type on the reference form as on the main form.
Step 5:
To perform the lookup of companies that match both the City and State, Field 4 on the main form is called “Company” and is a Lookup List field that references the name of the reference form, which is called “Sales Call - Ref Form” in this example.
To select only those records that match the City and State, the following script is added to Field 4 of the main form:
click:
select “Sales Call - Ref Form” where field 6 is $2
also
select “Sales Call - Ref Form” where field 5 is $3
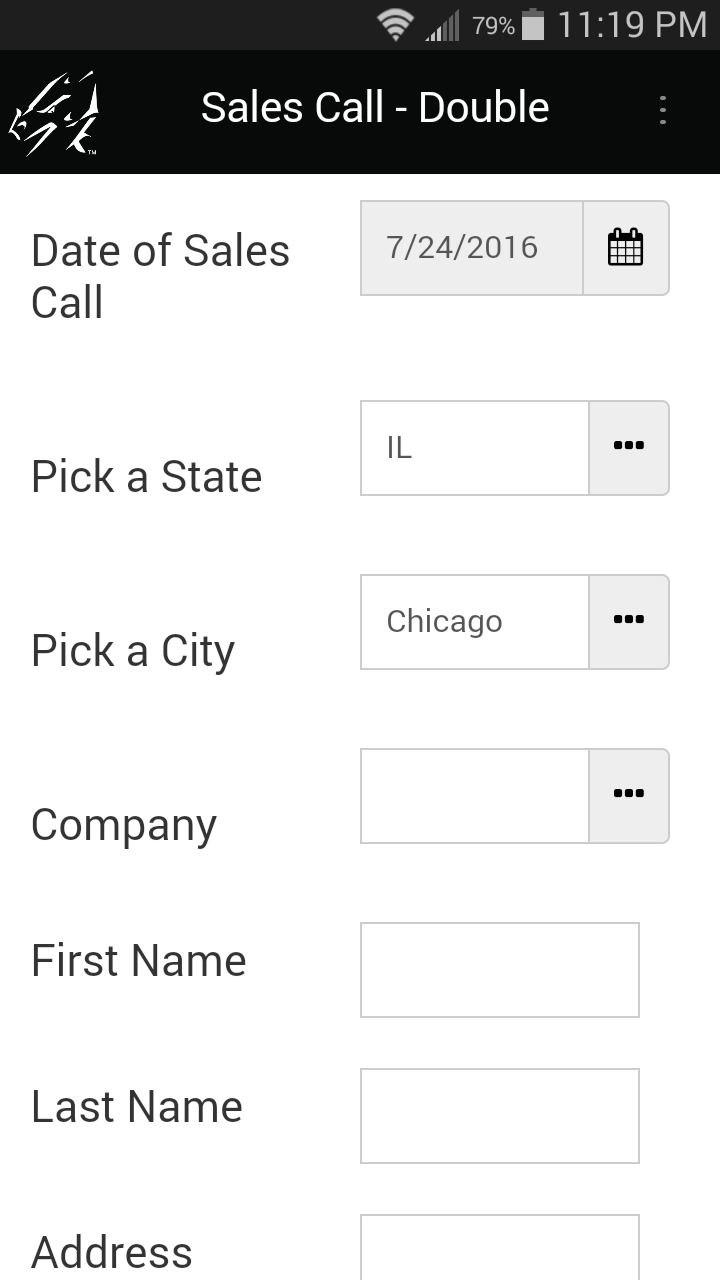
Field 6 of the “Sales Call - Ref Form” reference form is State, and Field 2 of the current form is “Pick a State”, so the first select statement selects only the records that match on state.
The also statement means that the selected records are to be used when the next select statement in the script is run.
The second select statement picks only the records where Field 5 (“City”) in the “Sales Call - Ref Form” reference form matches Field 3 of the current form, which is “Pick a City”. Since this statement only runs on the records that have already been selected on state, the effect is that only records matching the selected city and state are displayed.
